ProxySQL is a great tool. It's one of the most recommended technologies in our Open Source Database practice.
Many of our clients are running it or are migrating towards it, but we've seen that it is pretty CPU-intensive. We've also seen strange behavior in the connection handling when reaching the CPU saturation point.
At this point, we noticed that the
frontend_connections
counter in the
stats_mysql_users
table was not decreasing even after the connections were no longer present at the network level. This counter is used to check the
max_connections
value in the
mysql_users
configuration table, causing frontend connections to receive a "Too many connections" error. So we determined that the key element here is to scale it properly. Obviously, all the major cloud providers can help us here as they all have features like auto-scaling groups.
Jervin Real of Percona has recently
blogged
about running a load-balanced ProxySQL in Google Cloud Platform. We decided to take it one step further: "Autoscaling a load-balanced ProxySQL in Google Cloud Platform".
While this blog is about how we did it in GCP, similar things should just be valid in platforms like AWS. The terminology might be a bit different but the basic principle should be pretty much the same.
 Our scaling policy is based on CPU usage exceeding 60%. As you can see, we start with two instances so the green line on the bottom graph shows us we have a capacity of 120% (2* 60%). When our load goes up, the auto-scaler adds a 3rd and even a 4th instance. After the load test finishes and the CPU load goes down, our proxies start scaling down again. We have configured the cool-down period for scaling down to be three minutes. If you do not want it to scale down too soon, you can easily configure this to a higher value.
Creating the autoscaling managed instance group
To be able to create an instance group in GCP, you first need an instance template. Such a template defines all the properties of the machine, for example, CPU and memory resources, what kind of disks should be attached, networking options, etc. What you can also do is define a startup and shutdown script for this instance. These scripts will be run, obviously, on startup and shutdown of the machines. So in the autoscaling group that we will be creating, these will be executed on scale up and scale down events. For more convenience, we would recommend using the startup-script-url and shutdown-script-url options so that you can manage the scripts in a Google Cloud Storage bucket instead of having to recreate the instance template every time. These scripts will (among other things) be used to announce our instance to the cluster or to remove it from the group. Our instance group is set to always keep two nodes online (for HA purposes) and it can scale up to (currently) five nodes. And, just like Jervin described, we have put a Google Internal Load-balancer in front of it to listen on port 3306. We also had to create the health checks and add the correct network tags to allow the health checks to reach our instances. A side effect of the autoscaling is that hostnames and IP addresses are changing all the time; therefore, we opted to create an additional (smaller) instance that we call our "proxysql-master". This instance is not part of the Managed Instance Group and will also not receive any traffic from the load balancer. We only use it for configuring the ProxySQL cluster and to create backups of our configuration.Introducing Consul key-value store
The way we will make this autoscaling work is to use Consul as a service discovery platform. Consul is a lightweight distributed key-value store that is frequently used for service discovery, configuration, and segmentation functionality. The first two are exactly what we are going to use it for. For starters, we need a Consul "server" cluster. Consul server is the component that will actually store data. As mentioned before this is a distributed service so we need more than one node. In our example here we will start with a three-node setup; three nodes because we want a quorum possibility in case of network partitioning. Next to these Consul server nodes, we will install a Consul agent on any other server in our setup. This will result in the following Consul cluster:$ consul members Node Address Status Type Build Protocol DC Segment consul-1 10.1.0.2:8301 alive server 1.4.3 2 dc1 <all> consul-2 10.2.0.2:8301 alive server 1.4.3 2 dc1 <all> consul-3 10.3.0.2:8301 alive server 1.4.3 2 dc1 <all> proxysql-2ml7 10.1.0.4:8301 alive client 1.4.3 2 dc1 <default> proxysql-gf41 10.2.0.3:8301 alive client 1.4.3 2 dc1 <default> proxysql-master 10.1.0.3:8301 alive client 1.4.3 2 dc1 <default>We have 3 servers (this server binary also acts as an agent) and 3 clients (only agents). This is the configuration of our agent:
$ cat /etc/consul/consul.conf.json
 {
  "bind_addr": "10.1.0.3",
  "datacenter": "dc1",
  "data_dir": "/var/lib/consul/",
  "log_level": "INFO",
  "node_name": "proxysql-master",
  "server": false,
  "ui": true,
  "client_addr": "0.0.0.0",
  "retry_join": [
  "10.1.0.2",
  "10.2.0.2",
  "10.3.0.2"
  ]
 }
The only difference between client and server configuration is this
"server": "false"
option which we obviously change to
"true"
on the servers. The server also needs the option "
bootstrap_expect
" which we set to three because we expect three nodes to join our cluster.
Our startup script looks (in a little simplified version) like this:
#!/bin/bash
 LOCAL_IP=$(curl https://metadata.google.internal/computeMetadata/v1/instance/network-interfaces/0/ip -H "Metadata-Flavor: Google")
 LOCAL_HOST=$(curl https://metadata.google.internal/computeMetadata/v1/instance/name -H "Metadata-Flavor: Google")

 # Install, configure (basic) and start ProxySQL
 ...

 # Install, configure and start Consul Agent
 ...

 /usr/local/bin/consul kv put proxysql/servers/${LOCAL_HOST} ${LOCAL_IP}
This last line is where the magic happens. This line puts this ProxySQL node into the Consul K/V store, announcing it for the service discovery.
When all our instances are running, this is what our K/V store looks like:
$ consul kv export proxysql/servers
 [
 {
 "key": "proxysql/servers/proxysql-2ml7",
 "flags": 0,
 "value": "10.1.0.4"
 },
 {
 "key": "proxysql/servers/proxysql-gf41",
 "flags": 0,
 "value": "10.2.0.3"
 },
 {
 "key": "proxysql/servers/proxysql-master",
 "flags": 0,
 "value": "10.1.0.3"
 }
 ]
(Keep in mind that if you run this command in your environment, the values will be base64 encoded. For this blog post we have decoded them to show what is actually in there.)
Let's configure ProxySQL
Great! We now have all our ProxySQL instances in the Consul storage. Let's put them in the ProxySQL configuration. Option 1: C reate a bash script that we can run in the ProxySQL scheduler function. This script will connect via the local consul agent to the "leader" server and fetch the hostname and IPs from the K/V store and put it into the proxysql_servers table. Works great, but this was found to be a bit a waste of CPU cycles, as the scheduler would run it every x milliseconds (x > 0). Option 2: Consul Template ! Consul Template is a tool released by the creators of Consul. This tool will connect to the Consul cluster and it will start watching the key/value store for any keys you have defined in a template file. Whenever the values for these keys change in the K/V store, Consul Template will regenerate the "output file" with the newly received values. After this task is done it has the ability to execute a command to activate these changes (for example call a SIGHUP on a service). This is the template we gave to Consul Template to update proxysql_servers table:$ cat /etc/consul-template/templates/proxysql_servers.tpl DELETE FROM proxysql_servers; REPLACE INTO proxysql_servers (hostname, port, comment) VALUES ('', 6032, ''); SAVE PROXYSQL SERVERS TO DISK; LOAD PROXYSQL SERVERS TO RUNTIME;This results in this output file:
$ cat /etc/consul-template/templates/proxysql_servers.sql
 DELETE FROM proxysql_servers

 REPLACE INTO proxysql_servers (hostname, port, comment) VALUES
 ('10.1.0.4', 6032, 'proxysql-2ml7');
 REPLACE INTO proxysql_servers (hostname, port, comment) VALUES
 ('10.2.0.3', 6032, 'proxysql-gf41');
 REPLACE INTO proxysql_servers (hostname, port, comment) VALUES
 ('10.1.0.3', 6032, 'proxysql-master');

 SAVE PROXYSQL SERVERS TO DISK;
 LOAD PROXYSQL SERVERS TO RUNTIME;
And this is the configuration we use to activate the changes in ProxySQL:
$ cat /etc/consul-template/config/consul-template.cfg
 consul {
 ...
  address = "127.0.0.1:8500"
 ...
 }

 ...

 template {
  source = "/etc/consul-template/templates/proxysql_servers.tpl"
  destination = "/etc/consul-template/templates/proxysql_servers.sql"
  command = "/bin/bash -c 'mysql --defaults-file=/etc/proxysql-admin.my.cnf < /etc/consul-template/templates/proxysql_servers.sql'"
  command_timeout = "60s"
  perms = 0644
  backup = false
  wait = "2s:6s"
 }
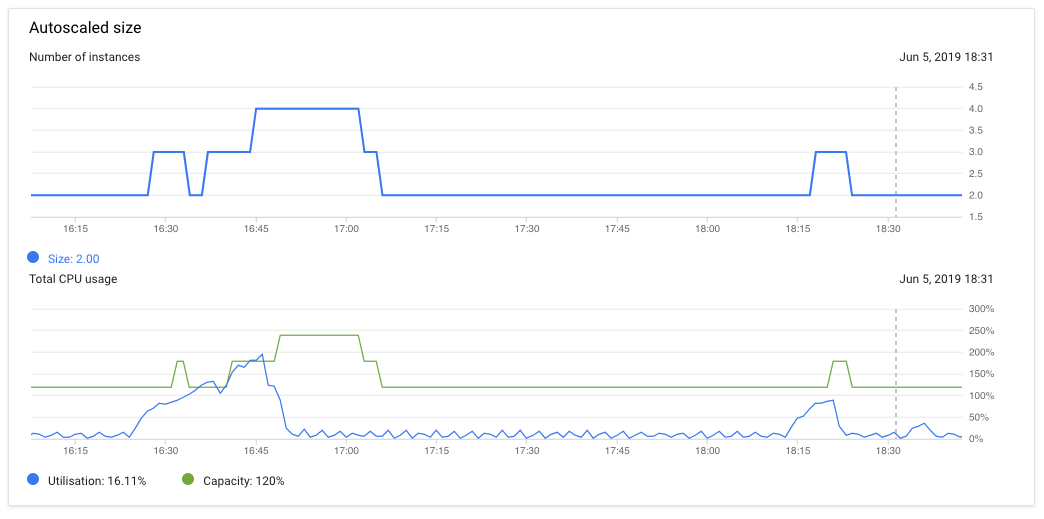
This what our autoscaling monitoring looked like when we were load testing:
Our scaling policy is based on CPU usage exceeding 60%. As you can see, we start with two instances so the green line on the bottom graph shows us we have a capacity of 120% (2* 60%). When our load goes up, the auto-scaler adds a 3rd and even a 4th instance. After the load test finishes and the CPU load goes down, our proxies start scaling down again. We have configured the cool-down period for scaling down to be three minutes. If you do not want it to scale down too soon, you can easily configure this to a higher value.

