
I’ll provide a quick start tutorial for Dialogflow (ES version) in this article. We’ll first examine the features offered by this product and then look at a simple use case involving currency conversion to understand how communication between the bot and the data on GCP (BigQuery) works.
Overview
Dialogflow creates chatbots that can be linked with web applications and third-party platforms like Slack, Facebook, Google Chat, and more. There are two flavors of Dialogflow: ES (Essentials) and CX (Customer Experience). CX is an improved (advanced) variant compared to ES, which is a standard version.
Please visit the Dialogflow or Dialogflow Guide for further details.
We’ll be using the Dialogflow ES version for this article. Instead of going into detail about the various Dialogflow components, we’ll focus more on how bots interact with the Google Cloud Platform via webhook.
Webhook
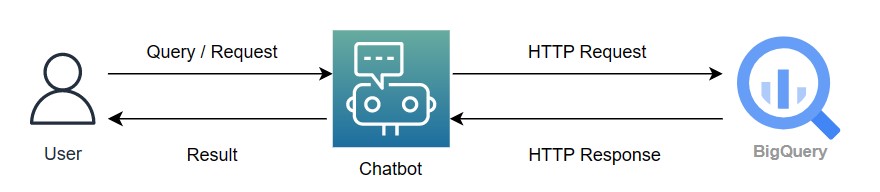
Before we go any further, let’s understand what a webhook is. Webhooks are user-defined HTTP callbacks that allow you to use the information obtained from natural language processing (user inputs/queries) to produce dynamic answers, verify data collection, or start backend processes.
Use Case
Let’s look at a scenario where a user wishes to compare or find the exchange rate between two currencies. A user might ask for the exchange rate between two currencies and say, “I’d like to know the exchange rate between USD and EUR.”
Flow Chart
Dialogflow Setup
Let’s quickly configure Dialogflow and its essential elements.
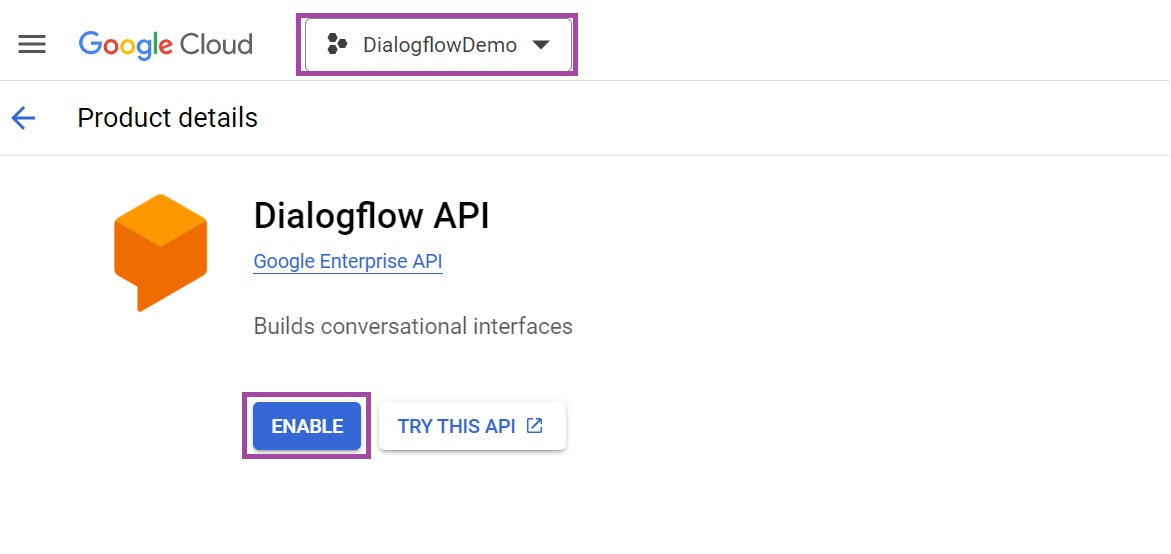
- Login to the GCP console and create a project – DialogflowDemo.
- Search “Dialogflow API” and enable it.
- Open webpage – https://dialogflow.cloud.google.com/
- Select or confirm “Global US” as the region (chosen by default).
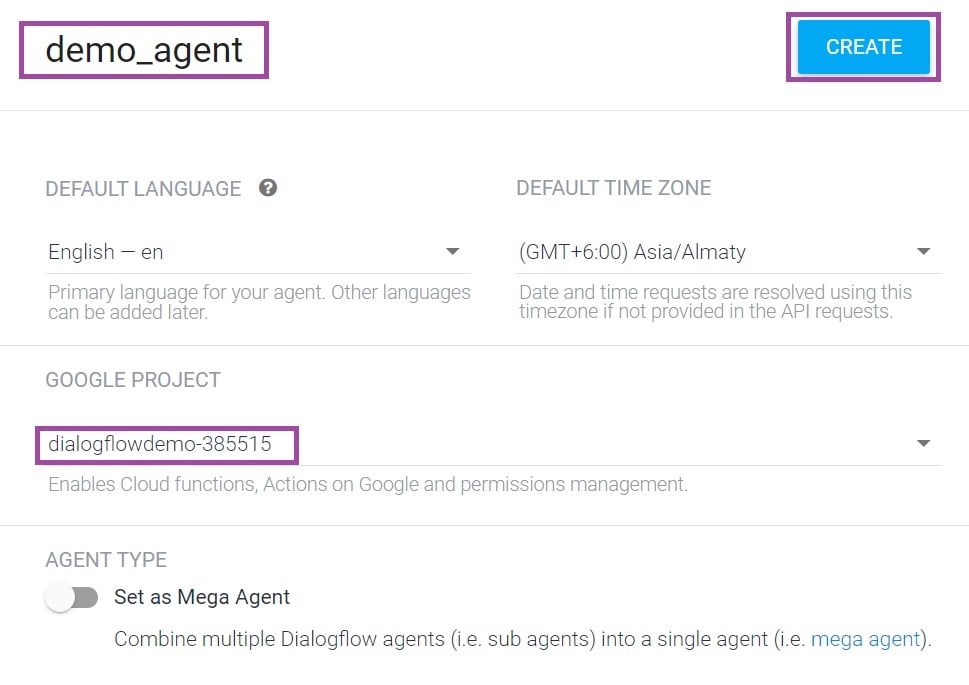
- Click “Create Agent” to start creating a new agent.

- Specify “demo_agent” as the agent name
- Choose “DialogflowDemo” in the section for Google projects.
- Click on the “Create” button.
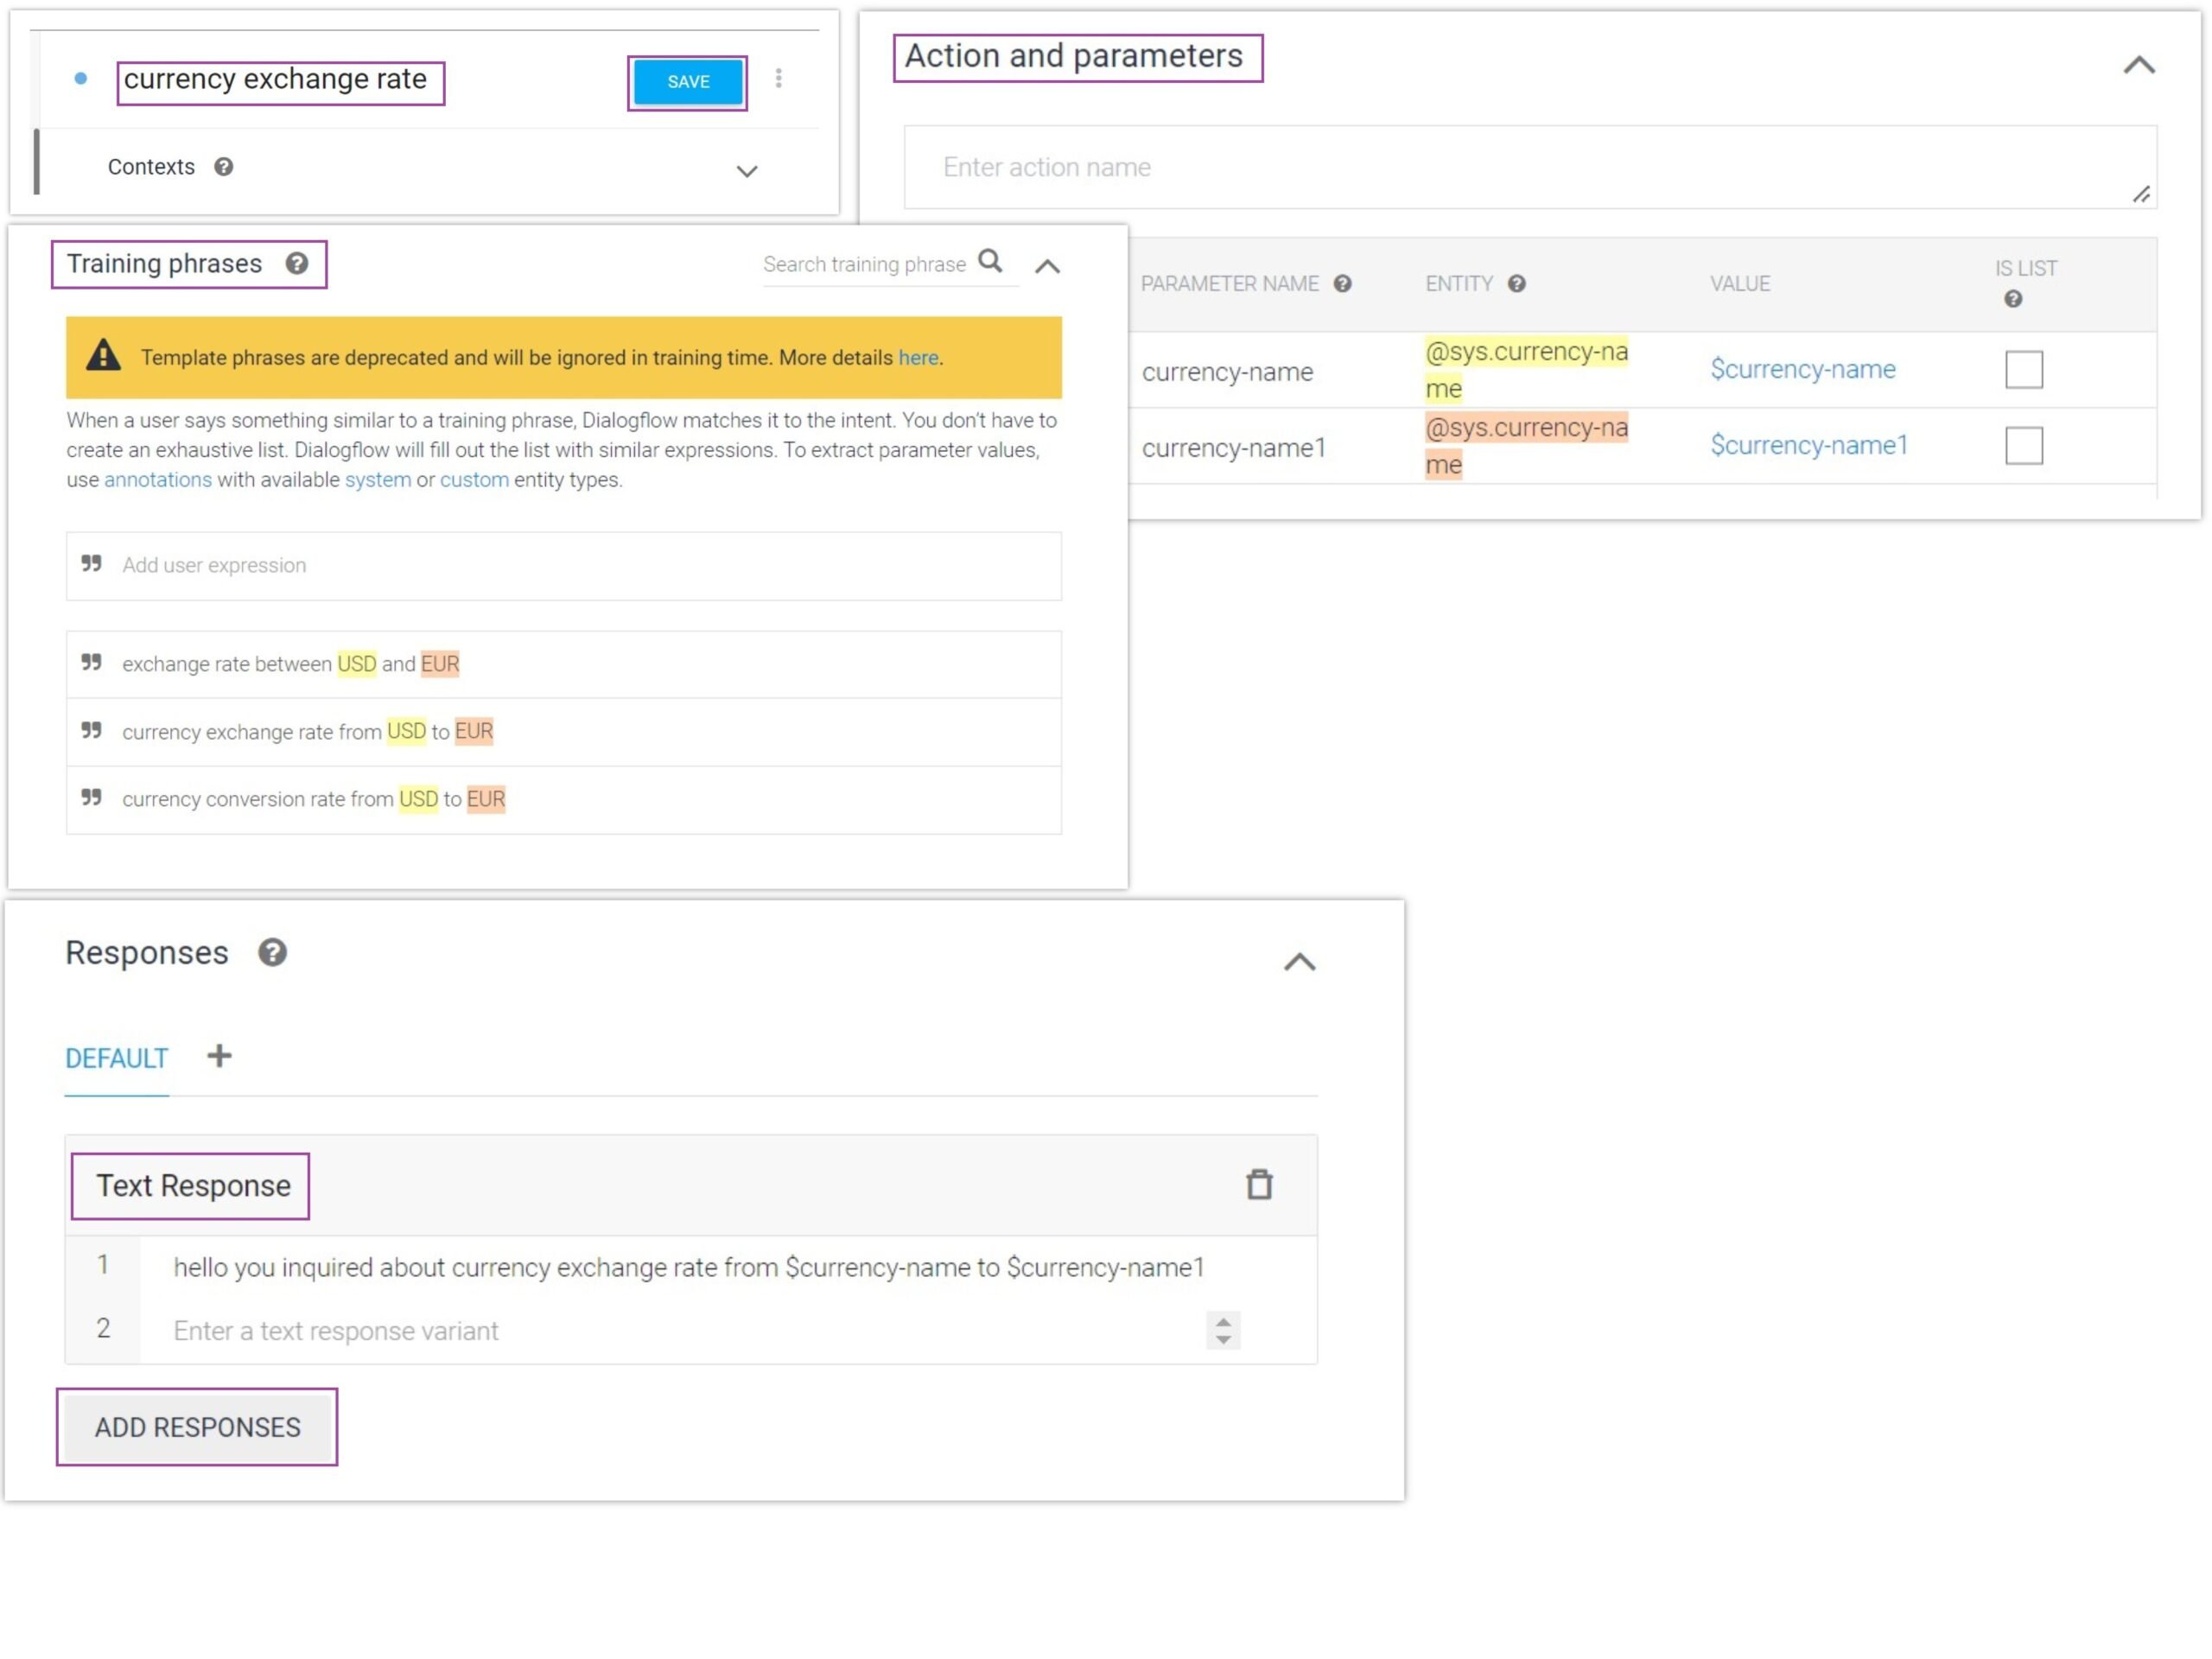
- Let’s create an “intent” with the details below.
- Intent name: currency exchange rate
- Add below training phrases –
- exchange rate between USD and EUR
- currency exchange rate from USD to EUR
- currency conversion rate from USD to EUR
- After adding the training phrases, you may view the automatically created parameters in the “action and parameters” section.
- Add text response – hello, you inquired about the currency exchange rate from $currency-name to $currency-name1.
- Click on the Save button.
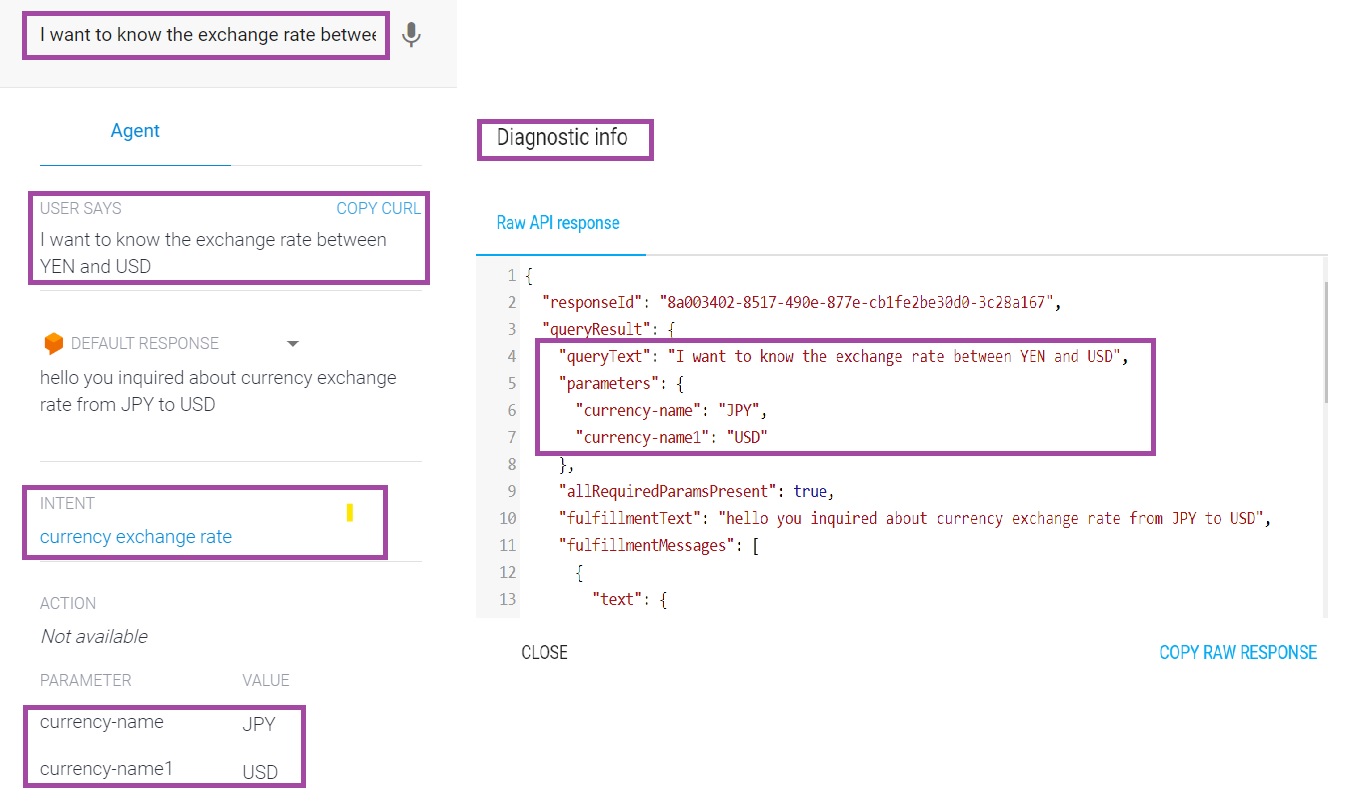
- Let’s test the intent in the console and look at the results (including the response from the API).
- Run the following search: “I want to know the exchange rate between YEN and USD” in the “Try it now” text box in the top right corner.
- You may now see the results and other information.
- You may have seen that the user query’s YEN was converted to JPN (Japanese Yen).
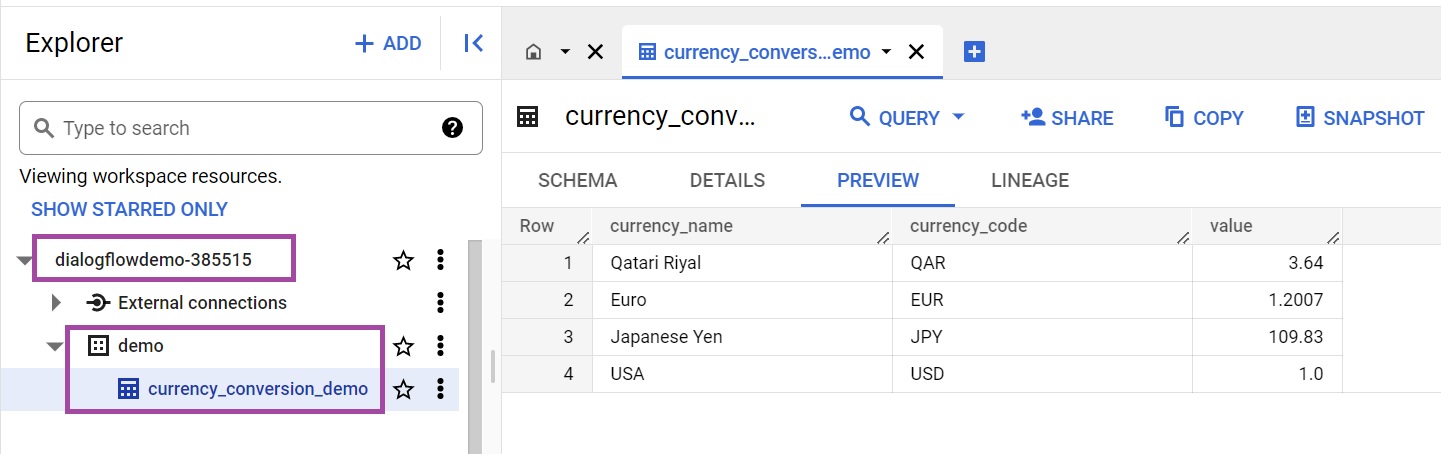
GCP BigQuery Setup
Create a demo or sample table for the currency conversion rate.
Python Code
For development, we’ll be working with Python 3.10 and deploying the code as a GCP Cloud Function.
from google.cloud import bigquery
from dialogflow_fulfillment import QuickReplies, WebhookClient, Text, Card, Payload, RichResponse
import traceback
import os

result_df = None

def get_conversion_rate(request):
    try:
        global result_df
        # Step 1: Fetch parameters from the request object
        request_json = request.get_json(silent=True, force=True)
        query_result = request_json.get('queryResult')
        query_text = query_result.get('queryText')
        parameters = query_result.get('parameters')
        currency_name = parameters.get('currency-name')
        currency_name_1 = parameters.get('currency-name1')

        # Step 2:  Extract details from BigQuery
        project_id = "dialogflowdemo-385515"
        bigquery_client = bigquery.Client(project=project_id)
        bigquery_table_name = "dialogflowdemo-385515.demo.currency_conversion_demo"
        query = f"SELECT * FROM `{bigquery_table_name}` WHERE currency_code IN " \
                f"('{currency_name}', '{currency_name_1}')"
        query_job = bigquery_client.query(query)  # Make an API request
        result_df = query_job.to_dataframe()  # Stores your query results to dataframe
        print(result_df)

        # Step 3:  Let's see how we can build a CARD response for Dialogflow
        agent = WebhookClient(request_json) # Build Agent response object
        agent.handle_request(handler)
        return agent.response

    except Exception as e:
        print(str(e))
        print(traceback.print_exc())


def handler(agent: WebhookClient):
    card_list = list()
    for index, row in result_df.iterrows():
        currency_name = row['currency_name']
        currency_code = row['currency_code']
        value = row['value']
        text = f"{currency_name} [{currency_code}] = {value}"
        card_list.append({"text": text})
    card = Card(
        title='Here are conversion/exchange rate details - ',
        buttons=card_list
    )
    agent.add(card)
Requirements.txt file –
blinker==1.6.2
cachetools==5.3.0
certifi==2022.12.7
charset-normalizer==3.1.0
click==8.1.3
colorama==0.4.6
db-dtypes==1.1.1
dialogflow-fulfillment==0.4.5
Flask==2.3.2
google-api-core==2.11.0
google-auth==2.17.3
google-cloud-bigquery==3.10.0
google-cloud-core==2.3.2
google-crc32c==1.5.0
google-resumable-media==2.5.0
googleapis-common-protos==1.59.0
grpcio==1.54.0
grpcio-status==1.54.0
idna==3.4
itsdangerous==2.1.2
Jinja2==3.1.2
MarkupSafe==2.1.2
numpy==1.24.3
packaging==23.1
pandas==2.0.1
proto-plus==1.22.2
protobuf==4.22.3
pyarrow==12.0.0
pyasn1==0.5.0
pyasn1-modules==0.3.0
python-dateutil==2.8.2
pytz==2023.3
requests==2.29.0
rsa==4.9
six==1.16.0
tzdata==2023.3
urllib3==1.26.15
Werkzeug==2.3.3
Code deployment –
- You can construct a cloud function using the GCP console or a terminal.
- Please ensure that the project id and appropriate access are set if you are creating using the terminal.
gcloud functions deploy dialogflow_webhook_demo \
--region=us-central1 \
--runtime=python310 \
--source=. \
--entry-point=get_conversion_rate \
--trigger-http \
--allow-unauthenticated
Webhook Setup
Now that the cloud function is running let’s quickly configure Webhook.
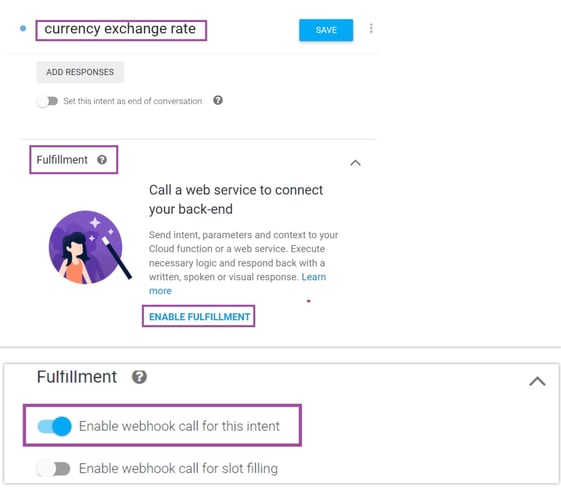
- Go to intents, open “currency exchange rate.”
- Click “Enable fulfillment” under the “fulfillment section” (down at the bottom).
- Enable webhook call for this intent and click on save.
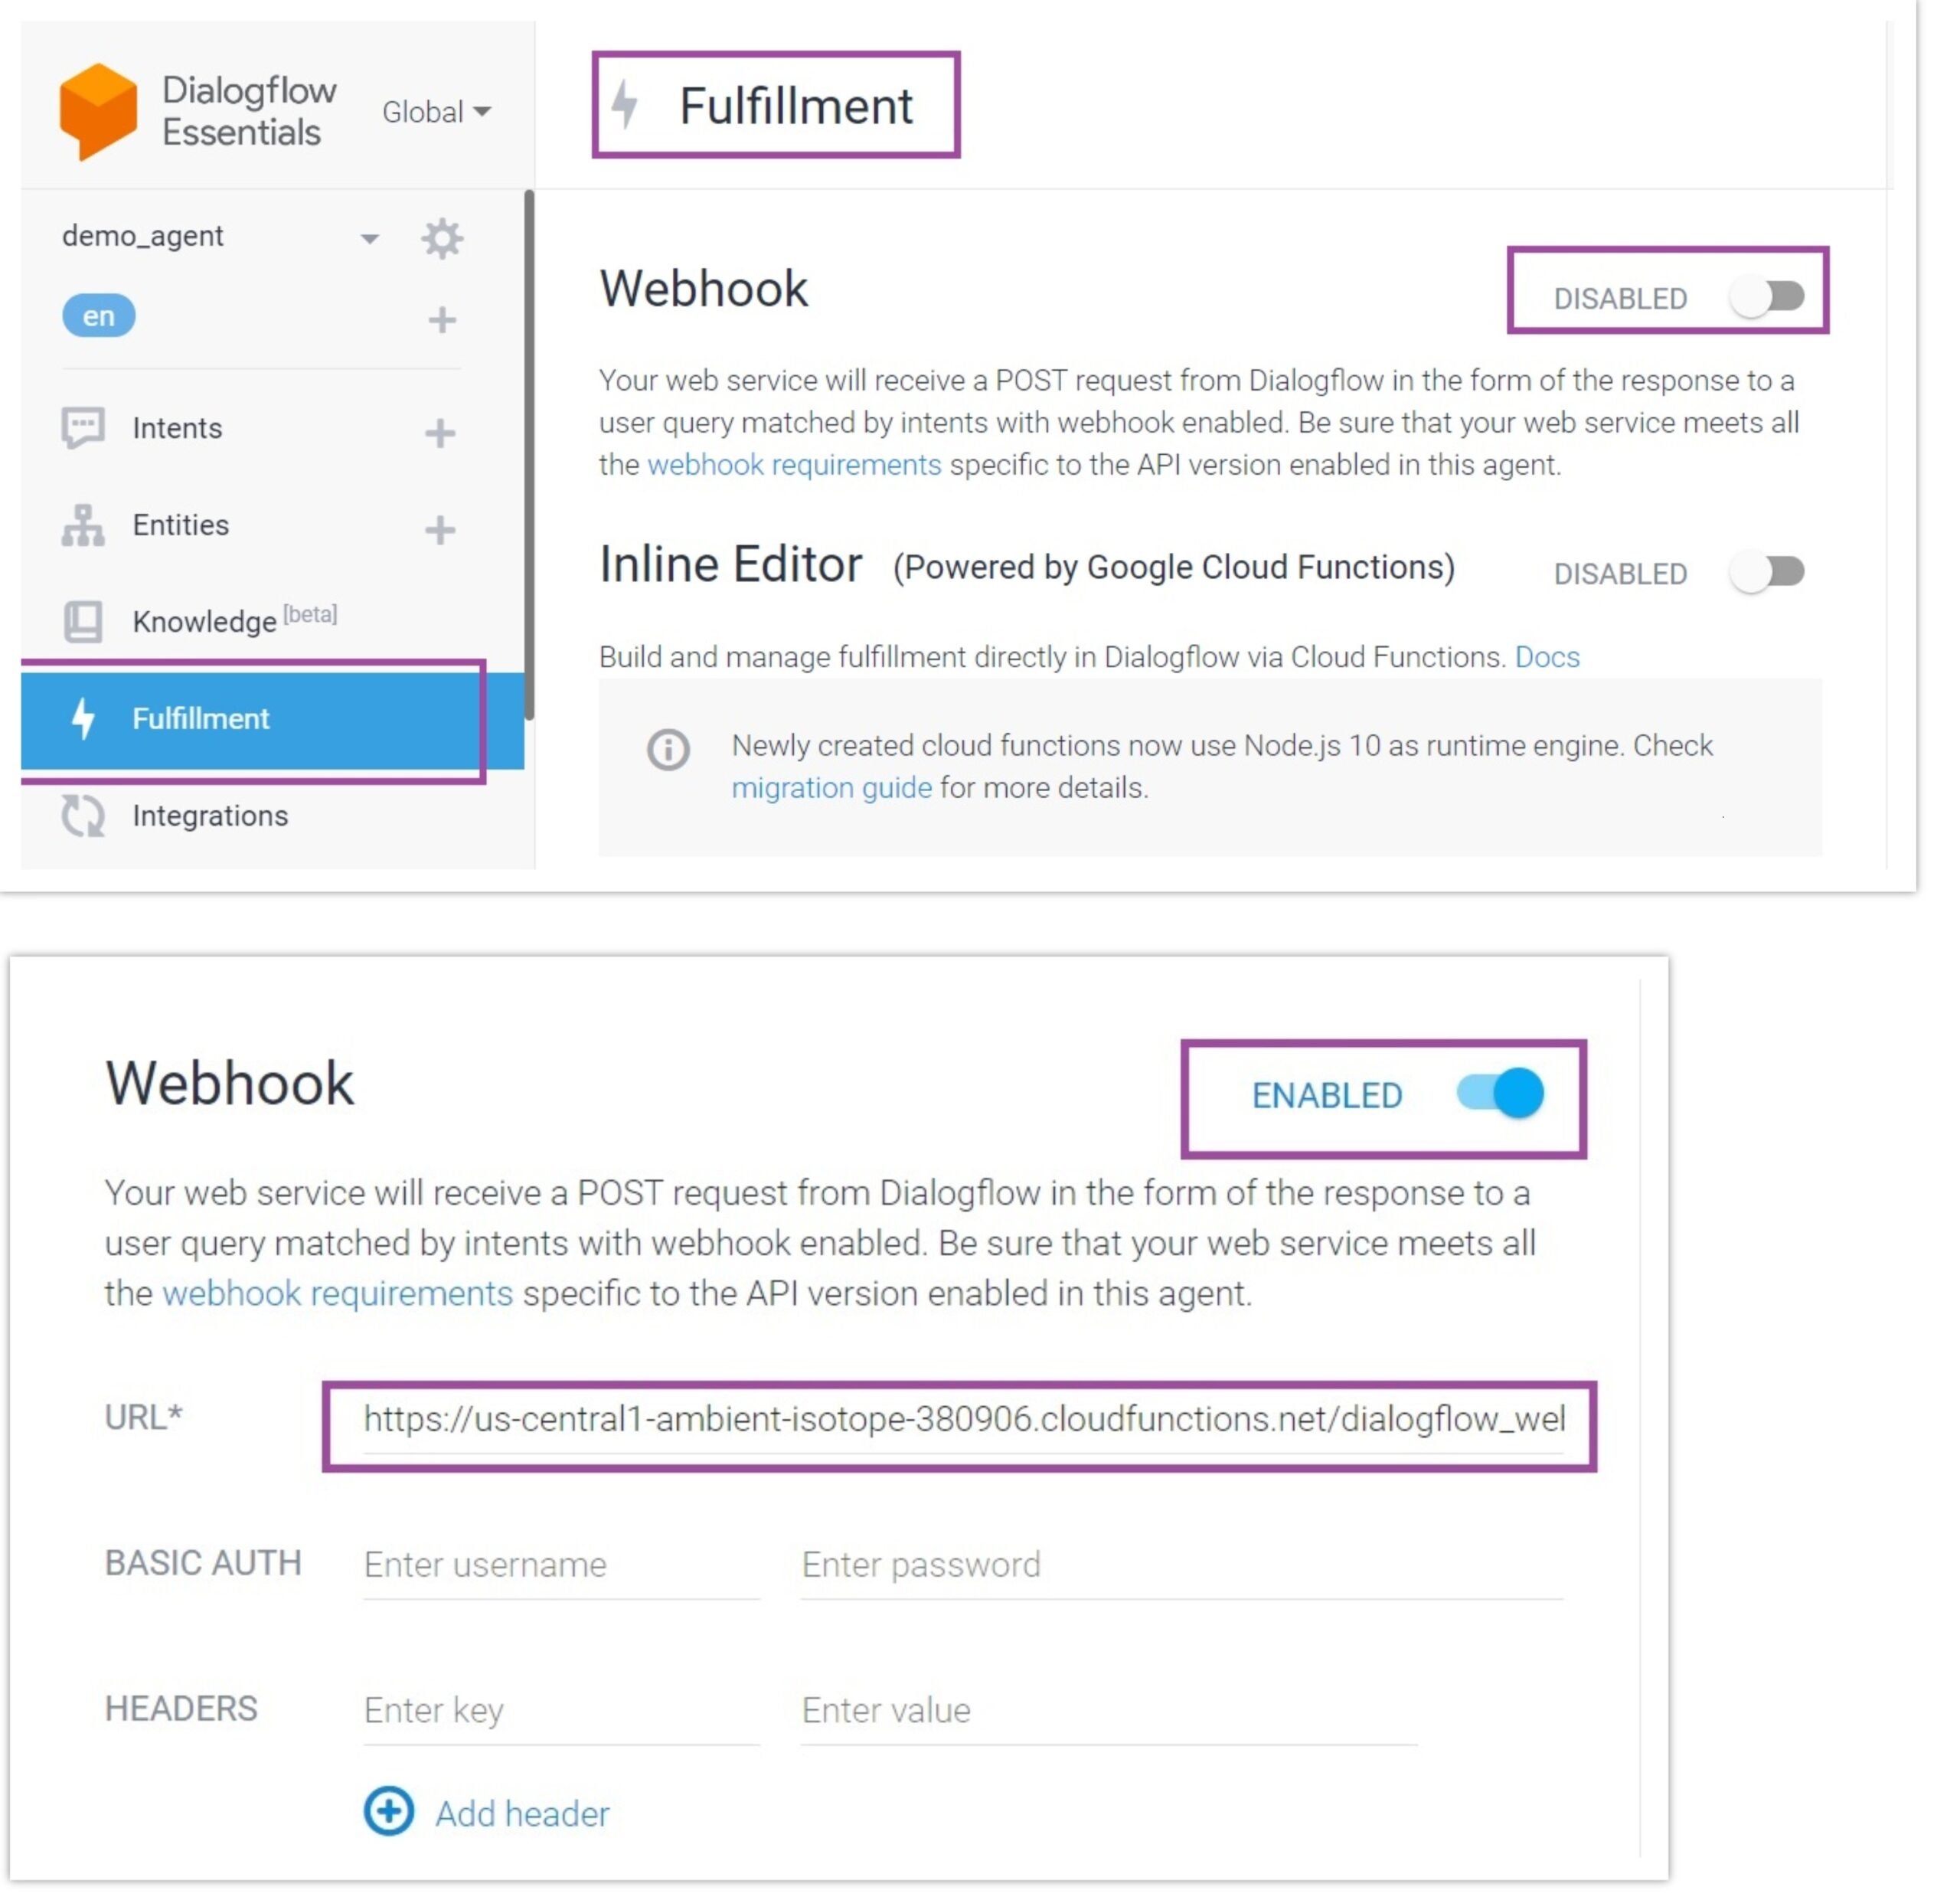
- Go to Fulfillments, and enable webhooks.
- Add the cloud function trigger URL in the URL field and click on save.
Now that the setups are complete, it’s time to test the intent.
Testing
Run the following search (same as earlier): “I want to know the exchange rate between YEN and USD” in the “Try it now” text box in the top right corner.
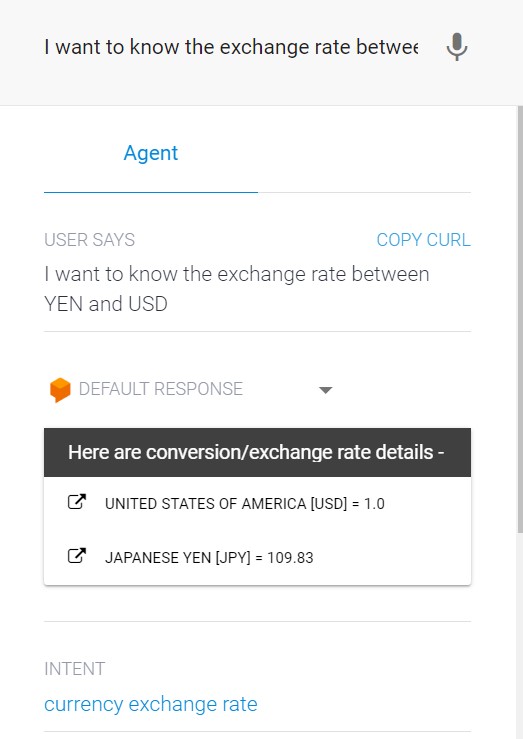
As a result of the webhook, the text response has been converted to a card response, which is visible now.
Conclusion
Social apps can be integrated with Dialogflow, an excellent natural language processing tool.
I hope you found this post helpful. Feel free to leave your questions in the comments, and make sure to sign up for updates so you don’t miss the next post.


