SAP HANA is the evolution of SAP HANA Service. It’s an in-memory platform for processing high data rates in real-time.
One of the main motivations of SAP HANA is to connect with on-premises systems, giving customers a seamless connection between on-premises and cloud resources.
DP Agent as a solution to SAP HANA Cloud
DP Agent creates a communication interface between HANA and the adapter. As DP Agent connects SAP HANA on-premises system to SAP HANA Cloud, you need to set up it up as an agent. The technique we’ll use to fetch the desired data from the source to our target system is called data provisioning and is a secure way of providing data to users.
The Data Provisioning (DP) Agent manages all Smart Data Integration (SDI) Adapters and connections to many sources. The DP Agent connects to the data source systems such as SQL Server, Hadoop, Flat Files, Odata, RDBMS, and others and passes information between the source systems and the HANA server using built-in adapters that are packaged with the DP Agent.
Prerequisites:
- A HANA Cloud DB Instance (endpoint details).
- You need to create a new HANA User.
- Go to SAP HANA Database Instance in BTP. Click on SAP HANA Cockpit (monitor and administer) in actions.
- Select ALL in my view -> User management -> Create user (+) -> Enter username -> Enter password, select No to Force change password to next logon.
- Assign privileges to two adapters:
- Adapter admin
- Agent admin
You can assign these privileges through Edit-> Add -> select.
- DP Agent software
- A computer, VMware ,or a remote desktop is used to install the DP Agent software.
Use of DP Agent to Hana Cloud migration
The DP Agent is usually installed in the customer’s premises and is set up to connect with SDI and the HANA DB server. Data is transmitted over HTTPS to and from the HANA server. DP Agent drivers are software programs known as adapters as they primarily adapt and map the source to destination. As this agent is set up for SAP HANA, it’s called a SAP HANA adapter:

The SAP HANA Database adapter enables communication between the Hana target server and the SAP HANA database or source. Say we have 100 records. Adapter takes HANA SQL and converts it to Oracle SQL. There are some drivers enabled for making connections. So, conversions of these keywords, specific record, and index entry are managed by these adapters.
There are multiple adapters that work with multiple remote sources. The following steps are used for setting up JDBC adapter to HANA Cloud.
1. Download the Data Provisioning Agent Set-Up
There are two ways to get the DP Agent software:
Option 1 : Discuss with your team if they have already relevant DP Agent software downloaded in their internal team share. If so, get the executable software.
Option 2 : If you have the SAP S-User ID or C-User ID, then follow these steps:
- Go to the SAP Software Download Center.
- Click Access Downloads, under either Installations & Upgrades or Support Packages & Patches.
- In the search box at the top of the page, enter “DP Agent”.
- From the list of downloads, select the desired version.
- Click the Add Selected Items to Download Basket icon.
- Select Download Basket and select Download Manager to start the download process.
2. Install DP Agent
Installing the agent can be done with a GUI/Wizard or from the command prompt in a Windows or Linux machine. Here we show the detailed steps with the GUI; similar steps can also be used in the command prompt if you prefer.
GUI
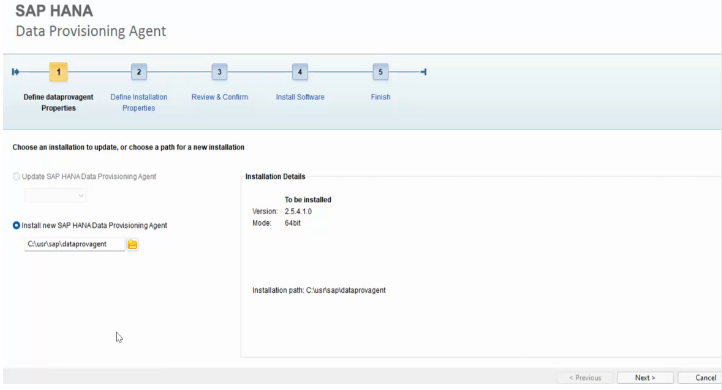
1. Download and install the right DP Agent. Next, you’ll see a software folder: -> IMDB_DPAGENT.
2. Select the hdbsetup.exe file within that folder and double click or run it. As set up wizard opens, click on Next.
Leave the default installation paths: C:\usr\sap\dataprovagent:
3. After clicking on next, specify installation properties.
- Agent unique name: it can be anything. Let’s say – TRAINING_DPAgent.
- Domain/username: domain name is the computer name and Username is the name which you use for logging into the computer. In the lock screen of your computer your username is displayed.
- Password: enter a password to use with DP Agent.
- Confirm password: enter the same password.
Note: Domain (Computer/Device name) \ Username (System user name) must be in format given as it is on your computer:
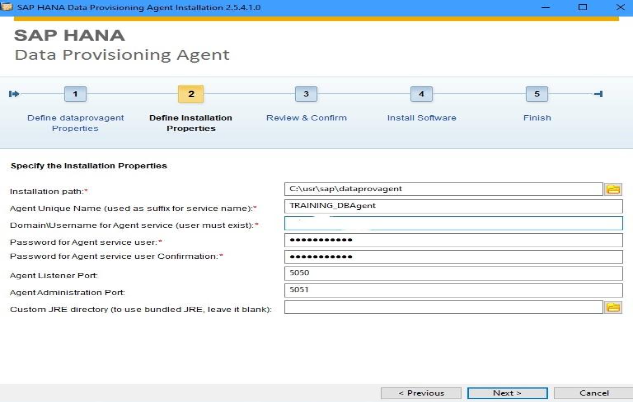
Note: One HANA Cloud can be connected with multiple DP Agents, each DP Agent should have a unique name.
After following the next steps, the setup wizard will accept given details. Click Install to start the installation process.
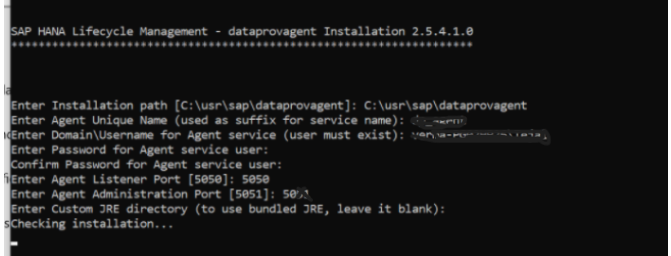
Note: You can also define the installation properties through cmd:
Extract the 1st .exe file from the zip file of dp_agent>install>Fill the details in cmd. The details will be the same as in the GUI method:
3. Connect DP Agent to SAP HANA CLOUD [Command Line]
- After installation, go to the installation path, go to the bin folder and open cmd from here.
- Start the configuration tool called agentcli.bat a batch file, with the –configAgent parameter. Run this command in cmd prompt as below :-C:\usr\sap\dataprovagent\bin>agentcli.bat –configAgent
After running that command, the DP Agent Configuration Tool will be initialized as below:
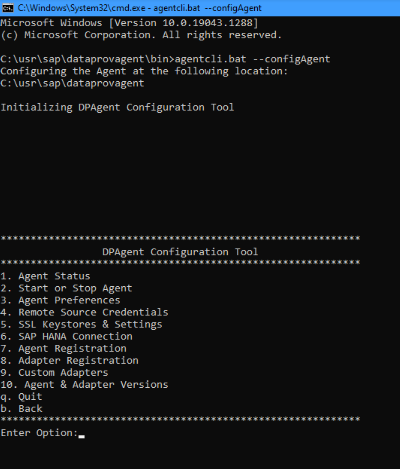
It will give you multiple options to connect my DP agent to the HANA cloud system.
3. Select option 6. SAP HANA Connection:
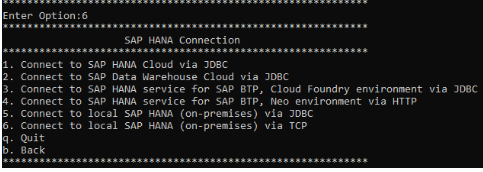
4. Select option 1. Connect to SAP HANA Cloud via JDBC.
5. Press “Enter” button to keep default or skip an optional setting. If a setting cannot be skipped, that means it is required.
Now, Go to SAP HANA Database Instance in BTP > Copy sql endpoint by clicking on actions. It will be like this:
‘27aa4aa9-****-49fd-2765-b***3fe579f7.hana.t**al-****.hanacloud.ondemand.com:000’
After Copying SQL Endpoint, go to cmd prompt again and give below details:
6. Host Name – 27aa4aa9-****-49fd-2765-b***3fe579f7.hana.t**al-****.hanacloud.ondemand.com:000
7. Port Number – 000
8. Agent Admin HANA User – DBADMIN
9. Agent Admin HANA User Password – (Type DBADMIN password here).
10. Enter the HANA user name for Agent messaging –
11. Enter HANA User Password for agent Messaging. (Created User password in the prerequisite section):

ENTER with False (since you have already created the user in SAP HANA cockpit).
Note: If process shows an error (i.e. “Failed to connect to server SAP DBTech”), then come to HANA cloud central server (Instance). Choose Edit to see the configuration. If the allowed connection is only for a BTP IP address, then change it to “Allow all IP addresses”. These errors are generated in connection because the firewall blocks some IP addresses.
12. Press Enter for the configuration tool connection to SAP HANA server via JDBC and repeat the same process.
13. Choose option b. Back.
14. Select option 1 to check the Agent status:
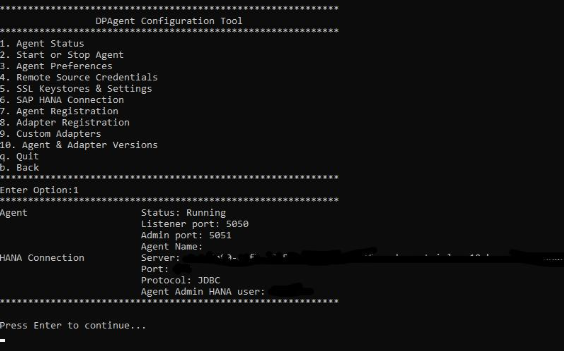
Here you can see the details of the DP Agent. Your agent status will show Running.
4. Register the Agent with SAP HANA [Command Line]
- Start the command-line agent configuration tool and connect to SAP HANA.
- Select option 7 to enter the Agent Registration menu.
- Select option 1 to register the agent.
- Specify the agent connection information as prompted.
- Specify the agent name.
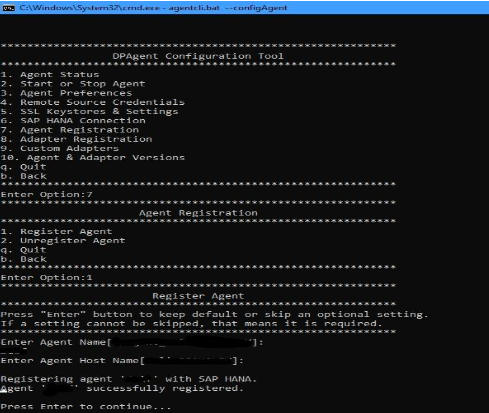
Go to HANA Database Explorer’s -> Agents in the catalog under the DBADMIN schema to view the agent you have created.
5. Register the adapters
Now, you need to register adapter. Follow the same process we used to register the agent:
- Select option 8 for adapter registration.
- Select option 1 to display the adaptors.
It will show number of adapters to select.
Next, we’ll register the HanaAdapter. Follow these steps:
Enter adapter name: HanaAdapter
Adapter “HanaAdapter” is successfully registered.
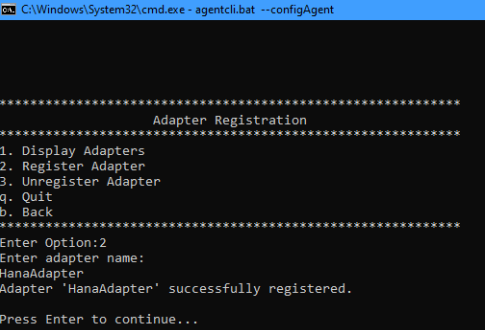
You can check about registered adapter “HanaAdapter” in Hana Database Explorer Server.
I hope you’ve found this post helpful. Feel free to share your questions in the comments and subscribe so you don’t miss the next post.

