Exadata Health Check: My Top 5 Tools and Features

From ORAchk/EXAchk/ODAchk, Database Security Assessment Tool (DBSAT) and Hang Manager, to Cluster Health Advisor (CHA), Cluster Verification Utility (CVU), Memory Guard and Tracefile Analyzer (TFA), Oracle DBAs have an abundance of great tools at their fingertips. Another plus is there’s no fee as long as you already have Oracle Support Services.
Most of the tools can be found on the Autonomous Health Framework (AHF) as of version 12.2. However, none of them are set up as a default, so you’ll need to select some individually to start and enable them in your environment.
Here are my top five features to get started in an Exadata environment.
1. Cluster Health Advisor: calibrate your Exa environment
Available with the AFH since 12.2, the CHA works along the cluster health monitor to provide you fine-grained notifications and correlations about your environment. And when I say it, I mean it–your environment. This is because the CHA works better if you calibrate it with your statistics. As usual, don’t use the most problematic day or the low workload night, but an average day that can be used as a reference. All this is stored in the grid infrastructure management repository (GIMR) as shown below and used for future comparison and model inference.
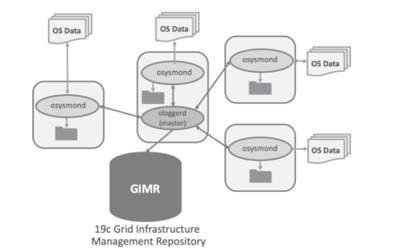
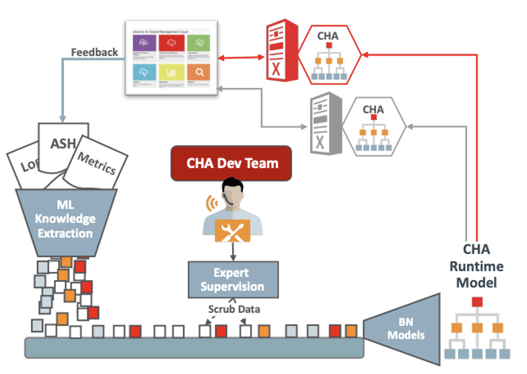
This means the CHA is not a long list of IFs with fixed metrics, but an intelligent tool monitoring over 127 processes that perform work based on your workload. Not only that, but the CHA is enriched with machine learning algorithms that model over 30 known DB problems based on over 150 metric predictors.
An example of inference can be seen below, where network and global cache statistics are used to inference a network issue.
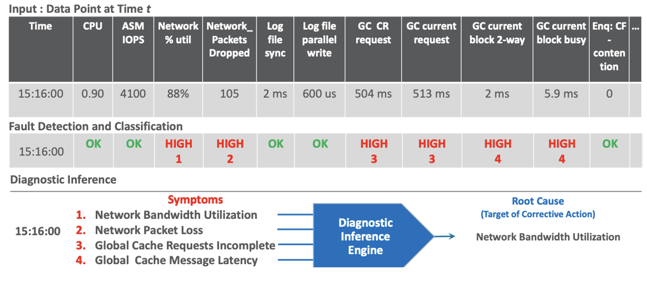
Not rocket science, but always nice to have someone digesting tons of logs and metrics and reaching this sort of conclusion unassisted, right? (As a DBA, you can steal all credit for the findings, no hard feelings.)
This is just one of the features of CHA. It has many other functionalities, so be sure to make the most of yours.
2. Daily automated EXAchk runs and reports
If you have an Exadata, you’re used to running an EXAchk periodically to review the recommendations and best practices for your environment. It requires almost no effort to run and copy the reports or create a script to do so. What if I told you Oracle has now automated this with AHF?
All you need to do is confirm the scheduled runs and set the address for the reports to be sent. Below is a quick cheat sheet:
a. Checking Status of the EXAchk:
[root@exa01dbadm01 ~]# exachk -d info
------------------------------------------------------------

Master node = exa01dbadm01

exachk daemon version = 211300

Install location = /opt/oracle.ahf/exachk

Started at = Wed Jun 16 11:58:03 MDT 2021

Scheduler type = TFA Scheduler


[root@exa01dbadm01 ~]# exachk -d status
exachk is using TFA Scheduler. TFA PID: 369350
b. Checking status of TFA daemon status and auto start:
[root@exa01dbadm01 ~]# ahfctl statusahf

.-----------------------------------------------------------------------------------------------------.
| Host | Status of TFA | PID | Port | Version | Build ID | Inventory Status |
+--------------+---------------+--------+------+------------+----------------------+------------------+
| exa01dbadm01 | RUNNING | 369350 | 5000 | 21.1.3.0.0 | 21130020210607124914 | COMPLETE |
| exa01dbadm02 | RUNNING | 118950 | 5000 | 21.1.3.0.0 | 21130020210607124914 | COMPLETE |
'--------------+---------------+--------+------+------------+----------------------+------------------'

------------------------------------------------------------

Master node = exa01dbadm01

exachk daemon version = 211300

Install location = /opt/oracle.ahf/exachk

Started at = Wed Jun 16 11:58:03 MDT 2021

Scheduler type = TFA Scheduler

------------------------------------------------------------
ID: exachk.autostart_client_exatier1
------------------------------------------------------------
AUTORUN_FLAGS = -usediscovery -profile exatier1 -syslog -dball -showpass -tag autostart_client_exatier1 -readenvconfig
COLLECTION_RETENTION = 7
AUTORUN_SCHEDULE = 3 2 * * 1,2,3,4,5,6
------------------------------------------------------------
------------------------------------------------------------
ID: exachk.autostart_client
------------------------------------------------------------
AUTORUN_FLAGS = -usediscovery -syslog -tag autostart_client -readenvconfig
COLLECTION_RETENTION = 14
AUTORUN_SCHEDULE = 3 3 * * 0
------------------------------------------------------------

Next auto run starts on Jun 17, 2021 02:03:00

ID:exachk.AUTOSTART_CLIENT_EXATIER1
c. Gather EXAchk next automated run:
[root@exa01dbadm01 ~]# exachk -d nextautorun

Next auto run starts on Jun 17, 2021 02:03:00

ID:exachk.AUTOSTART_CLIENT_EXATIER1

[root@exa01dbadm01 ~]#
d. Changing EXAchk notifications:
[root@exa01dbadm01 ~]# exachk -get NOTIFICATION_EMAIL,AUTORUN_SCHEDULE,COLLECTION_RETENTION
------------------------------------------------------------
ID: exachk.autostart_client_exatier1
------------------------------------------------------------
COLLECTION_RETENTION = 7
AUTORUN_SCHEDULE = 3 2 * * 1,2,3,4,5,6
------------------------------------------------------------
------------------------------------------------------------
ID: exachk.autostart_client
------------------------------------------------------------
COLLECTION_RETENTION = 14
AUTORUN_SCHEDULE = 3 3 * * 0
------------------------------------------------------------


[root@exa01dbadm01 ~]# exachk -id autostart_client -set NOTIFICATION_EMAIL=boesing@pythian.com

Updated attribute ['NOTIFICATION_EMAIL=boesing@pythian.com'] for Id[exachk.AUTOSTART_CLIENT]

Successfully copied Daemon Store to Remote Nodes


[root@exa01dbadm01 ~]# exachk -get NOTIFICATION_EMAIL,AUTORUN_SCHEDULE,COLLECTION_RETENTION
------------------------------------------------------------
ID: exachk.autostart_client_exatier1
------------------------------------------------------------
COLLECTION_RETENTION = 7
AUTORUN_SCHEDULE = 3 2 * * 1,2,3,4,5,6
------------------------------------------------------------
------------------------------------------------------------
ID: exachk.autostart_client
------------------------------------------------------------
NOTIFICATION_EMAIL = boesing@pythian.com
COLLECTION_RETENTION = 14
AUTORUN_SCHEDULE = 3 3 * * 0
------------------------------------------------------------

[root@exa01dbadm01 ~]# exachk -id autostart_client_exatier1 -set NOTIFICATION_EMAIL=boesing@pythian.com
Updated attribute ['NOTIFICATION_EMAIL=boesing@pythian.com'] for Id[exachk.AUTOSTART_CLIENT_EXATIER1]

Successfully copied Daemon Store to Remote Nodes


[root@exa01dbadm01 ~]# exachk -get NOTIFICATION_EMAIL,AUTORUN_SCHEDULE,COLLECTION_RETENTION
------------------------------------------------------------
ID: exachk.autostart_client_exatier1
------------------------------------------------------------
NOTIFICATION_EMAIL = boesing@pythian.com
COLLECTION_RETENTION = 7
AUTORUN_SCHEDULE = 3 2 * * 1,2,3,4,5,6
------------------------------------------------------------
------------------------------------------------------------
ID: exachk.autostart_client
------------------------------------------------------------
NOTIFICATION_EMAIL = boesing@pythian.com
COLLECTION_RETENTION = 14
AUTORUN_SCHEDULE = 3 3 * * 0
------------------------------------------------------------
e. Change EXAchk schedule and retention:
[root@exa01dbadm01 ~]# exachk -id autostart_client_exaier1 –set "AUTORUN_SCHEDULE=0 3 * * *" -> Time= 3 AM daily
[root@exa01dbadm01 ~]# exachk-id autostart_client –set "collection_retention=90"
f. EXAchk: Testing email sending and running an EXAchk report over email (this is for ad-hoc testing to check email sending outside of the scheduled runs):
[root@exa01dbadm01 ~]# exachk -testemail notification_email=boesing@pythian.com
Email Successfully sent to ['boesing@pythian.com'] from 'root@exa01dbadm01
[root@exa01dbadm01 ~]# exachk -sendemail notification_email=boesing@pythian.com


Searching for running databases . . . . .

. . . . . . . . . . . .
List of running databases registered in OCR

1. xxxxxx
2. yyyy
3. None of above

Select databases from list for checking best practices. For multiple databases, select 3 for All or comma separated number like 1,2 etc [1-3][3].
[...]
Detailed report (html) - /u01/app/oracle/oracle.ahf/data/exa01dbadm01/exachk/user_root/output/exachk_exa01dbadm01_xxxxx_061621_134748/exachk_exa01dbadm01_xxxxx_061621_134748.html

UPLOAD [if required] - /u01/app/oracle/oracle.ahf/data/exa01dbadm01/exachk/user_root/output/exachk_exa01dbadm01_xxxxxx_061621_134748.zip
Email Successfully sent to ('boesing@pythian.com',) from 'root@exa01dbadm01' with attachment
3. TFA: sanitize and mask options
Even with all the concerns on sensitive data being more and more relevant, this is something that actually surprised me. It’s possible to sanitize and mask data in collections. For example, mask will hide your inner data (let’s say table names):
[root@exa01dbadm01 ~]# tfactl diagcollect -srdc ORA-00600 -mask
Sanitize will hide your hardware setting. Not that useful if you have Exadata, but it might be interesting if you have commodity hardware you don’t want Oracle to know about.
[root@exa01dbadm01 ~]# tfactl diagcollect -srdc ORA-00600 -sanitize
4. TFA Nothing was Changed Resolver Tool
Here’s something DBAs go through once in a while:
Client: Yesterday was running fine but today it’s veeeery slow. But we didn’t change anything!
DBA: Something changed, that’s for sure.
Client: Absolutely nothing changed.
The resolver tool lets you check if, indeed, nothing changed from the client’s perspective or if someone took an action that’s hard to identify.
It takes parameters from OS and DB, tracks of old and new values and reports any changes:
[root@exa01dbadm01 ~]# tfactl changes

Output from host : exa01dbadm02
------------------------------
No Changes Found

Output from host : exa01dbadm01
------------------------------
[Nov/14/2021 00:08:33.000]: [db.dbprod19.dbprod191]: Parameter: log_archive_dest_2: Value: service=dbprod19stb => ASYNC NOAFFIRM delay=240 optional compression=disable max_failure=0 reopen=300 db_unique_name=dbprod19stb net_timeout=300
[Nov/14/2021 00:08:33.000]: [db.dbprod19.dbprod191]: Parameter: log_archive_dest_2: Value: service=dbprod19stb => valid_for=(online_logfile,all_roles)
5. Oracle Health Check Collections Manager
I wouldn’t be surprised if you don’t know this one and if so, I highly recommend you check it out. It’s a great tool and as with everything else in this post, it’s free!
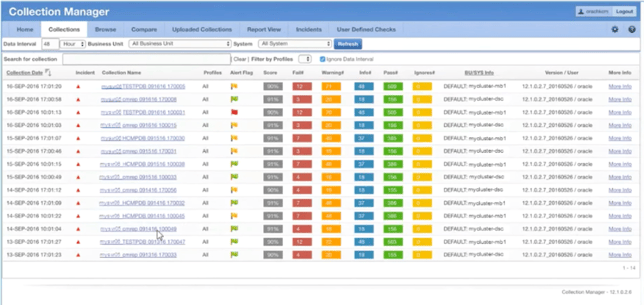
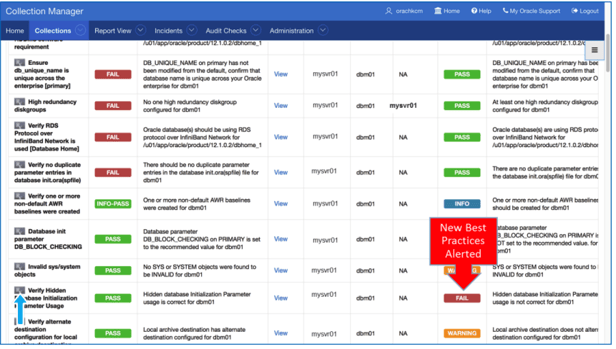
Oracle Health Check Collections Manager is an APEX companion application to Oracle EXAchk that gives you an enterprise-wide view of your health check collection data. All you need to have is an APEX 4.2 or 5 version and deploy the tool. The main idea is that you can consolidate all your reports in one place and, as a plus, manage all your EXAchk reports across time, including a view of any items regression you might have.
Here’s an example of the view of the collections:
And this is an example of a new best practices failure:
Do you agree with my list or would you like Pythian’s support in implementing them? Let me know in the comments.
Don’t forget to sign up for more updates here.

