What is Compaction?
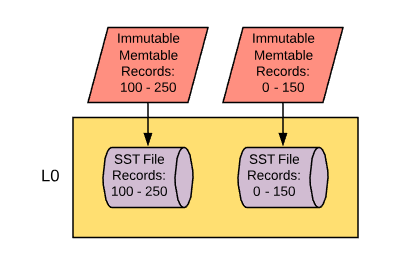
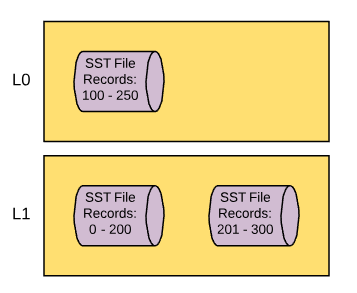
One of the philosophies of MyRocks is “write the data quickly and sort out data organization later”, which is pretty far removed from engines like InnoDB that take the approach of “continuously organize data on disk so it’s optimal as soon as possible”. MyRocks implements its philosophy in a way that is heavily reliant on a process called ‘compaction’. Let’s pick up where we left off with that first persistent flush from immutable memtable to data file and see how compaction comes into play. You may have noticed in a few of the variable topics we mentioned how data initially flushed from memory ends up in compaction layer 0. This is the topmost layer in a multi-layered approach to storing your data. MyRocks’ aim is to have data files that are sorted where you don’t have record overlap across data files. The first file will have a range of records (example: 1 - 100), then the next file would have the next range (example: 101 - 250), and so on. This really isn’t possible when data gets flushed into L0 because in order for that to occur, the flushing threads would have to be aware of what’s going on in all the other immutable memtables that are in scope, which could be in the process of being flushed by other concurrent flushing threads. So in order to get around this, we don’t bother with checking for data overlap in L0, but that’s not going to work for us for very long.
Once level 0 hits a certain size threshold it will start merging data down into the next compaction level down. Level 0 (L0) will feed into Level 1 (L1) and this is where we start removing overlapping data and make sure that sorting is recognized across the compaction layer. The compaction process from L0 to L1 works a little like this:
- MyRocks recognizes that the threshold for the amount of data allowed in L0 has been reached and calls for a thread to start compaction from L0 to L1.
- The compaction thread wakes up and checks the data files in L0 and picks one to merge into L1. Let's say, for example, that the file that it picks has keys ranging from 0 - 150.
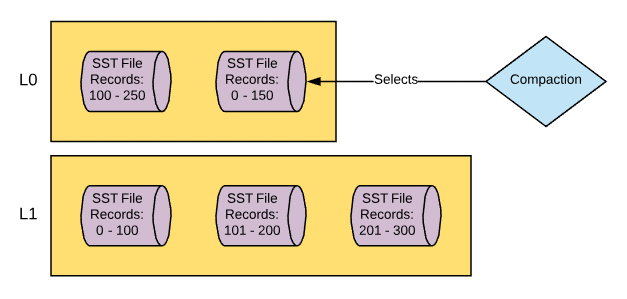
- The thread then checks files that are in L1 that contain records 0 - 150. Let’s say in this example that there are two files that contain these records.
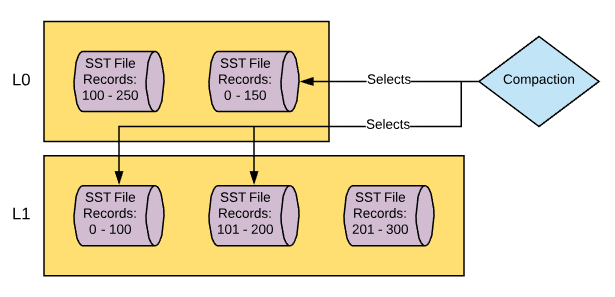
- The thread reads the L0 file to be compacted and the two L1 files that it needs to merge the data with and performs a merge sort, making sure that duplicate records are removed.
- The thread writes new file(s) in L1 comprising of the newly sorted and deduplicated data.

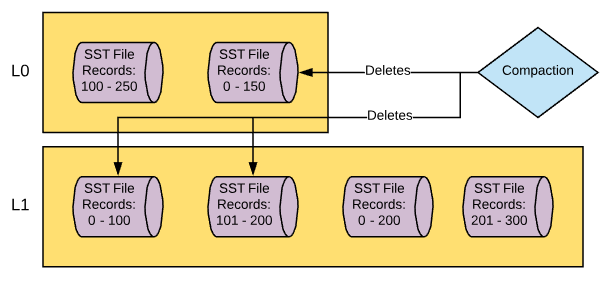
- Old files that were read in from L0 and L1 are removed.
As this process continues, more and more files will be created in L1, until eventually L1 it will hit its size threshold and a new thread will be called to compact from L1 to L2. The process of compacting from L1 to L2 is the same as L0 to L1 but with two key differences. Firstly, when data is compacted from L0 to L1, as mentioned before, there can be overlapping data. When you compact from L1 to L2, this isn’t a problem as overlapping and duplicate data will not exist by the time it has reached L1. Secondly, when data is compacted from L0 to L1, due to the nature of the overlapping data, compaction has to be single threaded. As I mentioned before, threads that flush and compact have to be aware of the contents of other threads, or else they cannot ensure a lack of data overlap or duplication. Once data resides in L1, there is no longer any concerns about data overlap, so when you compact from L1 to L2 you can distribute the load over multiple threads. Eventually, as you compact files from L1 to L2, you’ll hit the threshold for the data size of L2 and it will start to compact to L3 and so on and so on. The process of compacting from L2 to L3 and all subsequent compactions work exactly like the compaction from L1 to L2. This will go all the way down to the bottom most compaction layer, which by default is L6. Given that each compaction layer is larger than the preceding layer (ten times by default), your data set will eventually look like this. 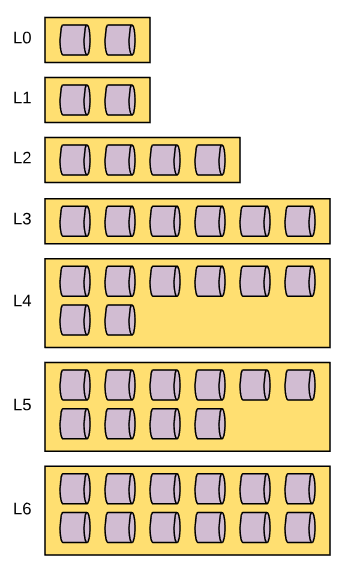
I should note one thing that is misleading about the diagram above is that it doesn’t reflect the default 1:10 scale between compaction layers, but it does show the default nature of L1 being the same size as L0. If you’re interested in learning about how MyRocks’ leveled compaction implementation selects data files for compaction you can read more about it here on the RocksDB Wiki . When you compare this to other storage engines that update data files as data is updated, this all seems quite strange, right? So why compact? The whole point here is the get that data written as quickly as possible and in this case that’s achieved by doing direct writes to L0 and then not having to update data files directly, but instead used data changes in a log structured format and merge them together. Not having to update files in place is also a huge advantage when it comes to using bloom filters. We’ll cover bloom filters in a future post in this series and I don’t want to get too far ahead of myself here, just keep that in your pocket for now and we’ll come back to it. So the next question you might ask yourself is, “Why is each compaction layer larger than the one that preceded it?”. This really comes down to file access. If each compaction layer was the same size and not large enough, you would have a lot of contention for files being read by compaction processes. Instead, the compaction layers get larger, thus reducing the odds of file contention during compaction. Finally, you might ask, “Well… what if my data size is larger than the threshold of my bottom most compaction layer? Do I stop writing data?”. The answer is no. The thresholds in this case are simply triggers that start the compaction. MyRocks will put a lot of emphasis on keeping compaction layers under their thresholds, and you can run into problems if you can’t flush from L0 to L1 fast enough. But when it comes to the bottom-most compaction layer, it can grow as large as it needs to in order to support your full data set. So now that you know more about the whats and whys of compaction, let’s dig a little deeper and look at the variables that are associated with its mechanics.
Variables and CF_OPTIONS
Rocksdb_max_background_jobs
The aim of MyRocks is to allow for concurrent compaction jobs so you can write quickly initially and then organize the data later. The variable rocksdb_max_background_jobs was mentioned in my previous blog post about persisting data from memory to disk. The variable is also being mentioned in this blog post as compaction jobs are also considered to be background operations. As such, this variable will limit the max number of compactions jobs that can be run at one time. Background jobs created for compaction and flushing are global in the sense that you cannot reserve jobs for specific column families. With MyRocks, you don’t have an option to spread your data files over multiple directories or storage platforms, but you can in RocksDB. I’m pointing this out because if you were to put different column families on different storage platforms, you may be bound to the slowest storage platform during compaction as documented in this bug report created for the RocksDB project. I don’t know if we’ll get an option to distribute our column families over different directories in MyRocks, but I feel this serves as a good example of considerations you need to make when dealing with global variables that have an impact across all column families. Default: 2 Using the default value of two ensures that there will be enough available background processes for at least one flush and one compaction.
Rocksdb_max_subcompactions
You can use multiple threads to help support a single compaction process. These threads are called subcompactions. You can even use subcompactions to help with compaction from L0 to L1 , which, as I noted above, is a single job process. The rocksdb_max_subcompactions variable allows you to designate the maximum number of subcompaction threads that are allowed for each compaction job. Default: 1
Rocksdb_compaction_readahead_size
Compaction has the ability to prefetch data from files in order to ensure greater amounts of sequential reads. This variable allows you to specify the amount of data that should be pre-fetched from the data files that are participating in the compaction input process. Default: 0 If you are using an SSD, you may not see a performance increase by attempting to establish more sequential reads as part of the compaction process. However, if you are using spinning media it’s recommended to set this value to 2Mb . Setting this variable to a non-zero value will automatically set variable rocksdb_new_table_reader_for_compaction_inputs to ON if it’s not already in that state. Be sure to check the information about rocksdb_new_table_reader_for_compaction_inputs below so you know the impact of enabling that variable before setting rocksdb_compaction_readahead_size to a non-zero value.
Rocksdb_new_table_reader_for_compaction_inputs
Compaction jobs are going to need to read from multiple files during the input process. For example, if you are doing a compaction from L2 to L3 you first need to access the L2 file that’s going to be compacted, and then all the L3 files that overlap with the key range of the L2 file. The variable rocksdb_new_table_reader_for_compaction_inputs allows you to work with one file descriptor per file that needs to be accessed. For those of you who are not familiar, a file descriptor is a computational resource used to access / read from a file. Using one file descriptor for multiple files means that you need to have that descriptor rotate through the files to get the info that it needs. Using multiple descriptors means you can access multiple files simultaneously, thus parallelizing the process. Default: OFF I would be inclined to test enabling this variable, but you have to be mindful of the fact that multiple file descriptors means more memory usage. I would test this in a non-production environment in order to determine the estimated memory footprint increase prior to implementing in production.
CF_OPTIONS target_file_size_base & target_file_size_multiplier
Once the compaction input process is complete, the compaction output process will create a series of new files in the N+1 compaction layer where N is the layer where compaction was initiated. The size of those files is determined by several factors. The size of files in the L0 compaction layer is going to be the same size as the write_buffer_size variable (the size of the memtable) multiplied by the column family option min_write_buffer_number_to_merge (this is the number of immutable memtables that must be created prior to a flush). The size of files in the L1 compaction layer is defined by the column family option target_file_size_base. The size of the files in the L2 compaction layer or greater is defined by the column family option target_file_size_multiplier. Each layer’s file size will be X times greater than the one that came before it, where X is defined by the value of column family option target_file_size_multiplier. For example, if the L1 compaction layer files are set to be 64Mb and the CF option target_file_size_multiplier is set to 2, files in the L2 compaction layer would be 128Mb, files in the L3 compaction layer would be 256Mb, and so on. Default:- CF option target_file_size_base: 67108864 (64Mb)
- CF option target_file_size_multiplier: 1
Assuming you are using the default value for write_buffer_size (64Mb) as well, this means that all data files across all compaction layers will be 64Mb. I think that 64Mb is a good place to start for L0 and L1 files considering that smaller files should result in faster compaction jobs, which could be important considering the single job nature of compaction from L0 to L1. As you move to greater compaction levels, you may want to consider the tradeoffs of increasing file sizes. In the case that you are doing a read that is working with a specific key value, you’ll have a lot fewer files to inspect if the key is present (based on min and max values), but in the case that you need to scan a file, you may be checking a lot more data than needed. Also, if you’re using larger files, it’s possible that compaction could take longer as it has a lot more data to merge and sort.
Rocksdb_rate_limiter_bytes_per_sec & Rocksdb_use_direct_io_for_flush_and_compaction
Rocksdb_rate_limiter_bytes_per_sec and rocksdb_use_direct_io_for_flush_and_compaction were both mentioned in my post about persisting data in memory to disk, and I would encourage you to go back and read to about them in that post if you haven’t done so already. I figured they deserved a mention in this post as well considering that they also apply to the compaction output process.
Rocksdb_delete_obsolete_files_period_micros
Once compaction has finished and it’s created the new data files on disk, it can delete the files that it used for compaction input as they have duplicate copies of the data that are contained within the files created by the compaction output. Remember, the whole point of compaction is to keep sequential data with as few copies of the data as possible so to reduce the number of files that need to be accessed during read operations. The problem is that a file that is pending deletion may be in a state where it’s being accessed by another thread at the time that compaction is done with it, and as such it cannot delete the file until it’s no longer being used by other processes , but it must eventually be deleted. The variable rocksdb_delete_obsolete_files_period_micros specifies the time period to delete obsolete files assuming they weren’t already deleted as part of compaction process. Default: 21600000000 (6 hours) I would be inclined to leave this variable in its default state unless I had an environment with heavy writes, long running range reads, and a large data set. With this being the case you may have a number of files that can’t be deleted during compaction and I don’t know if I would want to wait 6 hours to be rid of them. In contrast, if this was a system with known critical long running queries or transactions, I might be inclined to increase this value.
CF_OPTION level0_file_num_compaction_trigger
So now that we know how files are read and written by compaction, it’s good to understand when compaction occurs. This will occur at different times for each compaction layer and is dependent upon the amount of data stored in each layer. Compaction starts at L0 and works it was down to the bottommost compaction layer. The compaction trigger threshold for L0 to L1 is defined by the column family option level0_file_num_compaction_trigger. When the number of files in L0 reaches this number, MyRocks will call a job to start comaction from L0 to L1. You can determine how large the L0 compaction layer will be, in bytes, by multiplying the values of variable write_buffer_size, column family option min_write_buffer_number_to_merge, and column family option level0_file_num_compaction_trigger. Default: 4 I would recommend leaving this variable at its default value. As noted above, compaction from L0 to L1 is a single job, and compaction from L1 to L2 cannot occur while this is ongoing. The larger your L0 compaction layer is, the longer compaction from L0 to L1 will take and the more likely you’ll see interruptions for jobs trying to run compaction from L1 to L2.
CF_OPTION max_bytes_for_level_base
The compaction trigger threshold for L1 to L2 is defined by the column family option max_bytes_for_level_base. When L1 reaches the number of bytes defined by this option, it will trigger a compaction job for L1 to L2, assuming that there is not on ongoing compaction job from L0 to L1. Default: 268435456 (256Mb) The recommendation is to keep L1 the same size as L0. I noted how to calculate the size of L0 in the CF_OPTION level0_file_num_compaction_trigger section. If you change the size of L0, be sure to change this column family option to match.
CF_OPTION max_bytes_for_level_multiplier
The compaction trigger threshold for L2 and greater is defined by the column family option max_bytes_for_level_multiplier. L2 will be X times greater than L1 where X is the value of this variable, L3 will be X times greater than L2, and so on. Default: 10
CF OPTION num_levels
MyRocks will continue to write files lower and lower into compaction layers until it hits the maximum compaction layer, which is defined by this column family option. Keep in mind that compaction layers start at L0, so if this value is 7 then the maximum compaction layer is L6. Default: 7 There is some fairly complex math that you can use to determine how many compaction levels you need to minimize write amplification, but I think it goes outside of the scope of this blog series. If you want to know more about this I would recommend this blog post by Mark Callaghan which provided the details and was then followed up by this blog post which offered a few corrections.
CF OPTION level_compaction_dynamic_level_bytes
In the sections above I’ve described how MyRocks determines the size of each compaction layer. By default the rules will be to use the max_bytes_for_level_base to establish the size of the L1 compaction layer and then make each subsequent compaction layer X times larger than the previous where X is the value of the variable max_bytes_for_level_multiplier. However, there is another way that the size of each compaction layer can be determined and that’s when we shift from the standard definition to the dynamic definition. In the dynamic definition of compaction level sizing, the size of each compaction level is determined by the amount of data in the bottom most compaction layer, as opposed to using the top most compaction layer like we would if we were using the standard definition. The dynamic framework is first defined by using the max_bytes_for_level_base and max_bytes_for_level_multiplier variables, just like standard mode. For example, if we have max_bytes_for_level_base set to 268435456 (256Mb), max_bytes_for_level_multiplier set to 10, and num_levels set to 6, the following would be the maximum target compaction thresholds would be defined as follows. L0: 256Mb (assuming you use default values noted in the level0_file_num_compaction_trigger section above) L1: 256Mb L2: 2.5 Gig L3: 25 Gig L4: 250 Gig L5: 2.44 Tb L6: 24.41 Tb This defines the maximum compaction threshold. However the actual compaction threshold is changing dynamically based on the value of the total size of data in the bottom most compaction layer. Each compaction layer above it would be X/10 times the value of the compaction layer beneath it. To illustrate this, let’s use another example. Let’s use the exact tame variables, but assume there is 256 Gb of data in the L6 compaction layer. Each compaction layer threshold would be as follows. L0: 256Mb (assuming you use default values noted in the level0_file_num_compaction_trigger section above) L1: 2 Mb L2: 26 Mb L3: 262 Mb L4: 2.56Gb L5: 25.6 Gb L6: 256 Gb Assuming that the variables for data file sizes are default, the data file size would be 64Mb when it starts at L0. Given that L1 and L2 do not have a threshold size large enough to accommodate 64Mb, compaction will skip L1 and L2 and compact to L3 directly. The major difference here is that under standard compaction, the data starts at L0, then fills L1, then L2, then L3, and so on until compaction starts to fill L6. With the dynamic method, the opposite is true. Data starts in L0 (which it always does) and then will start to fill L6, then L5 once its threshold exceeds the data file size, then L4 once its threshold exceeds the data file size, and so on. You can think of the standard method like a top-down data fill method where dynamic fills that data a lot like the bottom half of an hourglass - the bottom has to fill to some extent before sand can rest on top of it. Somewhat like the diagram below: 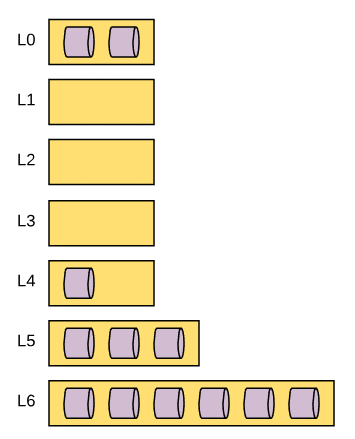
Default: Off I’m going to be covering compression and bloom filters in a later post and I think it would be best to review this section again after reading that post. The reason is that you can configure your column family to take on different characteristics for bloom filters and compression at different levels of compaction. The main point here is that if you are customizing the characteristics of each compaction layer, then you’re going to need to take that into account if you enable this variable. However, if you choose not to implement compression or bloom filtering (not recommended), you may want to consider enabling this variable as it offers greater assurance of a stable LSM-tree structure .
Rocksdb_compaction_sequential_deletes_file_size
Compaction layer size thresholds aren’t the only thing that can trigger compaction. There are two other triggers and the first of the two is an examination of how much sequential data in a data file is marked for deletion. If you have deleted a large batch of rows, you can save yourself a bit of overhead in the read process by removing data files that contain the records to be deleted as well as the data file that contains the delete markers. This process occurs in multiple steps, the first of which is designated by the variable Rocksdb_compaction_sequential_deletes_file_size. Any file larger than the value of this variable will be checked for delete markers. Default: 0 (bytes) The default value disables this feature. Also, per the documentation, you can set this variable to -1 which, per the source code, also disables the feature. With all the rest of the file size variables and column family options set to default, every data file in the data set should be approximately 64Mb. If you change the nature of file sizing, you may want to adjust this accordingly so only some files get checked, depending on your use case. The only reason why I would consider disabling this feature is to reduce write amplification. The more compaction jobs that are triggered, the more write I/O will be experienced.
Rocksdb_compaction_sequential_deletes_window
The next part of the process is to read the data file in search of sequential deletes. There has to be a certain number of sequential deletes and those sequential deletes need to be within a specific range (which is called a window in this case). That range of records is defined by the variable rocksdb_compaction_sequential_deletes_window. Default: 0 (disabled)
Rocksdb_compaction_sequential_deletes
Within the window, the number of sequential delete markers that need to be present in order to trigger a compaction job is defined by the variable Rocksdb_compaction_sequential_deletes. Default: 0 (disabled)
Rocksdb_compaction_sequential_deletes_count_sd
There are two kinds of delete markers that can exist in the MyRocks data file. A delete(), which is the standard marker to delete the record, and a SingleDelete() which deletes the most recent entry for a record so long as the single delete marker and the record itself line up during compaction. The means that old versions of the record may still be available during read processes after the single delete operation is performed. The variable rocksdb_compaction_sequential_deletes_count_sd determines if single delete markers should be counted when scanning for sequential delete markers in data files. Default: OFF
Rocksdb_compact_cf
The last mechanism that can be used to trigger compaction is manual compaction. Using variables in MyRocks, you can manually initiate compaction processes. The first variable being noted is rocksdb_compact_cf. Using this variable you can pass in the name of a column family and MyRocks will do a full compaction of the dataset from L0 all the way to the bottommost compaction layer. During my tests, I have found that this does not block incomi
Rocksdb_force_flush_memtable_and_lzero_now
The other option for performing manual compaction is to call the variable rocksdb_force_flush_memtable_and_lzero_now. A very similar variable, rocksdb_force_flush_memtable_now, was mentioned in my earlier post about persisting in-memory data to disk as a way to flush memtables to L0. This variable work similarly, but adds a step of compacting L0 files to L1 for all column families.
Default: OFF
Much like rocksdb_compact_cf, the value of this variable will return to OFF once it has completed the requested flush and compaction, so it really doesn’t work like a variable but just a way to manually trigger a flush and L0 compaction.
Compaction Stats
There is a group of metrics available specific to compaction that’s available in the information_schema table ROCKSDB_COMPACTION_STATS. This will provide a set of compaction stats for each column family that you have in your data set. Instead of listing them all here, as there are many, I would recommend checking this page in the RocksDB wiki in order to get a better understanding of what is available to you.
Associated Metrics
Here are some of the metrics you should be paying attention to when it comes to compaction:
You can find the following information using system status variables.
- Rocksdb_compact_read_bytes: The number of bytes that have been read by a compaction input process since the last MySQL restart.
- Rocksdb_compact_write_bytes: The number of bytes that have been written by a compaction process since the last MySQL restart.
- Rocksdb_compaction_key_drop_new: The number of times a record was removed by compaction due to a newer version of the record being available since the last MySQL restart.
- Rocksdb_compaction_key_drop_obsolete: The number of times a record was removed by compaction due to the record no longer existing since the last MySQL restart.
- Rocksdb_stall_l0_file_count_limit_slowdowns: The number of times that write slowdowns occurred due to compaction layer L0 being close to full since the last MySQL restart.
- Rocksdb_stall_l0_file_count_limit_stops: The number of times that write stalls occurred due to compaction layer L0 being full since the last MySQL restart.
- Rocksdb_stall_locked_l0_file_count_limit_slowdowns: The number of times that write slowdowns occurred due to compaction layer L0 being close to full at a time when compaction from L0 was already in progress since the last MySQL restart.
- Rocksdb_stall_locked_l0_file_count_limit_stops: The number of times that write stalls occurred due to compaction layer L0 being full at a time when compaction from L0 was already in progress since the last MySQL restart.
In the information_schema.ROCKSDB_CFSTATS table you can find the following information about each column family.
- COMPACTION_PENDING: Shows the current number of pending compaction requests
In the performance_schema, you may find the following setup instrument to be helpful.
- wait/synch/mutex/rocksdb/signal manual compaction: Shows the amount of mutex time wait during the manual initiation of compaction.
In addition to the metrics noted above, I would recommend you take time to review the following tables as they all contain a wealth of compaction related metrics as well as how to link your tables and column families to data files on disk.
- information_schema.ROCKSDB_COMPACTION_STATS
- information_schema.ROCKSDB_DDL
- information_schema.ROCKSDB_INDEX_FILE_MAP
Conclusion
In this post we covered the details regarding compaction, what it is, and why it’s needed. Compaction is a critical part of the MyRocks solution so I would recommend familiarizing yourself with this system as best you can before considering the implementation of MyRocks as part of your data platform.
Stay tuned for my next post where I’m going to cover compression and bloom filters!
In case you missed the previous posts, here they are:
Part 1: Data Writing
Part 2: Data Flushing

