Documentation. All developers want it, but no one wants to build or maintain it. Today, we’ll be looking at automating the documentation process using Sphinx, Cloud Build and Google Cloud Storage.
Step 1: Configuring Your Project
- The first thing we’ll need to do is make sure that your project is in a good state. At a high level, you’ll want to make sure that:
- Your project is pushed to a git repository. We’ll be using Google Source Repositories for this project, but you can use any repository hosting solution supported by Cloud Build. We’ll discuss setting this up later.
- Your project contains Python code compatible with Python >= 3.6.x and Sphinx is installed. You can install Sphinx using
pip install sphinx - Your Python code is commented using the Sphinx docstring format.
Below is a screenshot of the toy project we want to document:
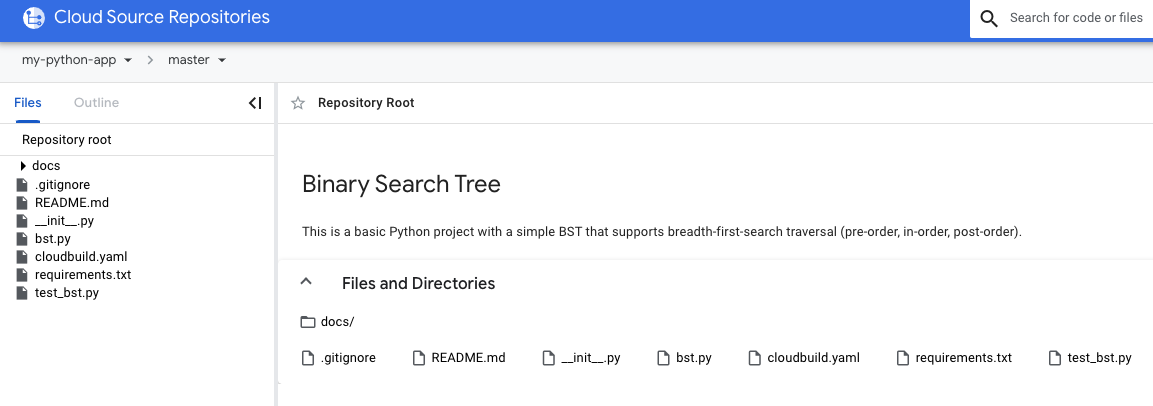
Let’s quickly go over some key files shown above:
- docs
- A directory containing reStructuredText and Sphinx configuration files necessary for automating our documentation build.
- bst.py
- Our code that we wish to generate documentation for. It contains several classes supporting the insertion and traversal of nodes in a Binary Search Tree.
- cloudbuild.yaml
- Our configuration for Cloud Build, which dictates which steps to perform in the build pipeline, as well as other configurable options. More on this later.
- requirements.txt
- A list of Python dependencies to install using pip.
- test_bst.py
- A collection of tests for the insertion and traversal methods included with our Binary Search Tree.
Let’s quickly focus on the docstrings that we need to add to our code; below is a snippet from bst.py:
class Node(object):
    """Basic Node object for use in a Binary Search Tree.

    :param data: The data enveloped by the Node.
    :type data: int
    """
    data: int = None
    l_child: Node = None  #: The left child of the Node. Everything in this sub-tree should be < ``data``.
    r_child: Node = None  #: The right child of the Node. Everything in this sub-tree should be > ``data``.

    def __init__(self, data: int):
        self.data = data

    def __repr__(self) -> str:
        return "data: {}, r_child: {}, l_child: {}".format(self.data, self.r_child, self.l_child)

class BinarySearchTree(object):
    """Basic BST object supporting pre-order, in-order, post-order traversal. This tree assumes that all values added through ``insert_node`` are unique."""

    root: Node = None

    def insert_node(self, data: int) -> None:
        """Inserts a node into the Binary Search Tree

        :param data: The number to insert into the BST.
        :type data: int
        """
        node = Node(data)

        if self.root is None:
            self.root = node
            return

        curr_root = self.root

        while True:
            if node.data < curr_root.data:
                if curr_root.l_child:
                    curr_root = curr_root.l_child
                    continue
                curr_root.l_child = node
                return
            else:
                if curr_root.r_child:
                    curr_root = curr_root.r_child
                    continue
                curr_root.r_child = node
                return
As you can see above, we have docstrings defined for properties, methods and the classes themselves. Ultimately, these docstrings will be used by Sphinx to generate the documentation. If you’re using a different docstring format, you can use a Sphinx extension called Napoleon to use your existing docstrings. Once your project has a level of docstring usage that you’re happy with, we can move on to the next step of configuring Sphinx.
Step 2: Configuring Sphinx to Generate Documentation
Our first step will be to initialize the Sphinx directory structure and config files. Open a terminal, navigate to the root of your project and run the following:
$ mkdir docs && cd docs && sphinx-quickstart
This will create a docs directory in your project. Navigate there and start a wizard where you can provide basic information about your project; this information will show up in your documentation when we generate it later.
Note: when the wizard prompts “Separate source and build directories (y/n)” I recommend you choose “y” as it will make targeting build artifacts easier later.
Following this, you’ll need to configure Sphinx to recursively explore your code base to find docstrings using autodoc; open docs/source/conf.py and look for the following:
# -- Path setup --------------------------------------------------------------

# If extensions (or modules to document with autodoc) are in another directory,
# add these directories to sys.path here. If the directory is relative to the
# documentation root, use os.path.abspath to make it absolute, like shown here.
#
# import os
# import sys
# sys.path.insert(0, os.path.abspath('.'))
We’ll need to uncomment the import statements, as well as the “sys.path.insert” line below them. Since my code is at the same level as the docs folder, this config block looks like this:
# -- Path setup --------------------------------------------------------------

# If extensions (or modules to document with autodoc) are in another directory,
# add these directories to sys.path here. If the directory is relative to the
# documentation root, use os.path.abspath to make it absolute, like shown here.
#
import os
import sys
sys.path.insert(0, os.path.abspath('../..'))
In that same file you’ll also need to enable the autodoc extension; look for an “extensions” variable and ensure it looks like this:
# Add any Sphinx extension module names here, as strings. They can be
# extensions coming with Sphinx (named 'sphinx.ext.*') or your custom
# ones.
extensions = [
'sphinx.ext.autodoc'
]
Finally, let’s add the modules rst file to our documentation’s table of contents. Open docs/source/index.rst and add “modules” under the “:caption: Contents:” line, separated by a newline; your toctree section should look like the following:
Welcome to Binary Search Tree's documentation!
==============================================
This project contains a simple implementation of a Binary Search Tree, but mostly aims to demonstrate how easy it is to automatically build documentation using Sphinx!

.. toctree::
   :maxdepth: 2
   :caption: Contents:

   modules
We officially have everything in place to make some basic documentation happen; navigate to docs/ and run make html. Please note that a warning of “WARNING: html_static_path entry ‘_static’ does not exist” is perfectly normal and the directory structure will be created automatically.
Once this has finished, you should be able to navigate to docs/build/html and open index.html with a web browser; what you see will look roughly like this:
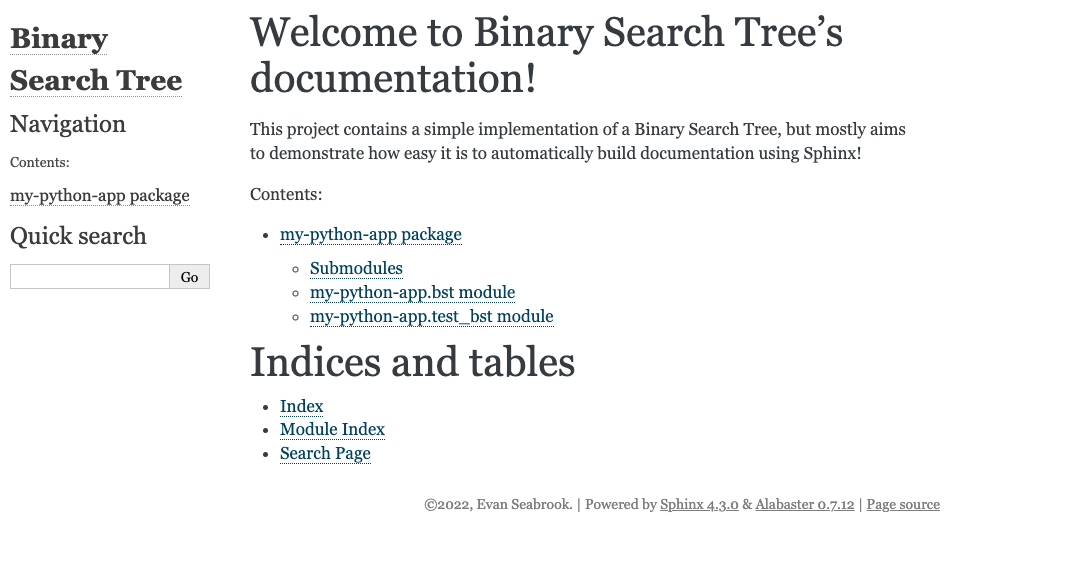
Congrats! You’ve successfully built documentation for your Python app just by adding docstrings to your code. Let’s click on one of our modules and view some of this documentation.
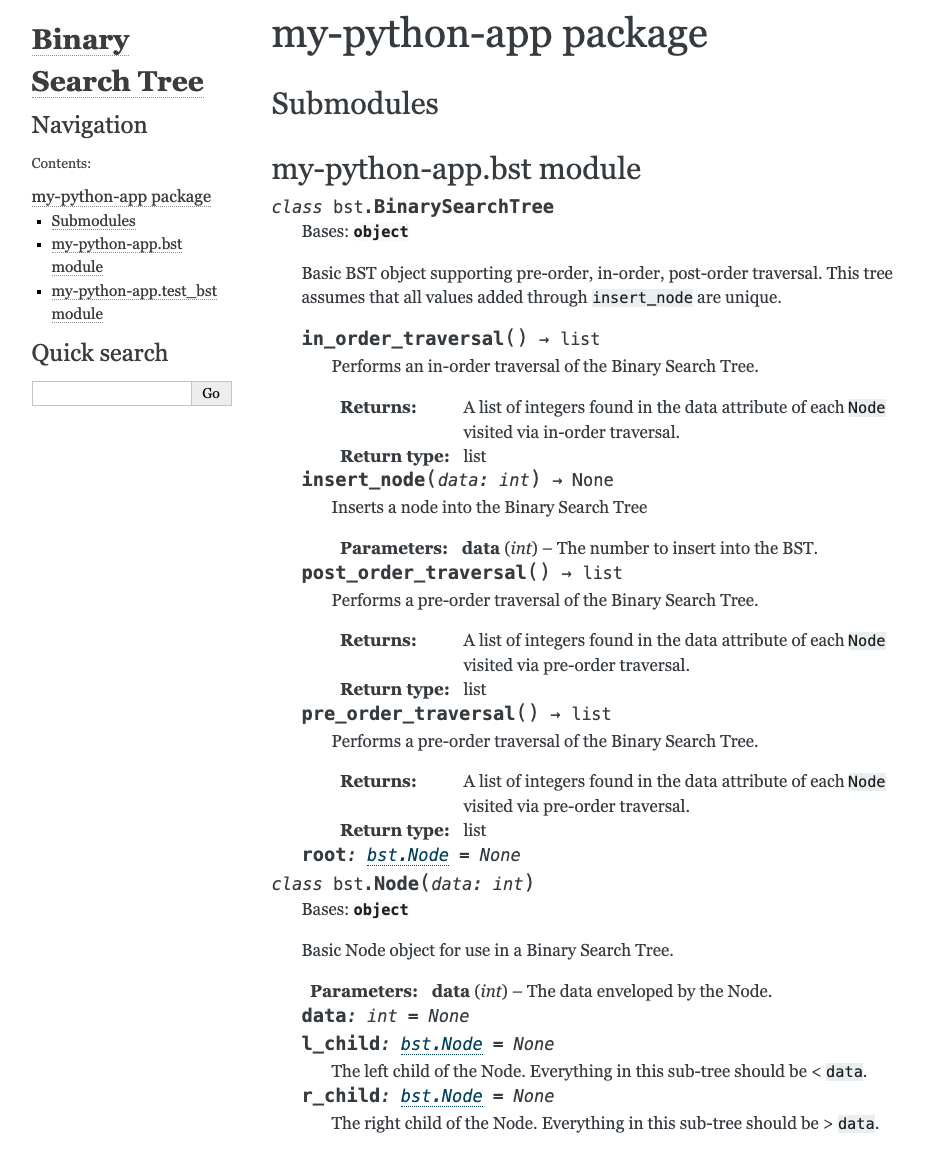
As you can see, there’s a lot of information available to users or contributors to our code. It’s also entirely searchable using the “Quick Search” functionality on the left-hand side. If you find the format to be a bit busy or would like to customize the appearance of your documentation, you can do that, though we won’t be covering that here.
For more information on how to customize Sphinx, view their documentation on templating and HTML theming.
Step 3: Hosting your Documentation in Cloud Storage
Now that we have Sphinx successfully generating documentation, we want to put it somewhere. For our purposes, we’ll be hosting our documentation on Google Cloud Storage, as the output of Sphinx’s make html is just a static website. Head over to Google Cloud’s console and create a project if you don’t yet have one.
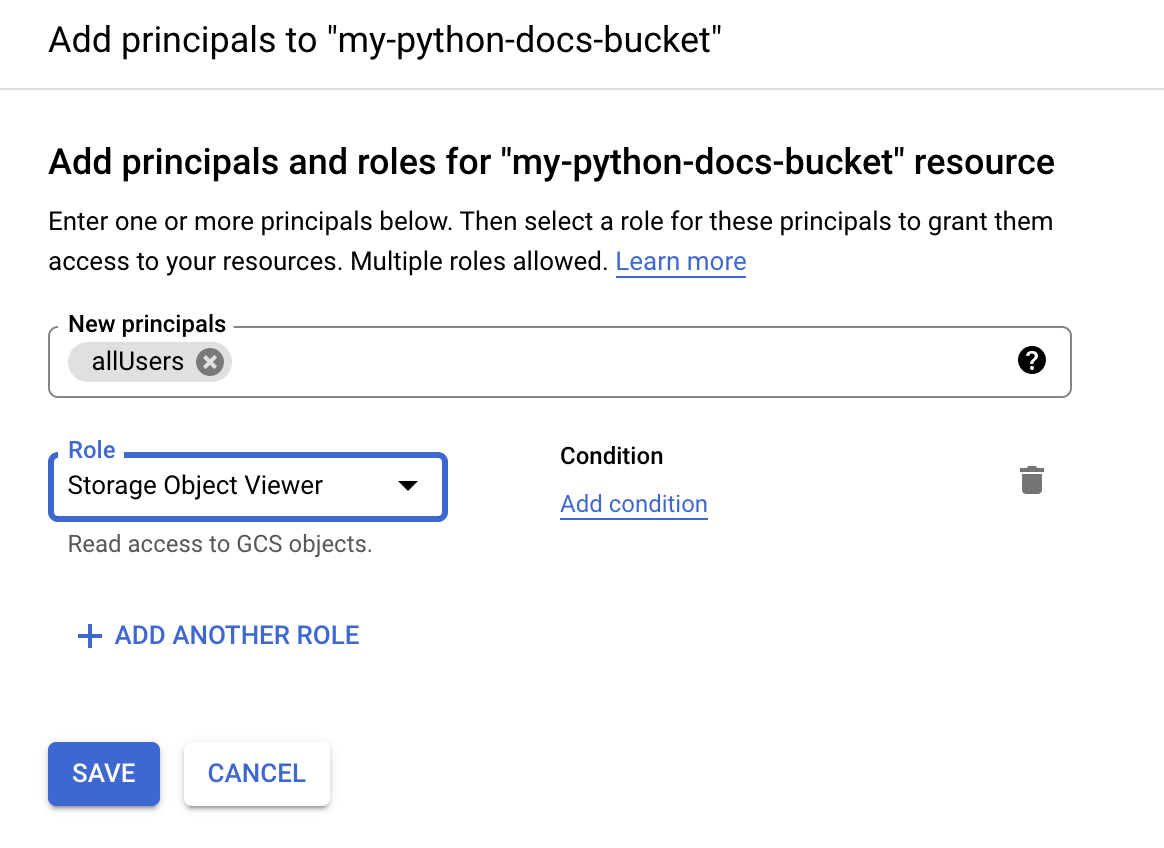
Once you have created and opened a project, navigate to Storage > Cloud Storage > Browser using the navigation menu to the left. From there, click “Create a Bucket” at the top of the screen and give your bucket a unique name; everything else can be left with its default setting. Once your bucket is created, it should automatically open; click on the “permissions” tab and we’ll get access setup.

For our purposes, we’ll be allowing public access to our bucket so that the static pages we’ll be hosting are viewable using a GCS-generated URL. Click on “Add” next to permissions, put “allUsers” as our new principal and “Storage Object Viewer” as the role.
That’s all we need to do for a basic cloud storage setup; note the bucket name and let’s finalize everything with Cloud Build.
Step 4: Configuring Cloud Build
The last stop on our quest for automated documentation is a pretty important one: automation!
Let’s recall the directory structure of our project, which had a cloudbuild.yaml file in the project’s root directory.
steps:
# Install dependencies
- name: python
  entrypoint: pip
  args: ["install", "-r", "requirements.txt", "--user"]

# Run unit tests
- name: python
  entrypoint: python
  args: ["-m", "pytest"]

- name: python
  entrypoint: bash
  args: ["-c", "PATH=\"/builder/home/.local/bin:$$PATH\" && echo $$PATH && cd docs && make html"]

- name: 'gcr.io/google.com/cloudsdktool/cloud-sdk'
  args: ['gsutil', 'rsync', '-r', 'docs/build/html', 'gs://${_DOC_BUCKET}/latest']

substitutions:
  _DOC_BUCKET: ""
The steps here are pretty simple. You can see we install our dependencies (which include Sphinx), followed by running our unit tests. We then run “make html” (just as we did locally), following by deploying the static website to our Google Cloud Storage location.
Once cloudbuild.yaml is set up, push it (and all of your other project files) to your main git branch. Note: exclude the contents of docs/build via a .gitignore file; these files will be generated as part of your build step.
We will now need to create a trigger in Cloud Build to connect to our repository, as well as read the configuration from our YAML file that we just produced. With the Google Cloud console open, navigate to CI/CD > Cloud Build using the navigation bar to the left. Since we are using Google Source Repositories, we can click “Create Trigger” at the top of the page; there’s a separate button for connecting to an external repository right next to it, if necessary.
Go ahead and fill out the form with a name, description, etc. Below is a screenshot outlining some of the more important details:
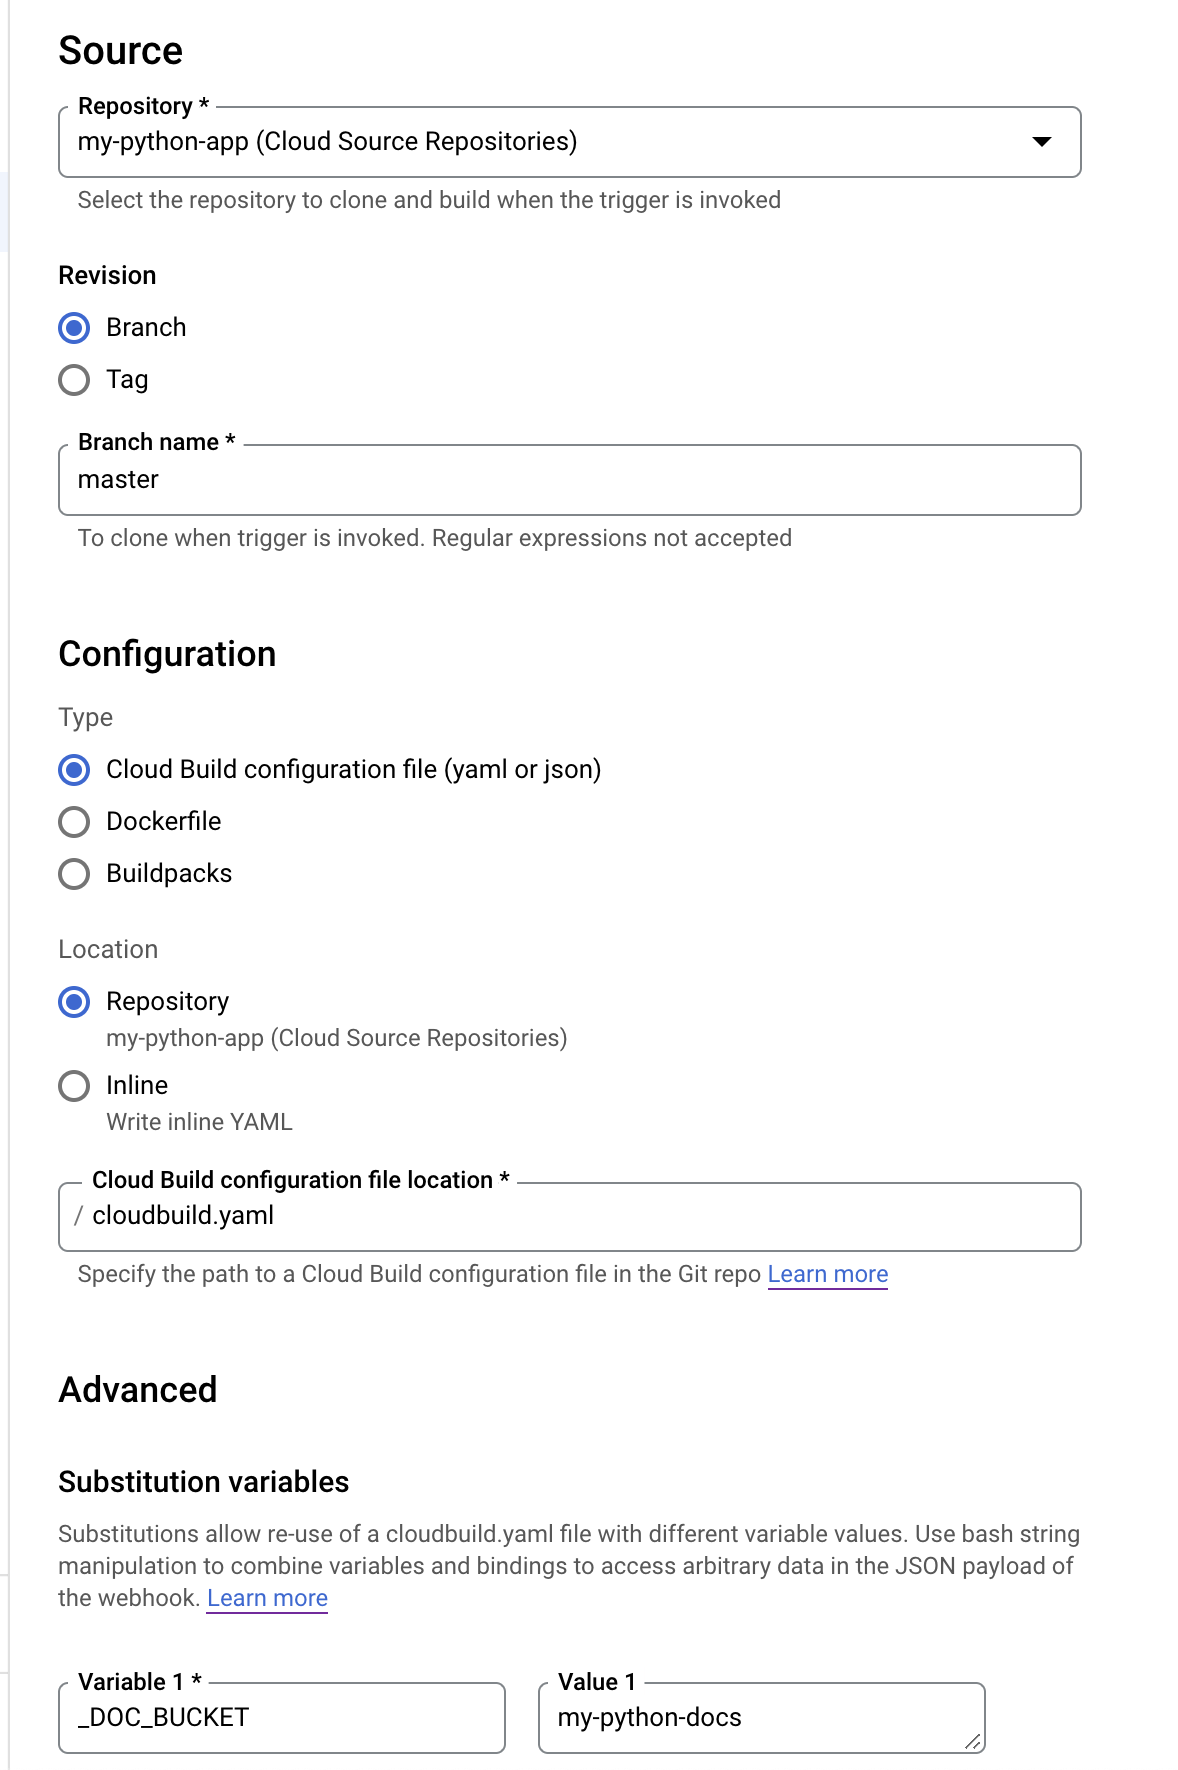
Make sure that the Cloud Build configuration file location is correct; mine is in the root of my project, so the above configuration works. Be sure to add your bucket name (excluding the gs:// scheme) to the substitution variable list (keep the variable named _DOC_BUCKET).
Once your trigger is set up, you can view it in the Triggers section of Cloud Build. From there, click “run” to verify that the pipeline works.
With the pipeline having completed successfully, navigate back to your Cloud Storage bucket. As a result of running the build, you should see a new directory called “latest”. Click on it to find some familiar looking html files.
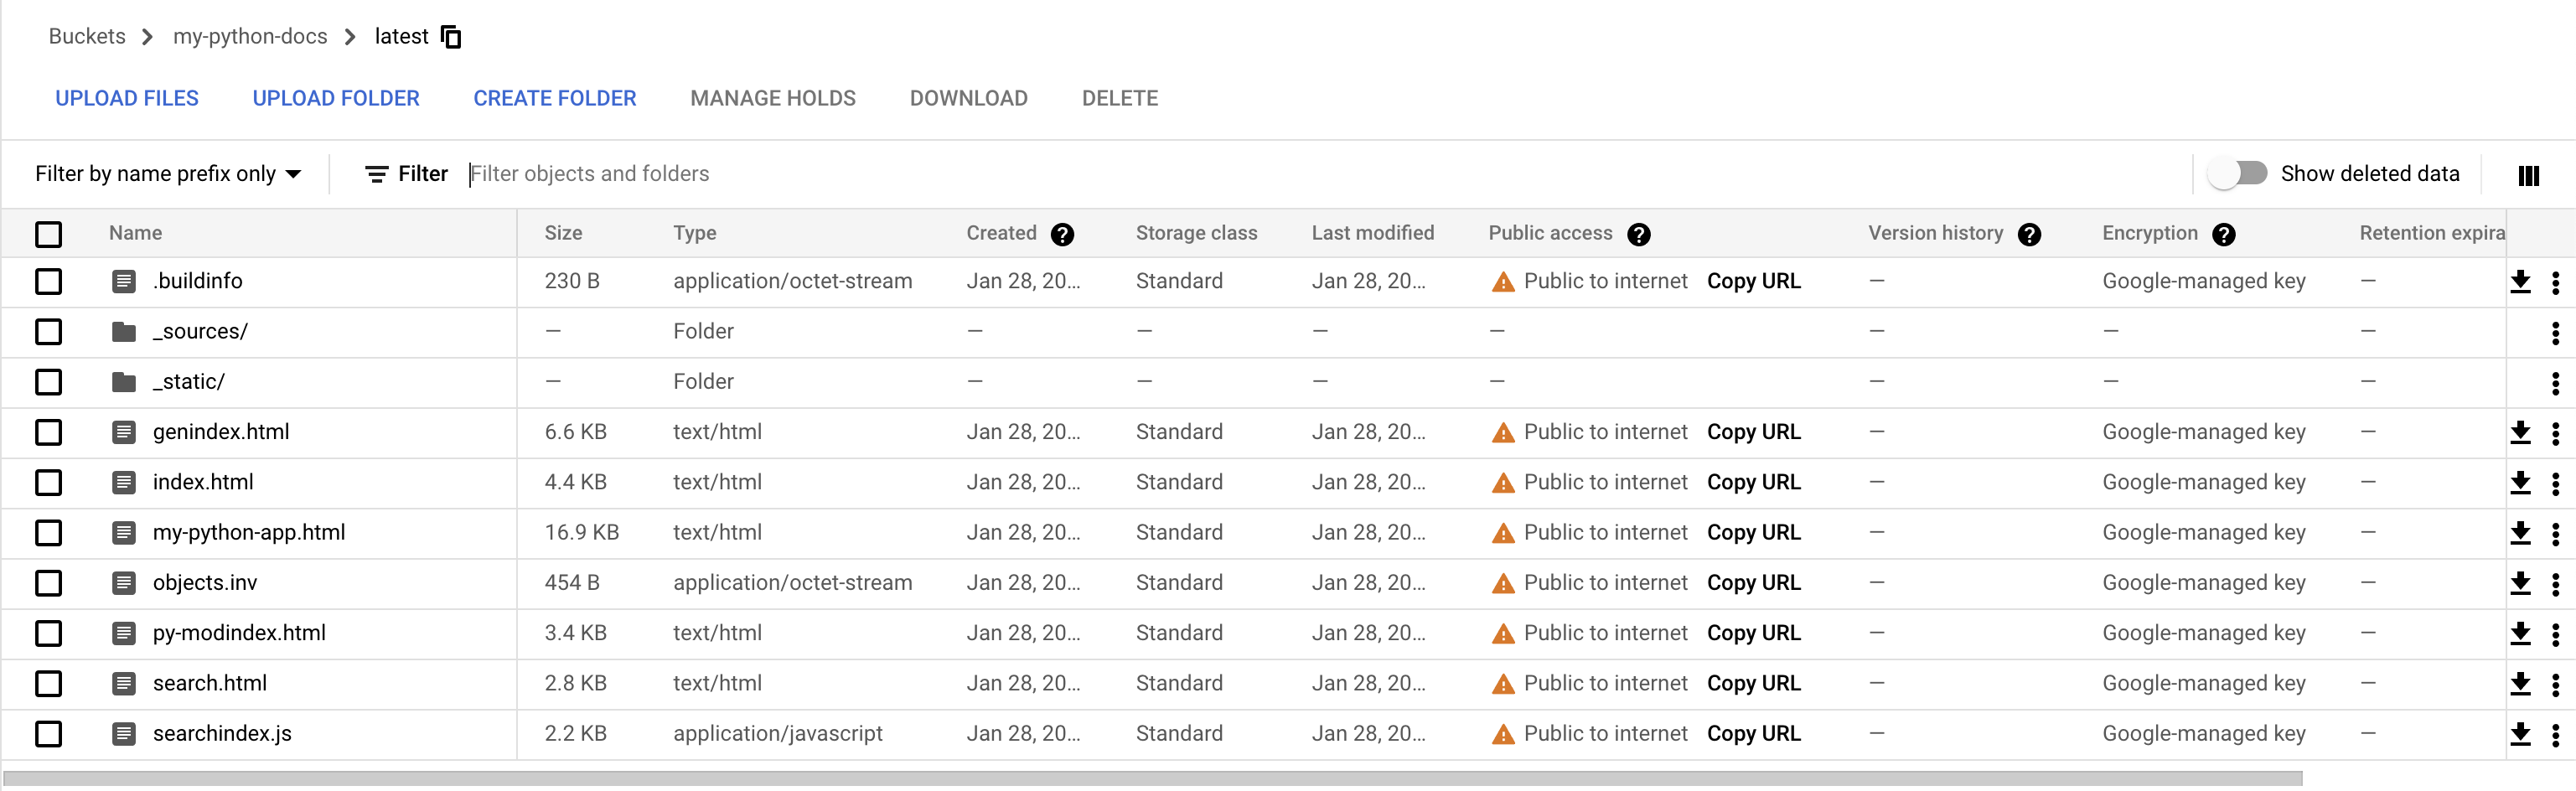
Click “Copy URL” next to index.html and paste it into a new browser tab. You should see the same documentation that you built and viewed locally!
Hopefully, this gives a good overview of how to generate documentation for your Python code and integrate it into your CI/CD pipeline. Let me know if you have any questions in the comments and don’t forget to sign up for the next post.

