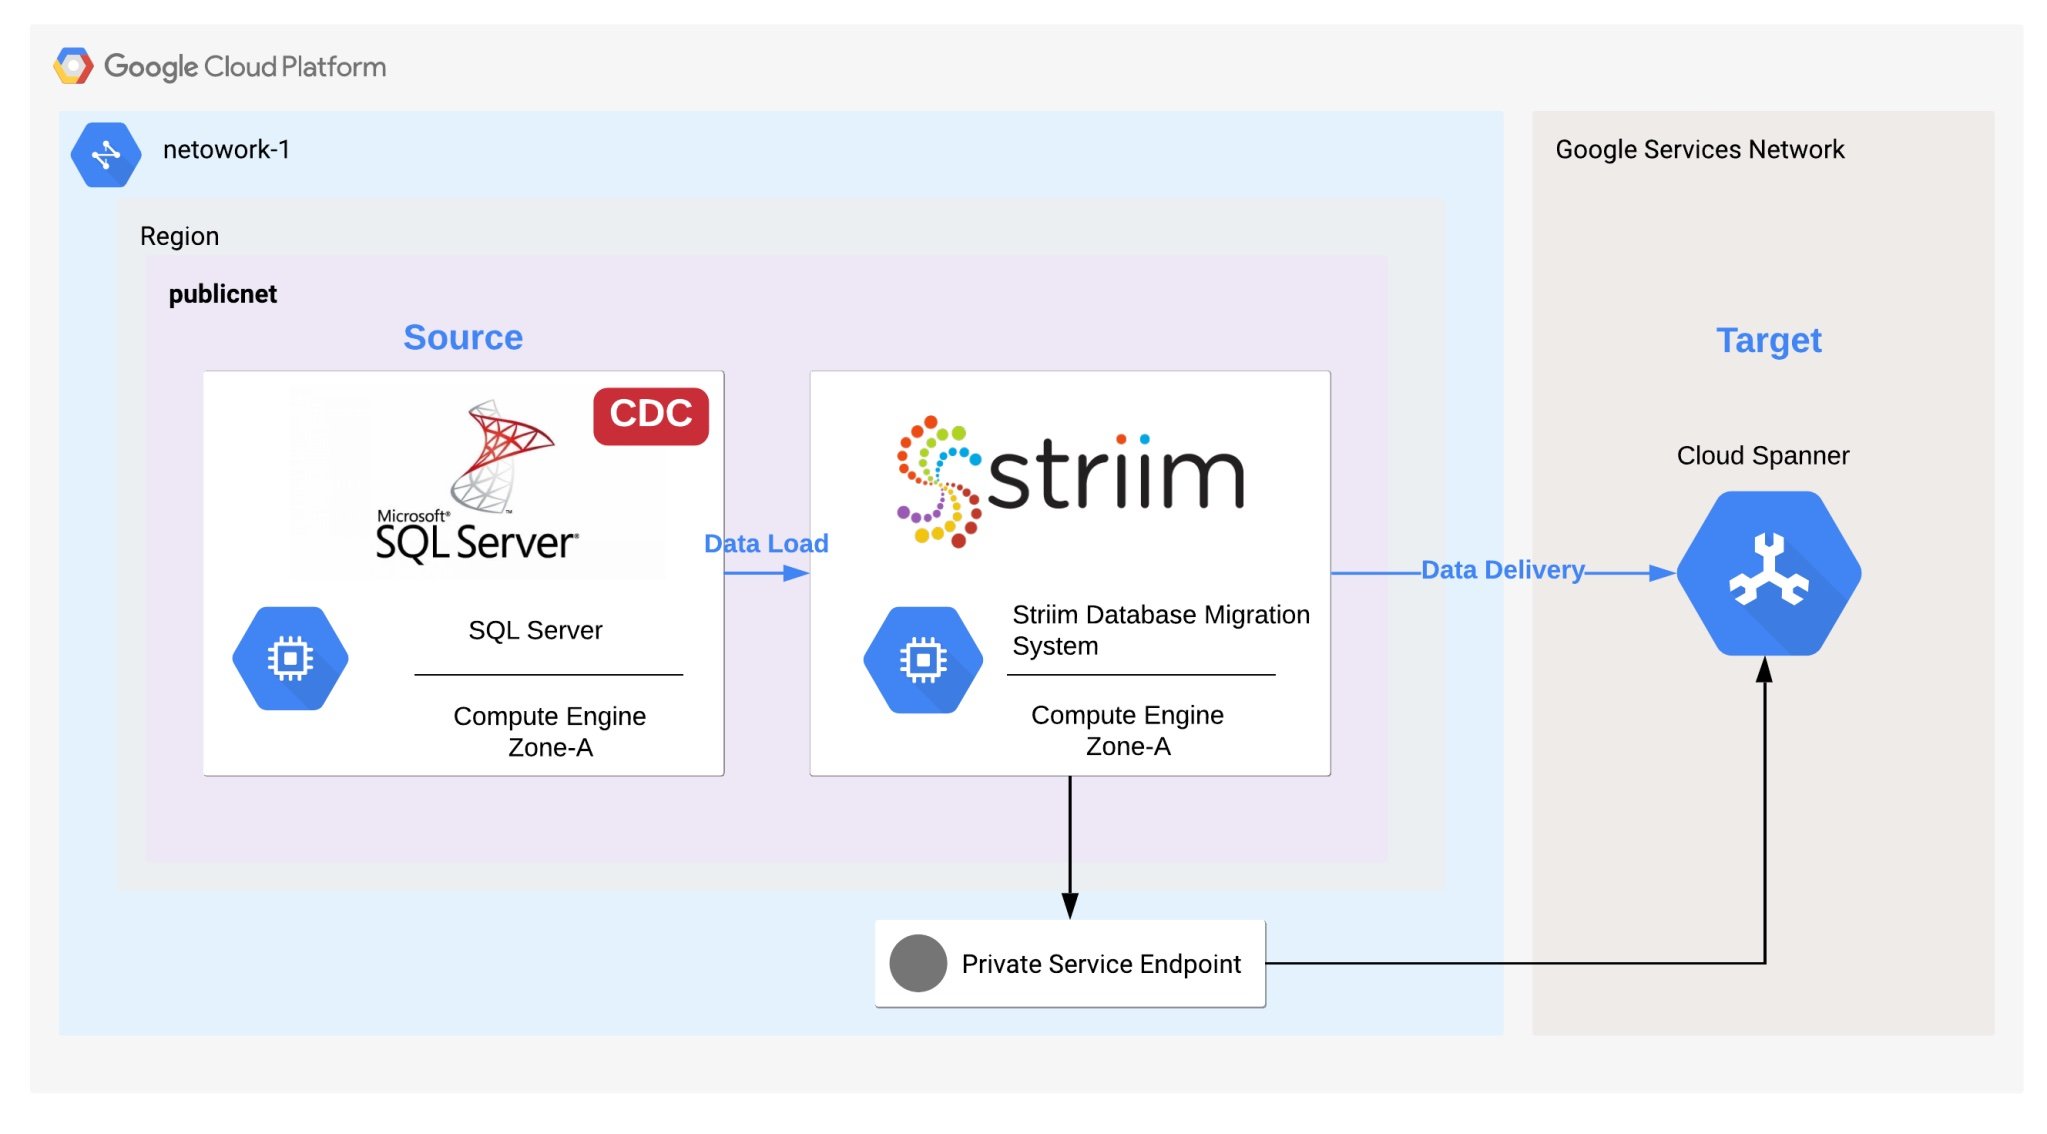
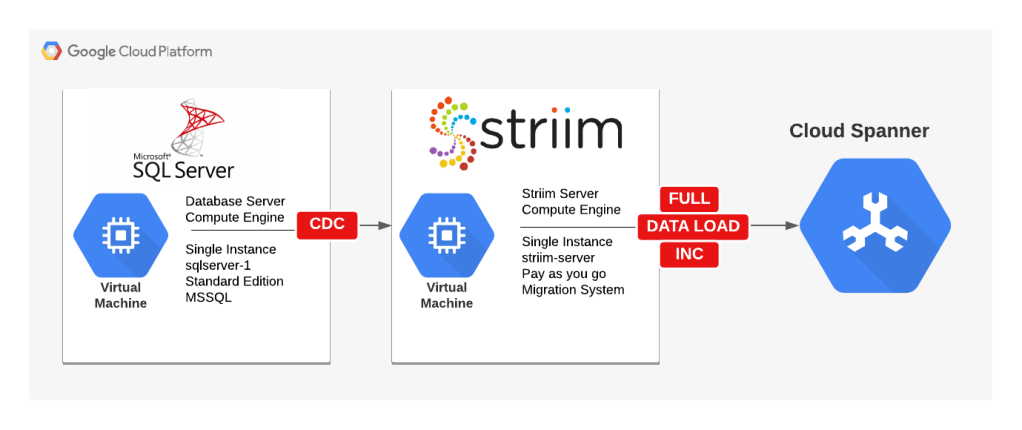
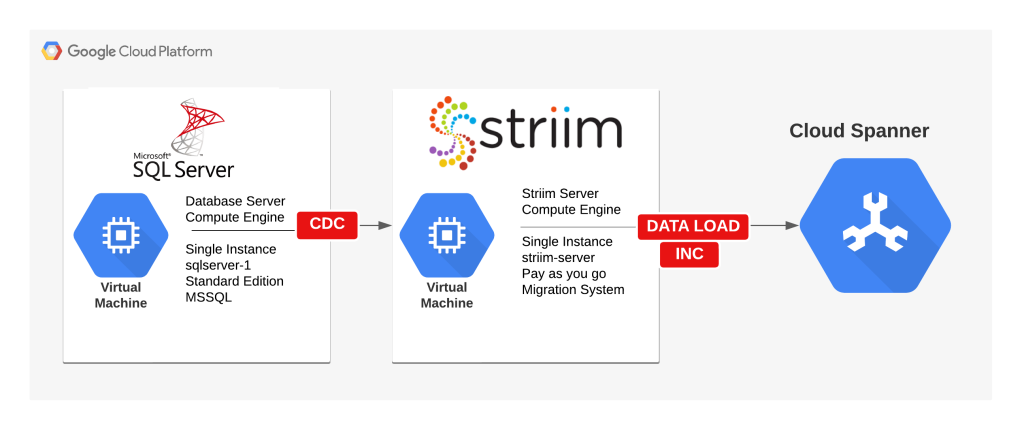
This post will focus on the implementation of a continuous migration from SQL Server to Cloud Spanner using Striim. It includes steps for configuring an initial load and a continuous data replication using change data capture. However, I don’t cover a full-scale database migration or the challenges you might face when considering a heterogeneous database migration.
Set up a Demo SQL Server source database
- Set up a virtual machine with SQL Server Standard Edition pre-installed using the below GCLOUD commands in CloudShell.
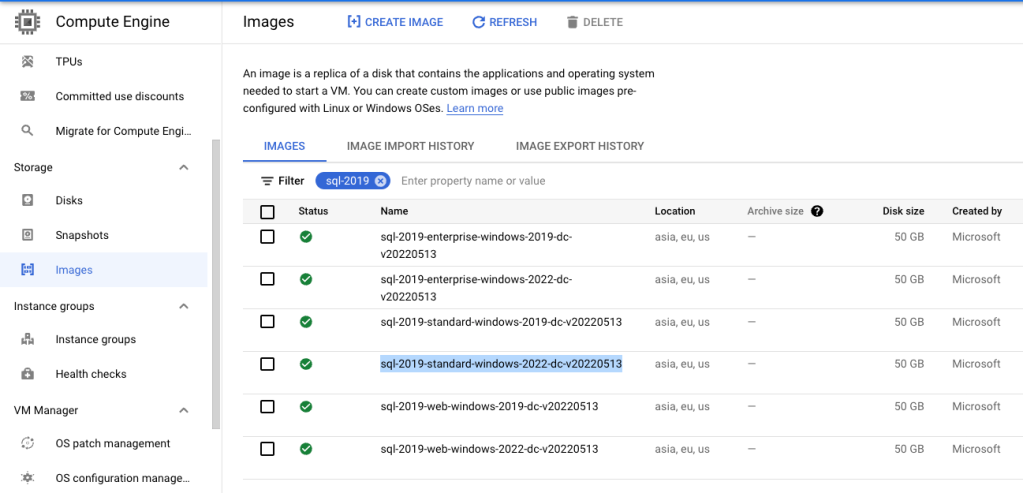
Once you have selected the correct image, replace export IMAGE='sql-2019-standard-windows-2022-dc-v20220513' in below script with the correct image name. You’ll also need to update the Project ID and Public IP of your laptop to allow RDP access to the VM through firewall:
export GCP_PROJECT_ID='xxxxxxxxxxxxxx'
export REGION='us-central1'
export ZONE='us-central1-a'
export NETWORK_NAME='network-1'
export PUBLIC_SUBNET='publicnet'
export PUBLIC_SUBNET_RANGE='10.0.0.0/24'
export MY_IP='<<YOUR PUBLIC IP HERE>>'
export HOST_TAG='mssql'
export HOST_NAME='sqlserver-1'
export IMAGE='sql-2019-standard-windows-2022-dc-v20220513'
gcloud services enable compute.googleapis.com
gcloud compute networks create $NETWORK_NAME \
    --project=$GCP_PROJECT_ID \
    --subnet-mode=custom
gcloud compute networks subnets create $PUBLIC_SUBNET \
    --project=$GCP_PROJECT_ID \
    --range=$PUBLIC_SUBNET_RANGE \
    --network=$NETWORK_NAME \
    --region=$REGION \
    --enable-private-ip-google-access
gcloud compute --project=$GCP_PROJECT_ID firewall-rules create allow-rdp-access \
    --direction=INGRESS \
    --priority=1000 \
    --network=$NETWORK_NAME \
    --action=ALLOW \
    --rules=tcp:3389 \
    --source-ranges=$MY_IP \
    --target-tags=$HOST_TAG
gcloud compute --project=$GCP_PROJECT_ID firewall-rules create allow-mssql-access \
    --direction=INGRESS \
    --priority=1000 \
    --network=$NETWORK_NAME \
    --action=ALLOW \
    --rules=tcp:1433 \
    --source-ranges=$PUBLIC_SUBNET_RANGE \
    --target-tags=$HOST_TAG
gcloud beta compute --project=$GCP_PROJECT_ID instances create $HOST_NAME \
    --zone=$ZONE \
    --machine-type=n2d-standard-2 \
    --subnet=$PUBLIC_SUBNET \
    --network-tier=PREMIUM \
    --maintenance-policy=MIGRATE \
    --tags=$HOST_TAG \
    --image=$IMAGE \
    --image-project=windows-sql-cloud \
    --boot-disk-size=100GB \
    --boot-disk-type=pd-balanced \
    --boot-disk-device-name=$HOST_NAME
2. RDP to the windows server and connect to the SQL Server instance using SSMS. Once connected to the instance, you’ll need to set up a sample database for migration.
3. Create a database named Sample. Under the database, create the following table and add dummy data to the table. This will be our source data:
Create Database [sample]
GO
USE [sample]
GO
EXEC sp_changedbowner 'sa'
GO
CREATE TABLE dbo.Employee (
    EmpID INT IDENTITY(1,1),
    EmpName VARCHAR(50) NOT NULL,
    Designation VARCHAR(50) NULL,
    Department VARCHAR(50) NULL,
    JoiningDate DATETIME NULL,
    CONSTRAINT [PK_Employee] PRIMARY KEY CLUSTERED (EmpID)
)
GO
INSERT INTO dbo.Employee
    (EmpName, Designation, Department, JoiningDate)
VALUES
    ('Sandeep Arora', 'CLOUD ARCHITECT', 'IT', GETDATE()),
    ('Shivam Bhatia', 'SR ACCOUNTANT', 'ACCOUNTS', GETDATE()),
    ('Mujahid Ahmed', 'SR DBA', 'IT', GETDATE()),
    ('Bhupinder Singh', 'SR DBA', 'IT', GETDATE()),
    ('Varun Saluja', 'SR PROGRAMMER', 'IT', GETDATE()),
    ('Rajeev Bhati', 'DIRECTOR', 'IT', GETDATE())
GO
select * from dbo.Employee
GO
4. Create a user that will be used by Striim to authenticate to SQL Server sample database:
USE [master]
GO
CREATE LOGIN [striim] WITH PASSWORD=N'P@ssw0rd', DEFAULT_DATABASE=[master], CHECK_EXPIRATION=OFF, CHECK_POLICY=OFF
GO
USE [sample]
GO
CREATE USER [striim] FOR LOGIN [striim]
GO
USE [sample]
GO
ALTER ROLE [db_owner] ADD MEMBER [striim]
GO
Note: The image that I used comes with windows authentication enabled only for SQL Server. You’ll need to ensure that SQL authentication is enabled and you have to restart the SQL Server instance for changes to take effect.
5. Enable CDC on the [sample] database and [dbo.Employee] table:
USE [sample]
GO
EXEC sys.sp_cdc_enable_db
GO
EXEC sys.sp_cdc_enable_table
       @source_schema = N'dbo',
       @source_name = N'Employee',
       @role_name = NULL,
       @supports_net_changes = 0
GO
Note: I had to update the SQL Server Instance Name to match the hostname before I could successfully run the above command. Use the below SQL code, restart SQL Server instance. Check Microsoft Documentation on renaming SQL Server instance for more details.
EXEC sp_dropserver 'INST-INSTALL-SQ';
GO
EXEC sp_addserver 'SQLSERVER-1', local;
GO
Set up the Striim migration software
You will need to set up an instance of the Striim Server through the Google Cloud Marketplace.
- Ensure that you have selected your GCP Project that has billing enabled. Click Navigation menu > Marketplace. In the search box type Striim and hit Enter. Select from the options listed on the screen. Alternatively, you can use the direct link to navigate to the marketplace. The licensing options are highlighted in red on the screen below. If you need a pay-as-you-go license for Striim use metered option. I’m using the free 7-day free trial as Striim can be very expensive to set up:

Click Launch. You will be presented with configuration options for the Striim server. I am using the below configuration settings. Make sure you place the striim server in network-1 where SQL Server is running:
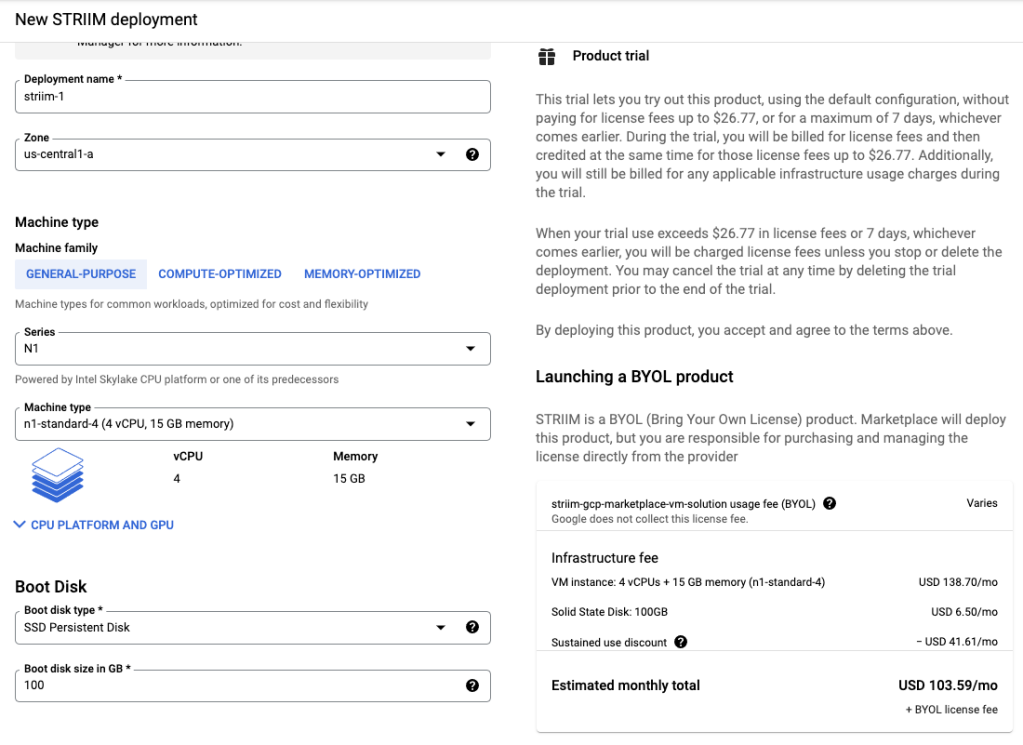
- Check the box for “I accept the GCP Marketplace Terms of Service” and choose whether to authorize information sharing with Striim.
- Leave the other options as-is, then click Deploy.
- You’ll be redirected to the Deployment Manager page, once the solution is provisioned, and the deployment details will show. Take note of the name of the VM and Site Address.
- Click Visit the site. This will open up the Striim configuration wizard in a new browser tab. If there’s a redirect notice, you can safely ignore it and click through the link provided.
- Accept the EULA by clicking Accept Striim EULA and Continue.
- Configure your Striim installation:
| Property | Value |
|---|---|
| First name | Sandeep |
| Last name | Arora |
hello@sandeep-arora.com |
|
| Company Name | Pythian |
| Cluster name | striim-cluster |
| Admin password | P@ssw0rd |
| Sys user password | P@ssw0rd |
| Striim Key Store password | ssw0rd |
Be sure to note the cluster name and the cluster and administrator passwords, as we will be using them later in this lab.
- Click Save and Continue.
- In the next screen will ask for license details. Leave the field empty and click Save and Continue.
- Click Launch and then click the green Log In button.
- Log in using the
adminuser and the administrator password. This will take you to the Striim administrator console (screen shown below), and we are now ready to set up a migration app.
Note: Username is admin and password is Admin Password set at time of installation using console:
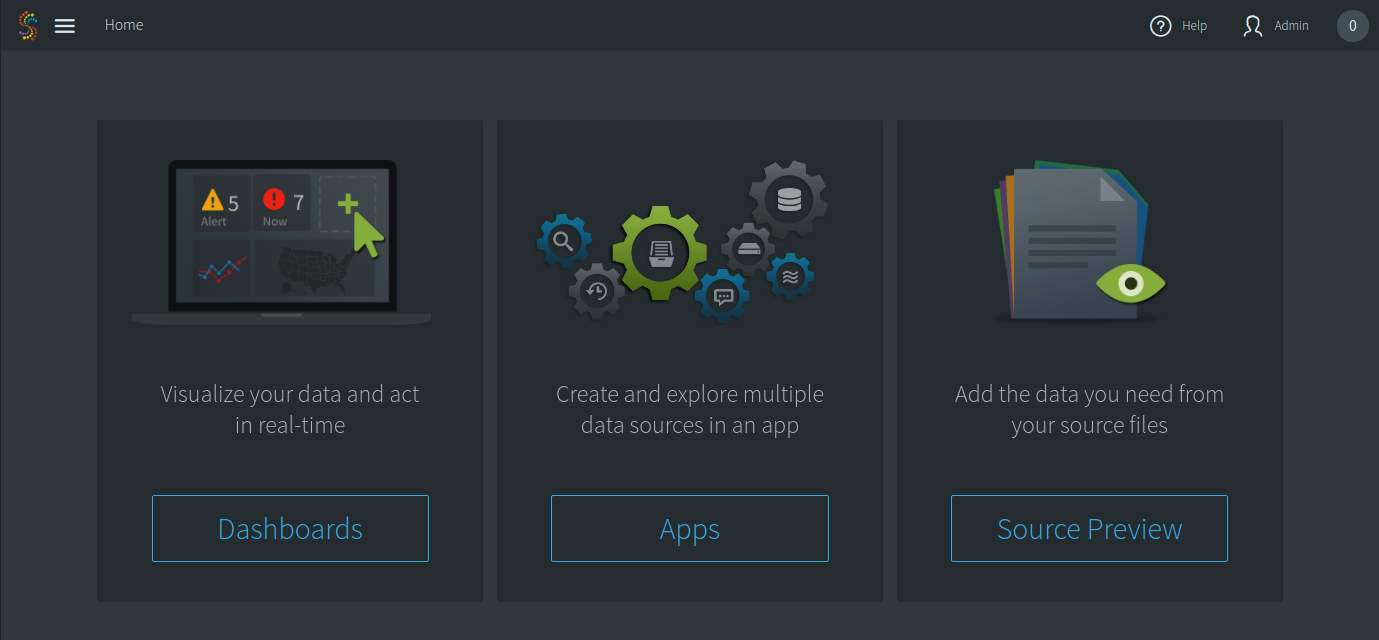 Striim Web UI Console View
Note: The “admin” user is a built-in user that must be used in order for login to succeed. The firewall rule to allow striim to connect to SQL Server on default port 1433 was opened while creating the SQL Server VM instance. SQL Server VM allows port 1433 for any VM in the publicnet subnet.
Set up the connector for SQL Server
You will now follow the Striim online documentation and use the Microsoft JDBC Driver for SQL Server to connect Striim to your SQL Server instance.
Note: For this step you will need to setup a firewall rule to allow SSH access to Striim server:
export TAG='striim-ssh'
export STRIIM_VM_NAME='striim-1-vm'
export STRIIM_VM_ZONE='us-central1-a'
export GCP_PROJECT_ID='xxxxxxxxxxxxxxxxxxxxxxxxxx'
export NETWORK_NAME='network-1'
gcloud compute --project=$GCP_PROJECT_ID firewall-rules create allow-ssh-access \
    --direction=INGRESS \
    --priority=1000 \
    --network=$NETWORK_NAME \
    --action=ALLOW \
    --rules=tcp:22 \
    --source-ranges='0.0.0.0/0' \
    --target-tags=$TAG
gcloud compute instances add-tags $STRIIM_VM_NAME \
    --zone $STRIIM_VM_ZONE \
    --tags $TAG
- Navigate to the virtual machines console and ssh to the Striim virtual machine.
- To read or write or write to Microsoft SQL Server, Azure SQL Database, or Azure SQL Data Warehouse, the Microsoft JDBC Driver for SQL Server must be present in Striim’s Java class path. The JAR file can be downloaded from here.
- Download the driver and copy over the connector to the VM and unpack it. As of creation of this post the latest version for JDFC driver for SQL Server is – Microsoft JDBC Driver 7.2 for SQL Server. Download the file (sqljdbc_7.2.2.0_enu.tar.gz) locally and then scp it to the Striim server.
tar -xvzf sqljdbc_7.2.2.0_enu.tar.gz
- Copy the file to the Striim library path, allow it to be executable, and change ownership of it. I basically downloaded the file locally to my laptop and then uploaded to Cloud Shell and then used gcloud scp to put it in the /tmp directory of the striim server.
cd sqljdbc_7.2/enu/
sudo cp mssql-jdbc-7.2.2.jre8.jar /opt/striim/lib/
sudo chmod +x /opt/striim/lib/mssql-jdbc-7.2.2.jre8.jar
sudo chown striim /opt/striim/lib/mssql-jdbc-7.2.2.jre8.jar
- We now need to restart the Striim server to recognize the new library. We can do this in the same SSH session.
sudo systemctl stop striim-node
sudo systemctl stop striim-dbms
sudo systemctl start striim-dbms
sudo systemctl start striim-node
5. Open the /opt/striim/conf/startUp.properties in your favorite file editor. Use elevated permissions to edit and save.
6. Add\Update MEM_MAX=12288m (12 GB Memory was allocated for Striim out of 15 GB RAM available on the instance). Adjust the memory according to RAM available on the server. Check official documentation on adjusting memory for more details. Save and Exit the editor
7. Restart Striim server:
sudo systemctl stop striim-node
sudo systemctl stop striim-dbms
sudo systemctl start striim-dbms
sudo systemctl start striim-node
Create a Cloud Spanner access key
Striim requires an access key so that it can connect to Cloud Spanner. Here are the required steps you need to do:
- Create a service account for Striim to use to connect to Cloud Spanner. Run the below command in the Cloud Shell:
gcloud iam service-accounts create striim-sa --display-name striim-sa
export sa_striim_spanner=$(gcloud iam service-accounts list --filter="displayName:striim-sa" --format='value(email)')
export PROJECT=$(gcloud info --format='value(config.project)')
gcloud projects add-iam-policy-binding $PROJECT --role roles/spanner.databaseUser --member serviceAccount:$sa_striim_spanner
gcloud iam service-accounts keys create ~/striim-sa.json --iam-account $sa_striim_spanner
This will create a key called striim-sa.json in your home path.
- Now, we need to move the key you just created to the Striim VM. Identify the name of the virtual machine in which Striim is deployed.
- Copy the JSON file to the Striim server with the following command. This might cause an SSH key to be generated (in this case you have to provide a passphrase). Confirm when promoted to continue with Y and leave the passphrase field empty:
export STRIIM_VM_NAME='striim-1-vm'
export STRIIM_VM_ZONE='us-central1-a'
gcloud compute scp striim-sa.json $STRIIM_VM_NAME:/tmp --zone=$STRIIM_VM_ZONE
Important: There might be a workgroup error displayed in the console – you can safely ignore that. check /tmp directory on the Striim server and the key should be copied over to the directory.
- Now, move back to the SSH console for the Striim VM and move the JSON file on the Striim VM that you copied in the last step to the user home directory to the /opt/striim directory
sudo cp /tmp/striim-sa.json /opt/striim
sudo chown striim /opt/striim/striim-sa.json
You are now ready to create a Striim application for migration of data from SQL Server to Spanner.
Create a Destination Spanner Database
Now we’ll need a destination schema where we’ll migrate the data to Spanner. The SQL Server and Spanner DDL statements are almost alike, but you’ll have to pay attention to the data types. For example:
- INT translates to INT64 ()
- VARCHAR translates to STRING
- DATETIME translates to TIMESTAMP
You’ll have to do a schema conversion before you can implement an equivalent schema in the Spanner database. Execute the below code in CloudShell:
export INSTANCE_NAME='spanner-demo'
export DATABASE_NAME='sample'
export CONFIG='regional-us-central1'
gcloud services enable spanner.googleapis.com
gcloud beta spanner instances create $INSTANCE_NAME \
--config=$CONFIG \
--description=$INSTANCE_NAME --processing-units=100
gcloud beta spanner databases create $DATABASE_NAME \
--instance=$INSTANCE_NAME \
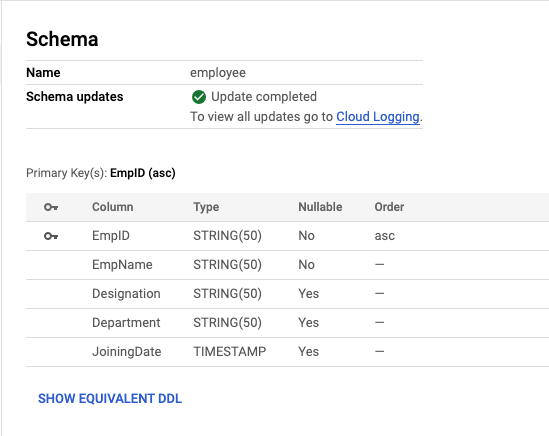
--ddl='CREATE TABLE employee (EmpID STRING(50) NOT NULL, EmpName STRING(50) NOT NULL, Designation STRING(50), Department STRING(50), JoiningDate TIMESTAMP) PRIMARY KEY (EmpID)'
Note: Using integer values for the primary key will be anti-pattern if the values increases monotonically. The EmpID column in SQL Server is the identity column, so we’ll be loading that as String in Spanner to avoid hotspots. Check Schema design best practices for Spanner to learn more.
You’ll have the database and table successfully created and you can verify the schema upon creation under the Spanner Console. INSTANCE > DATABASE > TABLE:
Also, checkout the striim data conversion utility for converting schemas of large sets of tables. Also, view datatype support and mapping from SQL Server to Spanner before proceeding with an actual migration project. (Reminder: this enablement post doesn’t discuss full-scale database migrations and their challenges.)
Migration Strategy
The migration will involve three major steps:
- Load full data (Initial Load of Data) from SQL Server to Spanner.
- Switch to ongoing data replication between SQL Server and Spanner using CDC.
- Cutover and switch application to Spanner.
Each step is discussed in detail in the following sections of the post.
Step 1 : Create an Online Migration App for Initial Database Load from SQL Server to Cloud Spanner
Copy the below TQL code and paste it in your favorite code editor on a local PC. Modify the code by replacing:
1. [SQL SERVER DNS NAME OR IP ADDRESS] – Your SQL Server Source Instance IP Address or DNS Name.
2. [YOUR PASSWORD GOES HERE] – The password for [striim] user that was created in SQL Server. Striim encrypts the password so what I recommend importing this app into Striim GUI and then supplying the password in the GUI. In our case, the [striim] user password for SQL Server authentication is set to – P@ssw0rd. The encrypted format for P@ssw0rd on my Striim server was hdkwLUFVEcsguRY5ADBxjw==
You can use the same password as in the code to import the app (otherwise the import will fail) and then update the password in GUI and test the connection. Striim should automatically encrypt the password when supplied in GUI and you save the app:
CREATE APPLICATION initial_database_load USE EXCEPTIONSTORE TTL : '7d' ;


CREATE FLOW employee_tbl;


CREATE SOURCE sqlserver_employee_tbl USING DatabaseReader  (
Query: 'SELECT cast(EmpID as varchar(50)) as EmpID, EmpName, Designation, Department, JoiningDate FROM dbo.Employee',
  FetchSize: 100,
  Username: 'striim',
  ConnectionURL: 'jdbc:sqlserver://[SQL SERVER DNS NAME OR IP ADDRESS]:1433;DatabaseName=sample',
  QuiesceOnILCompletion: false,
  Password_encrypted: 'true',
  DatabaseProviderType: 'SQLServer',
  Tables: 'dbo.Employee',
  Password: 'hdkwLUFVEcsguRY5ADBxjw==' )
OUTPUT TO sqlserver_employee_tbl_initial_load_stream  ;


CREATE TARGET spanner_employee_tbl USING Global.SpannerWriter  (
Tables: 'dbo.Employee,sample.employee',
  CheckpointTable: 'CHKPOINT',
  BatchPolicy: 'EventCount: 1000, Interval: 60s',
  ParallelThreads: '2',
  ServiceAccountKey: '/opt/striim/striim-sa.json',
  InstanceID: 'spanner-demo' )
INPUT FROM sqlserver_employee_tbl_initial_load_stream  ;


END FLOW employee_tbl;


END APPLICATION initial_database_load;
3. Once the file is updated locally after replacing placeholders, save it as initial_database_load.tql. Next step will be to import the app into Striim. Follow below steps to import the app.
Steps for importing the app into Striim
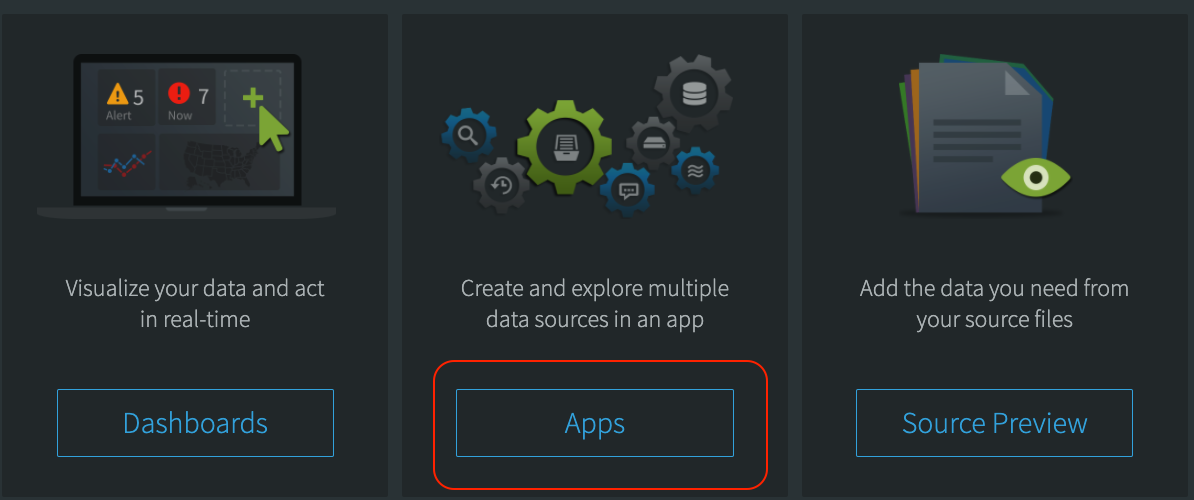
- Navigate to Apps Section in the UI:
- Click on Add App button on the top right-hand corner:

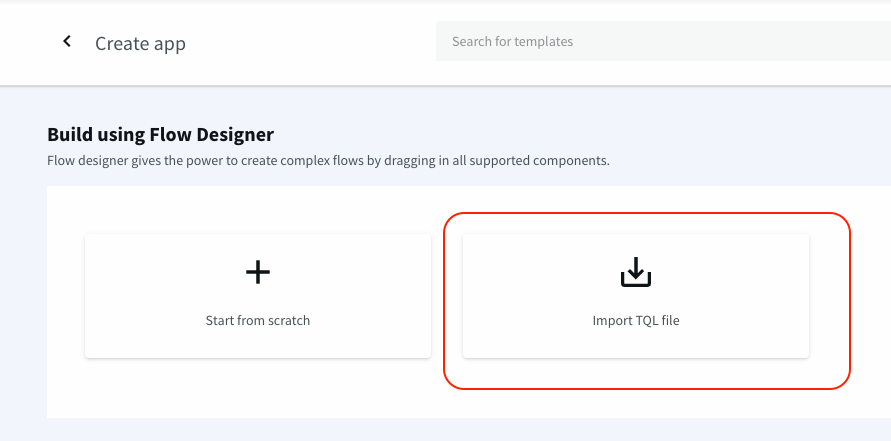
- Then, use the import TQL file button to import an existing Striim app written in TQL format above:
- Add the App to default namespace or you can add your own namespace by typing to add new namespace. Add a namespace migration for this setup:
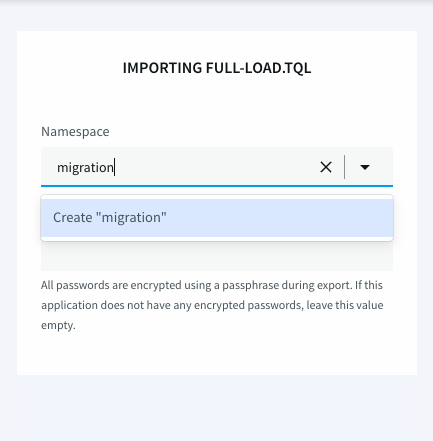
- Leave the passphrase section empty.
- At bottom right click on the IMPORT button and this should successfully import the App into Striim.
Capture SQL Server Current LSN Number
Log into SQL Server and get the current LSN details. We’ll need that while switching from initial load to change capture mode.
SELECT sys.fn_cdc_get_max_lsn() AS max_lsn;
Run the Striim App
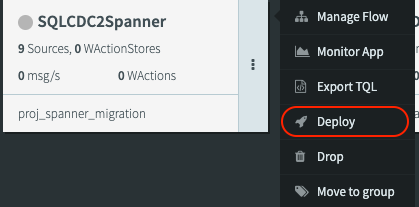
- To run a Striim app you’ll need to first Deploy the app. Right click on the three dots on the side of the app and then click on the deploy button. Use the default deployment group to deploy all flows in the app. Each flow represents a migration job for each table:
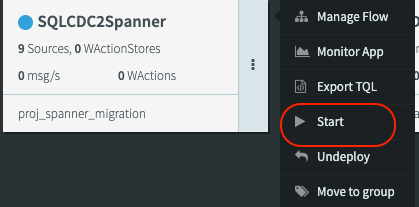
- Once the App is deployed by click on the 3 dots you should be able to Start the app
- To monitor the progress of the app click on the Monitor App button.
- You can deploy and execute multiple apps at the same time using the same process.
- No Changes can be made to the App while it is deployed. You will need to Undeploy the App first. To Undeploy the App click on the 3 dots presented on the right hand side of the app and click on Undeploy button.
- Click on Manage Flow to open the App in the Editor mode.
- To Arrange the App in a separate group for manageability and grouping all apps click on the Move to group button.
Verify initial load on Spanner
You can stop the app once all data transfer is completed and undeploy the initial_database_load app. The below image shows a successful initial load. The app doesn’t give a completion status and continues to run even after data transfer is complete. However, it the app will show now messages being transferred after the initial load is complete.
You can run a select count(*) statement on SQL Server source and Spanner destination to know when the load is complete. Keep in mind that if the source still had data being written to it, the count won’t match and you can use the max function on a column something like timestamp on source and map it to Spanner table max value of the timestamp. If it matches, the initial load is complete:
The next steps will be to setup ongoing data replication using CDC.
Step 2 : Create an Online Migration App for Continuous Data Replication from SQL Server to Cloud Spanner using CDC
- Create an sql_cdc_to_spanner.tql file locally using below script. Make sure to update the ConnectionURL: [SQL Server Source] and InstanceID: [Spanner Destination] in the TQL script file to point to the correct SQL Server instance:
CREATE APPLICATION sql_cdc_to_spanner;
CREATE FLOW Employee_CDC;
CREATE OR REPLACE SOURCE SQLCDC_Employee USING MSSqlReader (
TransactionSupport: false,
FetchTransactionMetadata: false,
Compression: false,
connectionRetryPolicy: 'timeOut=30, retryInterval=30, maxRetries=3',
Password_encrypted: 'true',
ConnectionURL: 'jdbc:sqlserver://[SQL SERVER DNS NAME OR IP ADDRESS]:1433;DatabaseName=Sample',
Password: 'hdkwLUFVEcsguRY5ADBxjw==',
Username: 'striim',
Fetchsize: 0,
adapterName: 'MSSqlReader',
DatabaseName: 'Sample',
ConnectionPoolSize: 10,
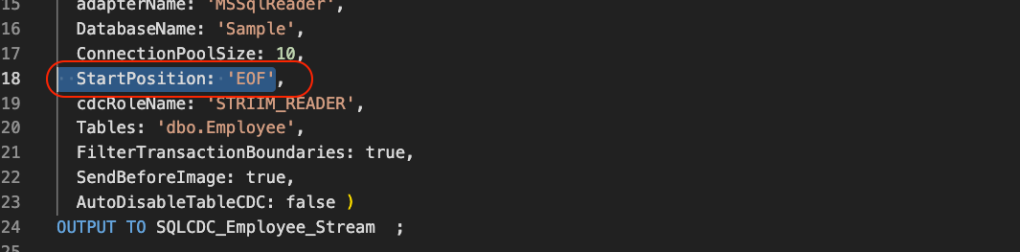
StartPosition: 'EOF',
cdcRoleName: 'STRIIM_READER',
Tables: 'dbo.Employee',
FilterTransactionBoundaries: true,
SendBeforeImage: true,
AutoDisableTableCDC: false )
OUTPUT TO SQLCDC_Employee_Stream ;
CREATE OR REPLACE TARGET Spanner_Employee USING Global.SpannerWriter (
CheckpointTable: 'CHKPOINT',
BatchPolicy: 'EventCount: 1000, Interval: 60s',
IgnorableExceptionCode: '6',
adapterName: 'SpannerWriter',
Tables: 'dbo.Employee,sample.employee ColumnMap(EmpID=EmpID,EmpName=EmpName,Designation=Designation,Department=Department,JoiningDate=JoiningDate)',
ServiceAccountKey: '/opt/striim/striim-sa.json',
InstanceID: 'spanner-demo' )
INPUT FROM SQLCDC_Employee_Stream;
END FLOW Employee_CDC;
END APPLICATION sql_cdc_to_spanner;
2. Import the sql_cdc_to_spanner app to Striim under migration namespace using same steps used for initial load. See Steps to import the App into Striim above for more details.
3. Use the following settings for the CDC reader in the sql_cdc_to_spanner App:
- SQL Server (MSSQL Reader): set Start Position to the LSN you recorded before performing the initial load.
- Use Manage Flow on the imported App to include the Start Position.
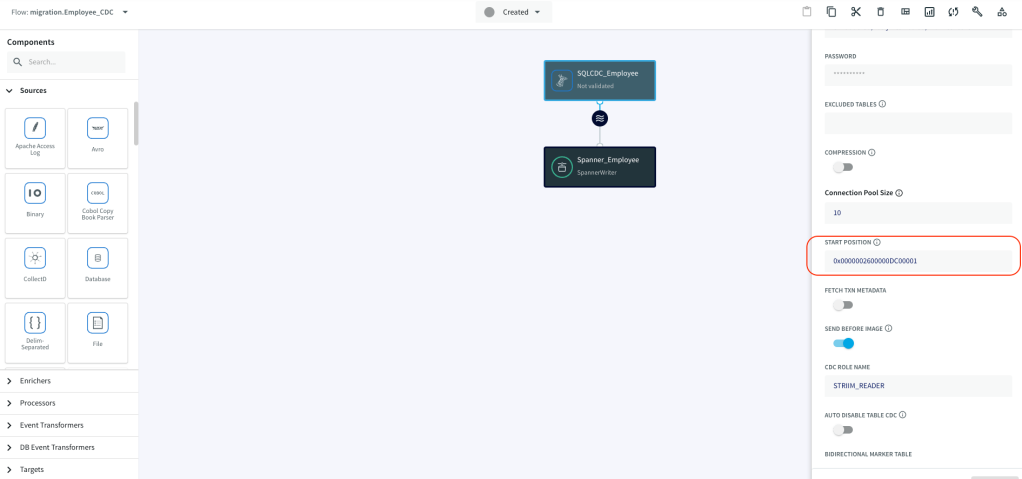
- Alternatively, before importing the TQL you can use the Find and Replace feature of the code editor to set the StartPosition and then import the TQL. This is LSN you recorded before performing the initial load. Replace EOF with LSN:
- For the Spanner Writer’s you will need to set the Ignorable Exception Code property and any duplicates to spanner from SQL Server will be ignored because of Primary key constraint. The code is already set in the TQL script. No new action required.
- Spanner: 6, SQL Error [6]: ALREADY_EXISTS (6 is the error code for primary key constraint violation)
Verify Data Replication to Spanner using CDC
- Insert new rows in the SQL Server employee table:
USE [sample]
GO
INSERT INTO dbo.Employee
    (EmpName, Designation, Department, JoiningDate)
VALUES
    ('John Schulz', 'CLOUD ARCHITECT', 'IT', GETDATE()),
    ('Sofia Carpentar', 'SR ACCOUNTANT', 'ACCOUNTS', GETDATE())
GO
select * from dbo.Employee
GO
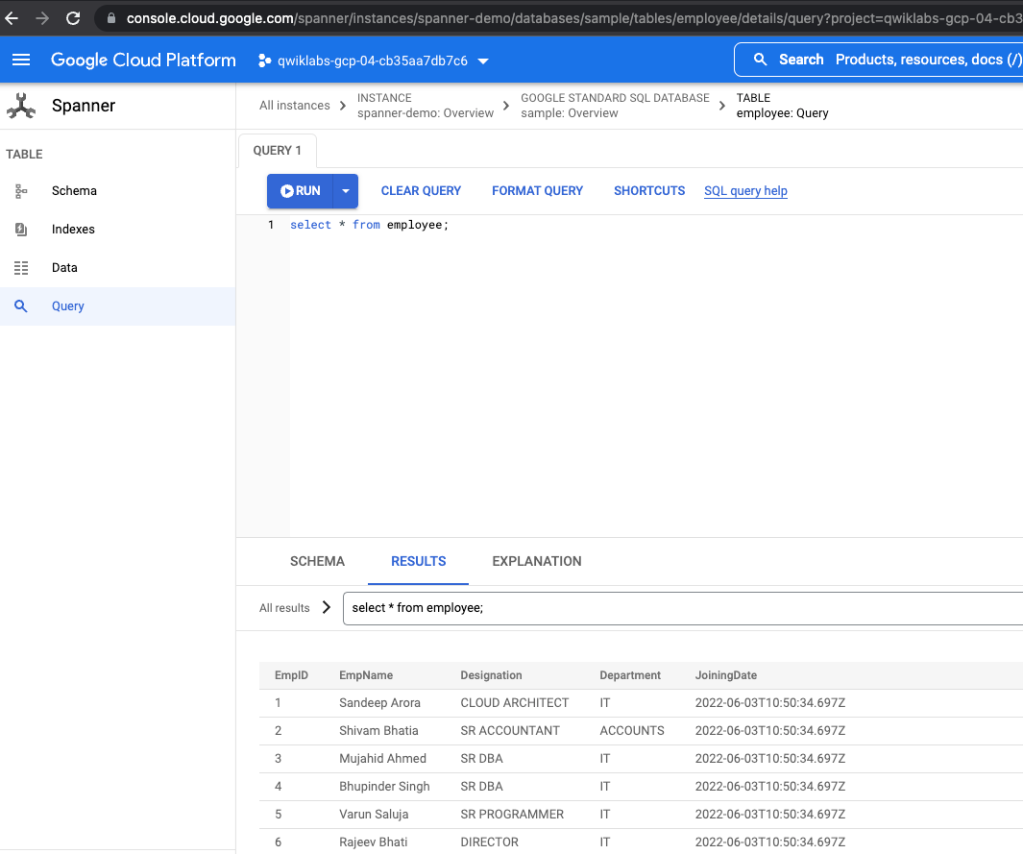
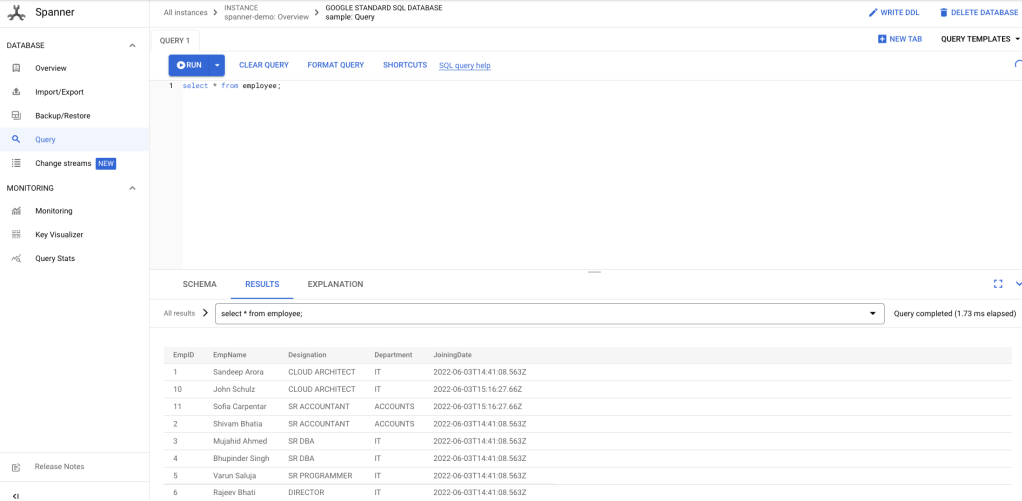
2. Verify that new transactions have been replicated over to spanner successfully. The below image shows that now data replication is working as expected:
Step 3 : Database Cutover
- Stop the client application. We don’t have an application running in the demo but in case if this was a real life application then you would need to stop that application
- Verify no more records are pending replication to Spanner by performing a count on all tables.
- Stop the sql_cdc_to_spanner App and undeploy.
- Switch application to now read and write from spanner database
Note: Application integration with Spanner database is outside the scope of this post.
Summary
This is a high level demonstration of how to perform an online data migration from SQL Server Spanner using CDC. As highlighted before there are many challenges with a complex migration like this one. Some of the challenges include,
- How to handle data Type conversions and transformations for unsupported data types?
- We have only discussed migrating one table. How can you create one app with separate workflows for multiple tables?
- How to do load tests and measure post migration performance?
- How do you roll back from Spanner to SQL Server?
- What about application integration and cutover?
If you’re embarking on a similar migration journey, talk to Pythian. We’re happy to provide guidance and expertise to carry out complex migrations not just from SQL Server to Spanner, but from and to any data source.
I hope you found this post helpful. Feel free to add your thoughts in the comments and don’t forget to sign up for the next post.
Want to talk with an expert? Schedule a call with our team to get the conversation started.