Three or four months ago Oracle released a new 12.3 version of the Oracle GoldenGate (OGG) software. The release did not only include a number of new features related to support of data types and some new features but, even more importantly, it got a completely new branch of software supporting a new internal OGG architecture. Now we have "Classic" and "Microservices" architectures for the GoldenGate for Oracle databases. In this blog I want to share some initial experience setting up and working with the new OGG architecture.
As the Microservices architecture uses a different binary distribution, it is a good idea to read the documentation and make a decision before the actual implementation. You will find a comprehensive list of recommendations to help you decidewhich architecture to choose in the documentation for OGG 12.3. In general, it is recommended to use the Microservices architecture when you have a complex environment with multiple topologies and want a proper user management and role separation to manage the replication. The new architecture provides access through secure web access or you can embed it into your application using REST API and HTML5.
What is different in the new architecture apart from the access and interface? You still have the extract, trail files and replicat which are essentially the same behind the scenes as in the classic architecture but the Manager process is replaced by "Service Manager" service with web access to deployment and processes and "Administration Server" where you can configure your users, replicat, and extracts. Also instead of classic "Data Pump" and "Collector" you are getting "Distribution" and "Receiving" servers responsible for trail records movement between different hosts or deployments. And in the new Microservices architecture, the Performance Metric Server (PMSRVR) is enabled by default and you have a web interface to its metrics and reports. For a better understanding of the new architecture design, you may have a look at the picture in the Oracle documentation with all components outlining the processes.
Let's go through a setup process for a simple replication and see how it works.
The installation is simple and doesn't take too much time. In first, you have to go to the oracle OGG download page and pick up the proper OGG release. Again, please be aware that you have two different Oracle GoldenGate 12.3.0.1 for Oracle where one is for classic architecture and the second is for Microservices. So far we are limited having it only on Linux 86x64 platform and for Oracle database. After getting and unpacking the software you run the standard Oracle installer.
 [oracle@bigdatalite distr]$ unzip 123010_fbo_ggs_Linux_x64_services_shiphome.zip

 [oracle@bigdatalite distr]$ cd fbo_ggs_Linux_x64_services_shiphome/Disk1/
 [oracle@bigdatalite Disk1]$ ./runInstaller
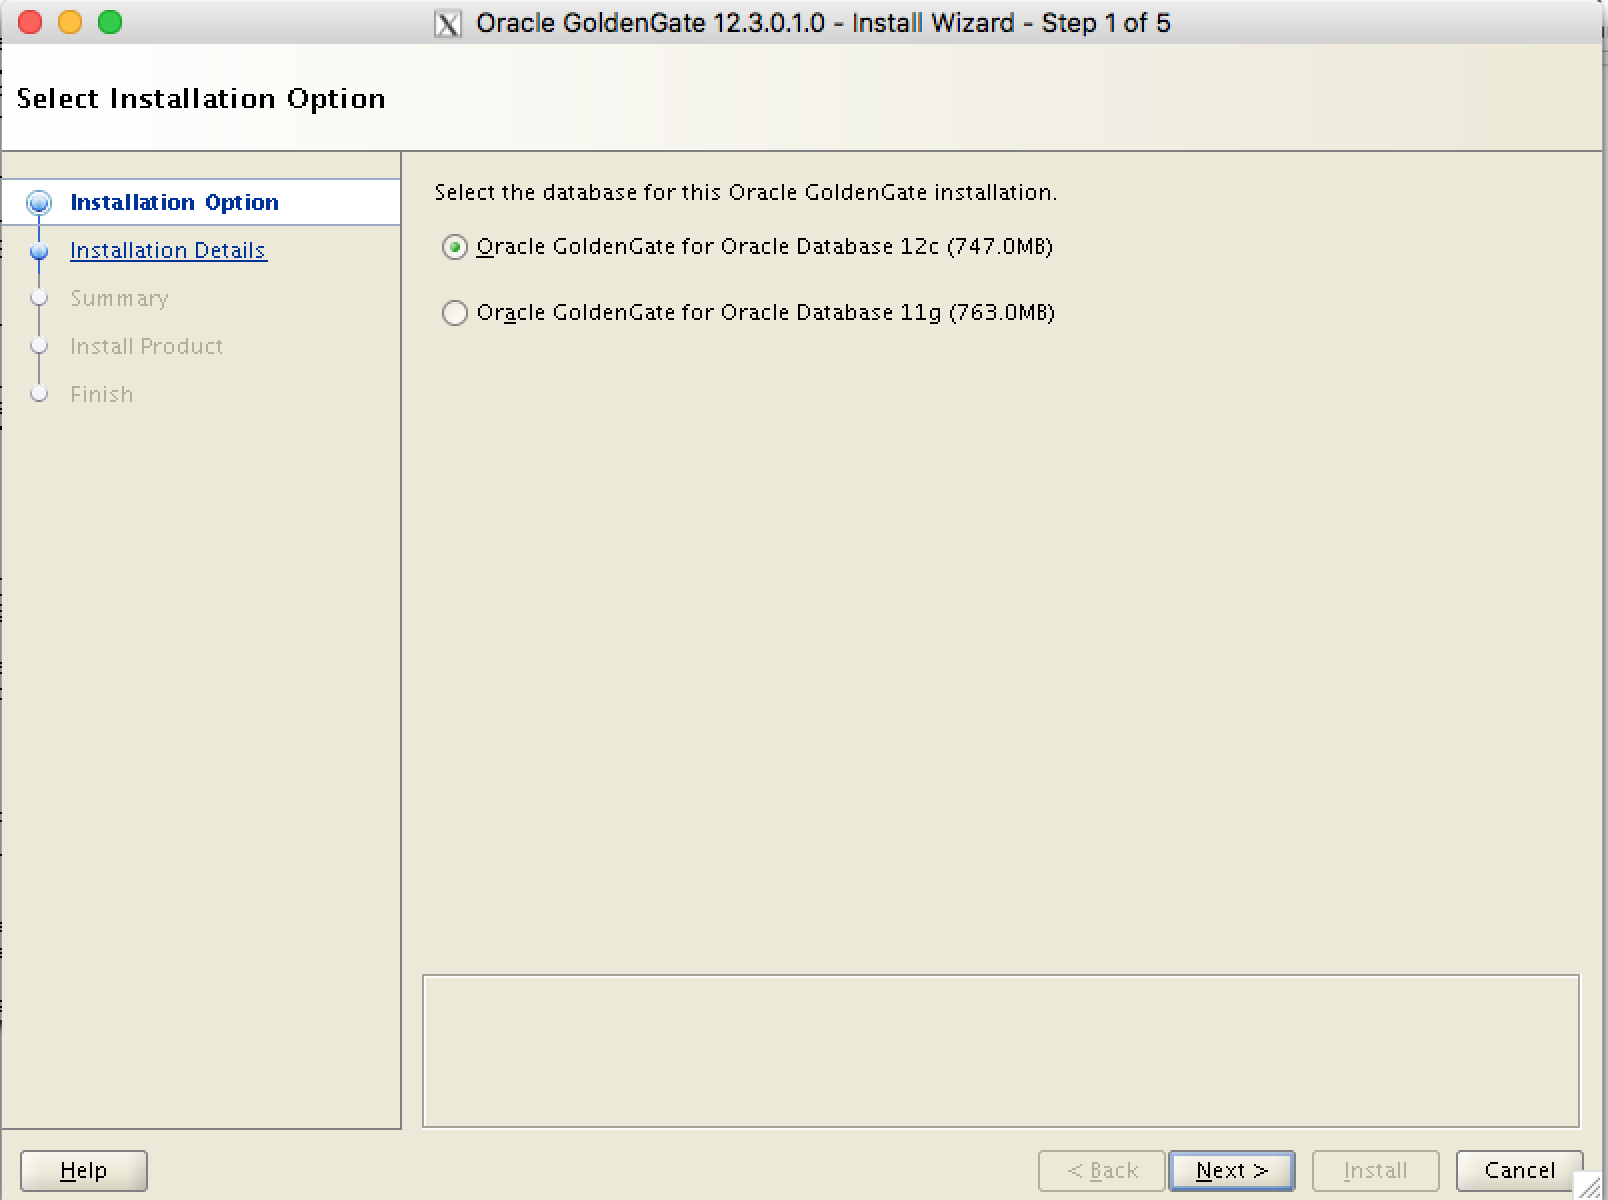 We need only provide the version of your database choosing between 11g and 12c and a location for binaries. After that, we have the installed binaries in the chosen directory. But before using the GoldenGate we have to run an initial configuration.
To prepare configuration for Service Manager and to manage deployments you run the $OGG_HOME/bin/oggca.sh script where $OGG_HOME is the directory you have chosen during installation. You will need to define another directory as a home for your Service Manager deployment and port to access it. By default, Oracle suggests the 9001 port. Also, you have options to register it as a system daemon and integrate with XAG which can be useful in case of RAC implementation. 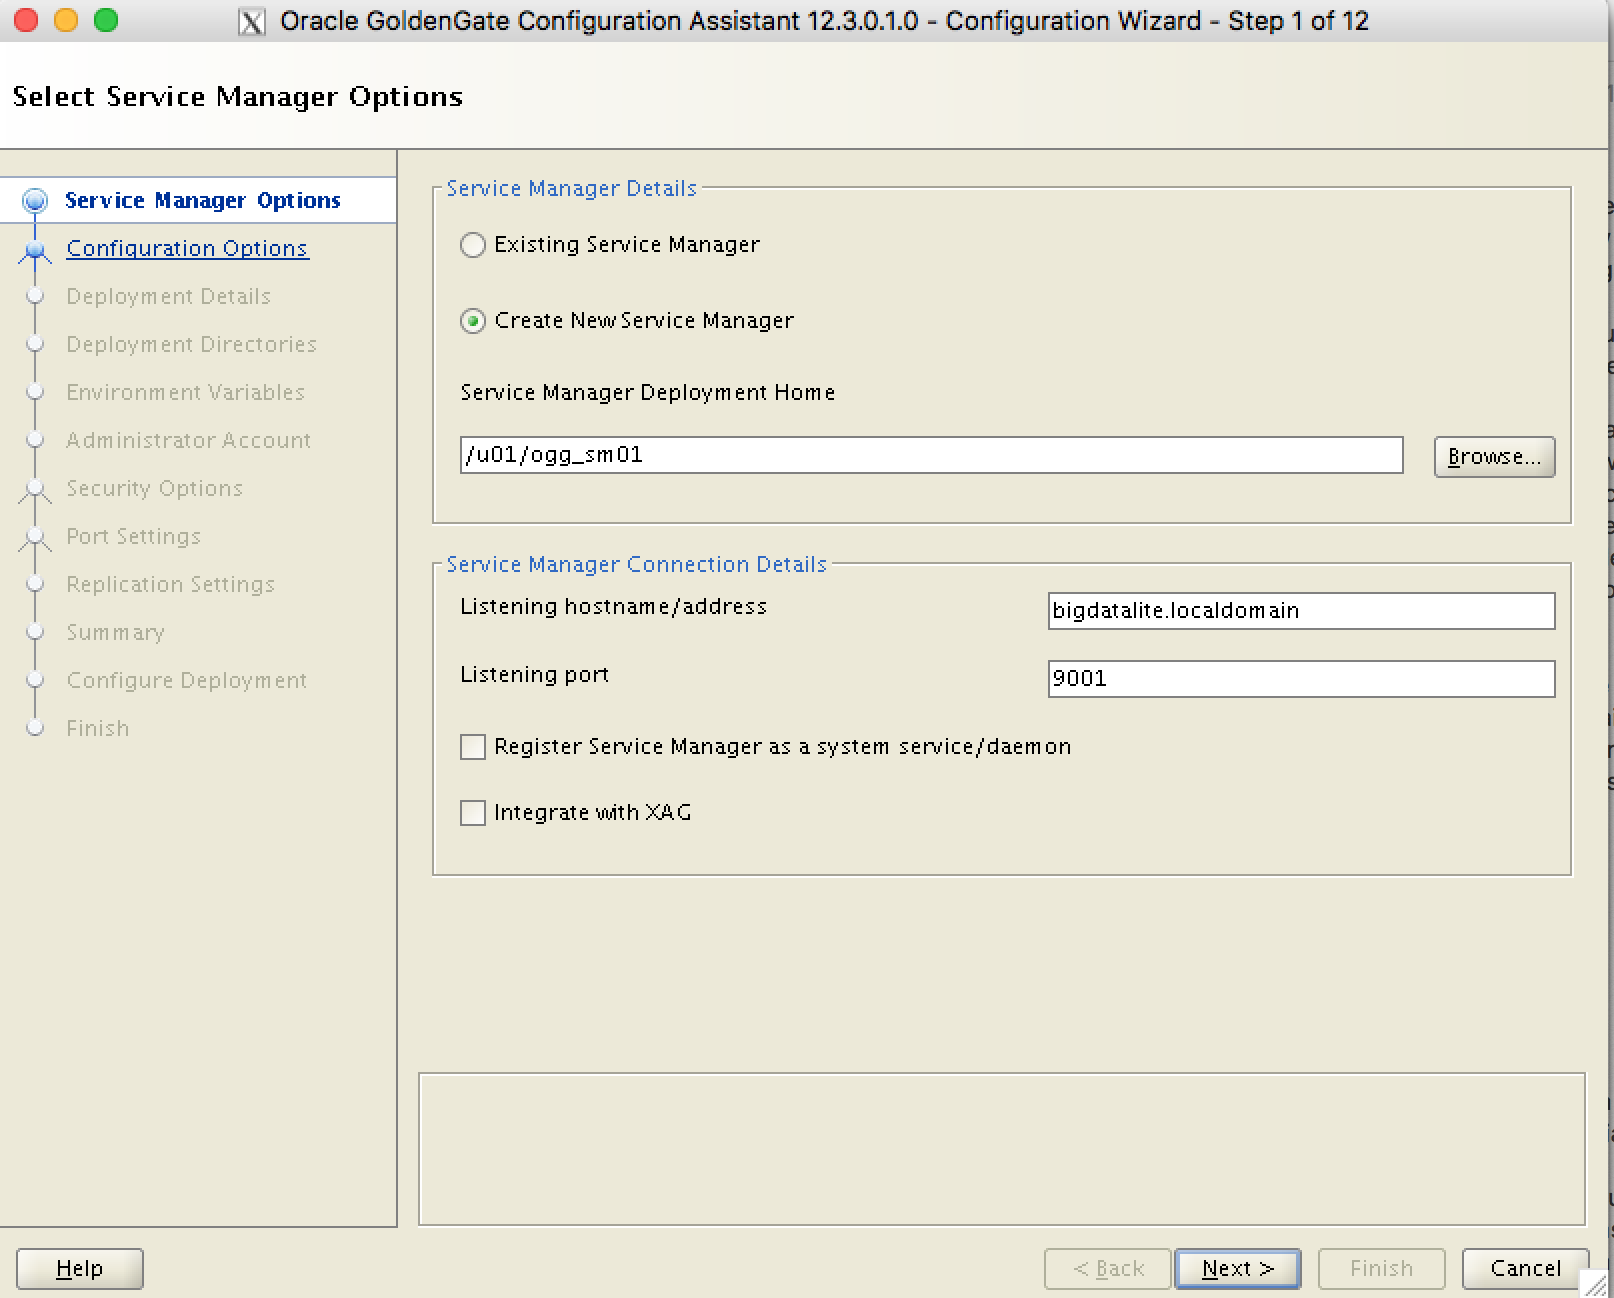
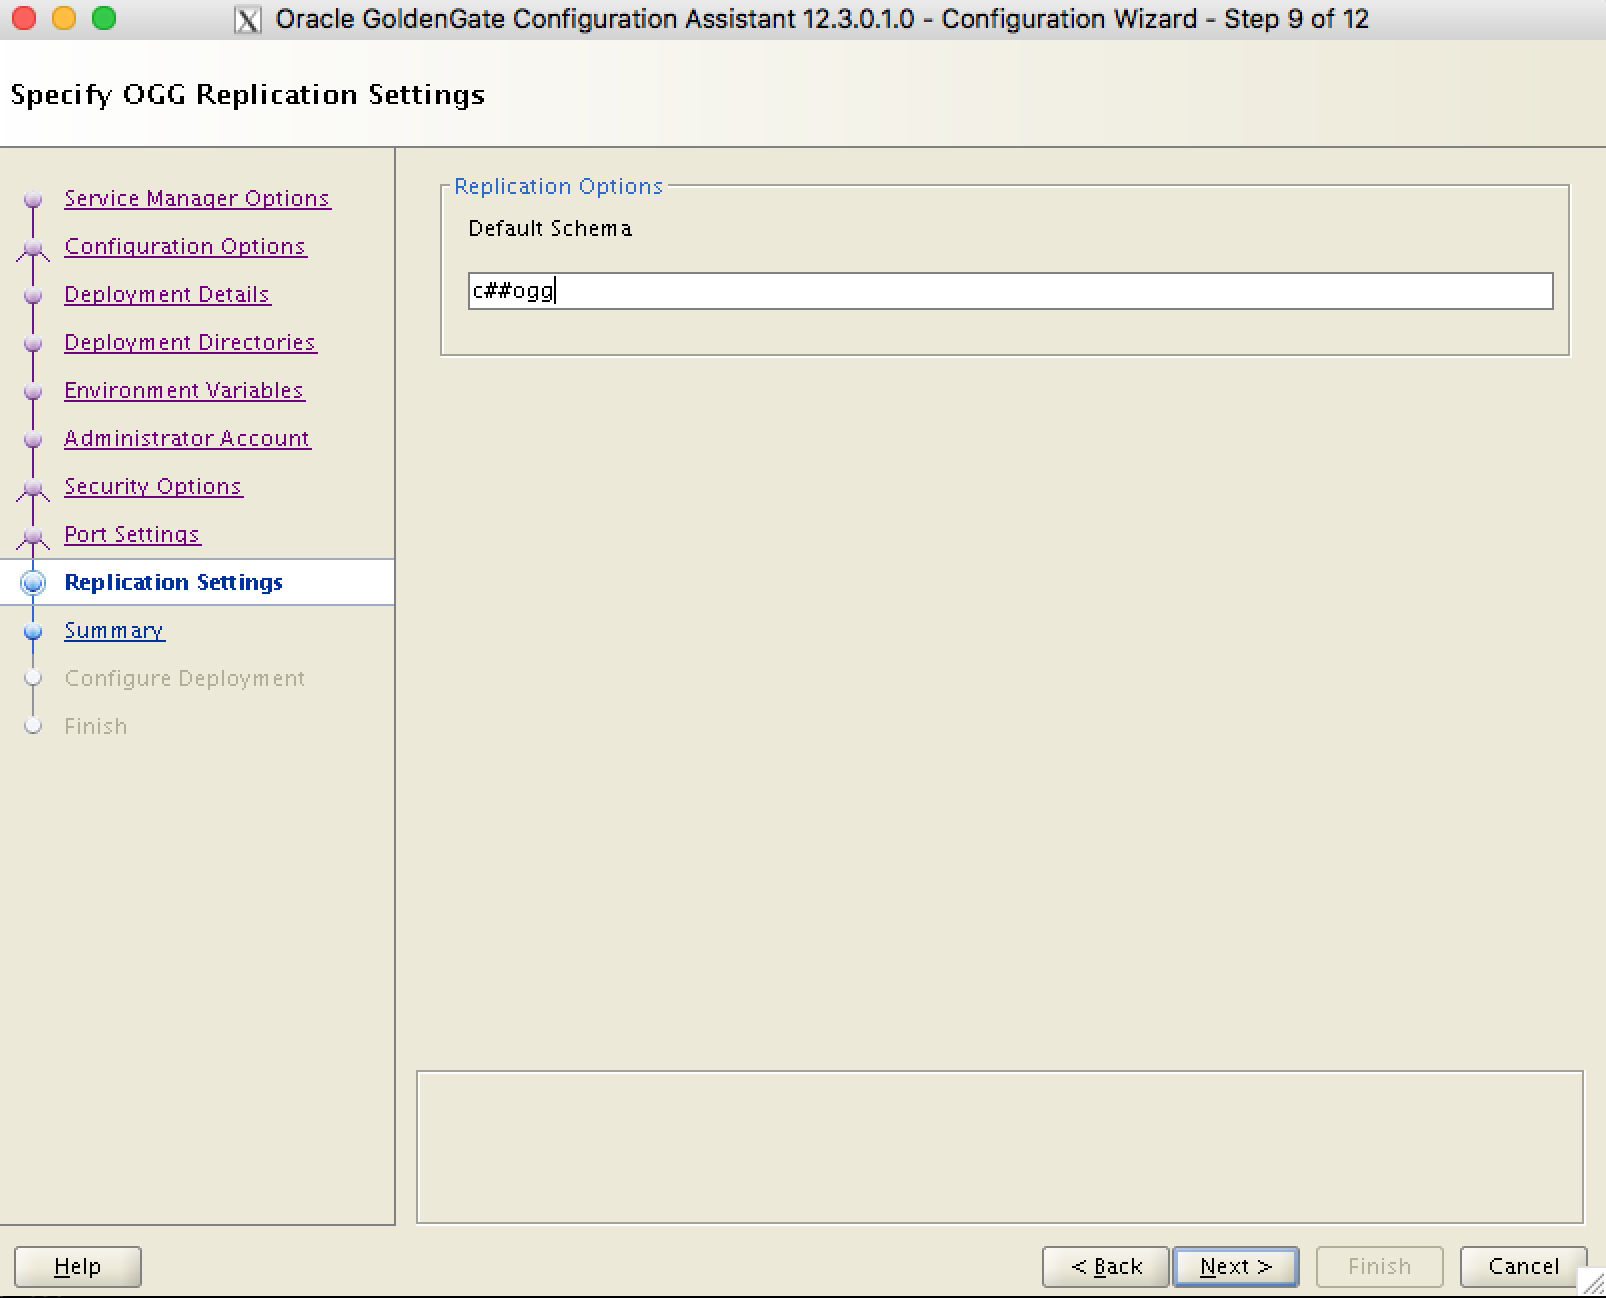
Then you can add a new deployment to your configuration. The deployment is the entity where your replication configuration will be placed. You may have more than one deployment for one Service Manager with different services running independently from each other. For the deployment, you will need a separate home directory. In general, you need to define at least three directories:
- The OGG software home with binaries.
- Directory for the Service Manager deployment.
- Directory for your Configuration deployment (you can have several of those).
 or you can prepare a new response file and run it in silent mode :
 [oracle@bigdatalite bin]$ ./oggca.sh -silent -responseFile /home/oracle/oggca.rsp
 Oracle GoldenGate Service Manager for Oracle
 Version 12.3.0.1.0 OGGCORE_12.3.0.1.0_PLATFORMS_170721.0154

 Copyright (C) 1995, 2017, Oracle and/or its affiliates. All rights reserved.

 Linux, x64, 64bit (optimized) on Jul 21 2017 08:05:45
 Operating system character set identified as UTF-8.

 2017-11-24 15:23:26 WARNING OGG-12075 The outbound Communication Security interface can not be initialized because the '/config/securityDetails/network/outbound' property is not in the configuration file.

 2017-11-24 15:23:26 WARNING OGG-12075 The outbound Communication Security interface can not be initialized because the '/config/securityDetails/network/outbound' property is not in the configuration file.

 2017-11-24 15:23:27 INFO OGG-01851 filecaching started: thread ID: 139973453936384.

 2017-11-24 15:23:27 INFO OGG-01815 Virtual Memory Facilities for: COM
  anon alloc: mmap(MAP_ANON) anon free: munmap
  file alloc: mmap(MAP_SHARED) file free: munmap
  target directories:
  /u01/ogg_ora121/var/temp/.
 Successfully Setup Software.
 [oracle@bigdatalite bin]$
Upon completion of the initial configuration, we are getting running the Service Manager and all the services for the new deployment. Everything is ready to configure a replication now.
To set the replication you need to go to Administrative Service (AS) interface either by putting "host:port" for the service in your browser or by simply clicking the link from the AS overview page. 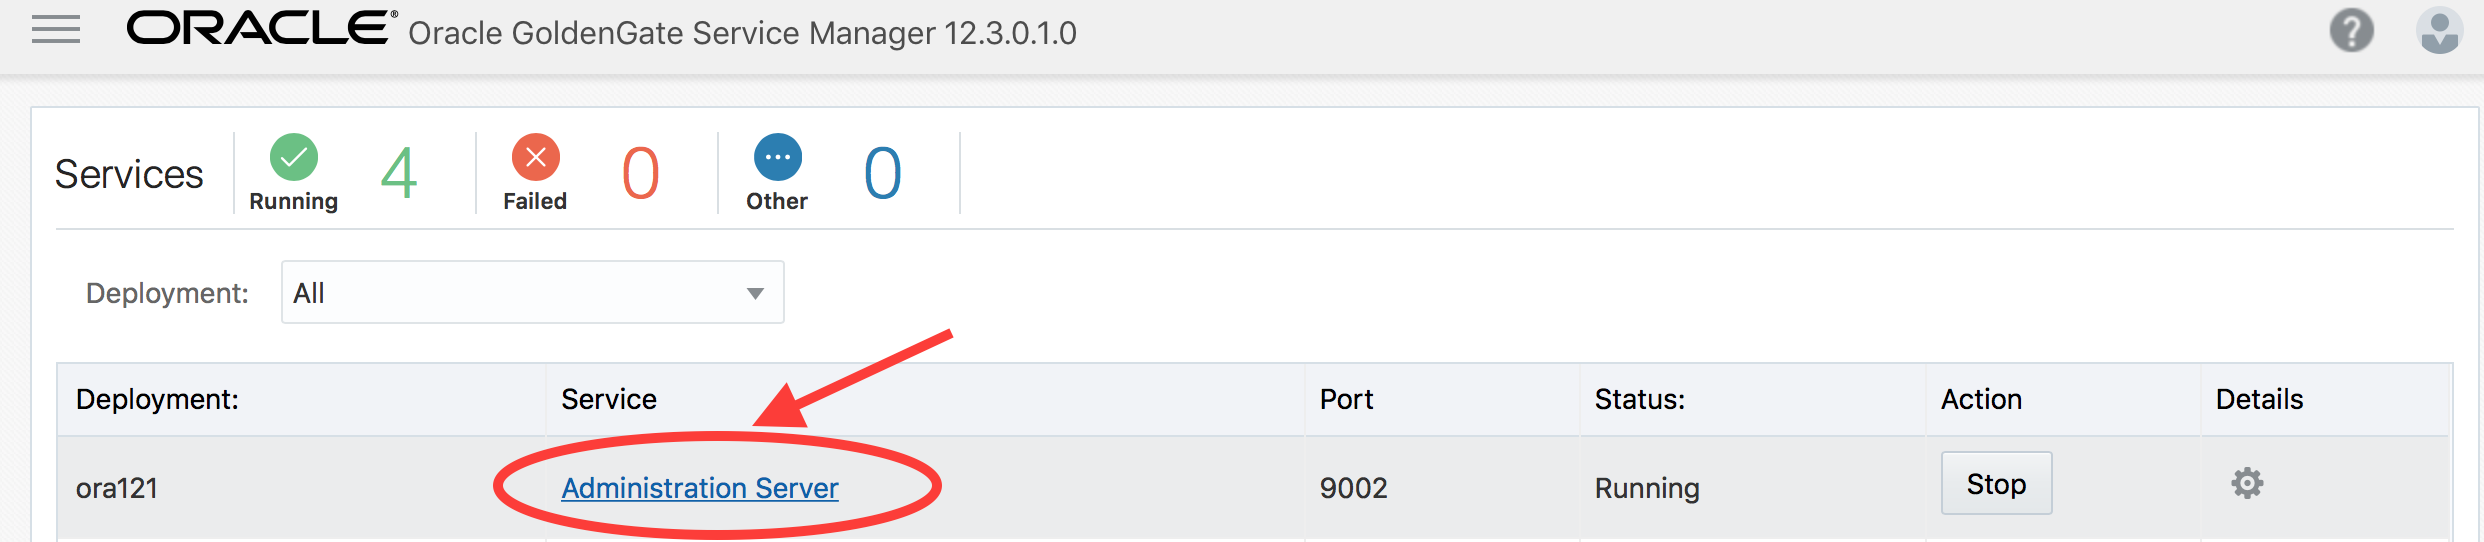 Optionally you can create another account to manage the environment. We have several options providing some separation in rights for different types of user. And those users don't need any kind of direct access to your source or target database. Let's set up an extract capturing all the DML and DDL changes for a GGTEST schema in my sandbox database. At first, we have to create a credential for the GoldenGate administrator schema in the database. We can do it using the "Configuration" tab of the service. Keep in mind that you have to have either "Administrator" or "Security" role for the OGG web interface user to be able to do that.
 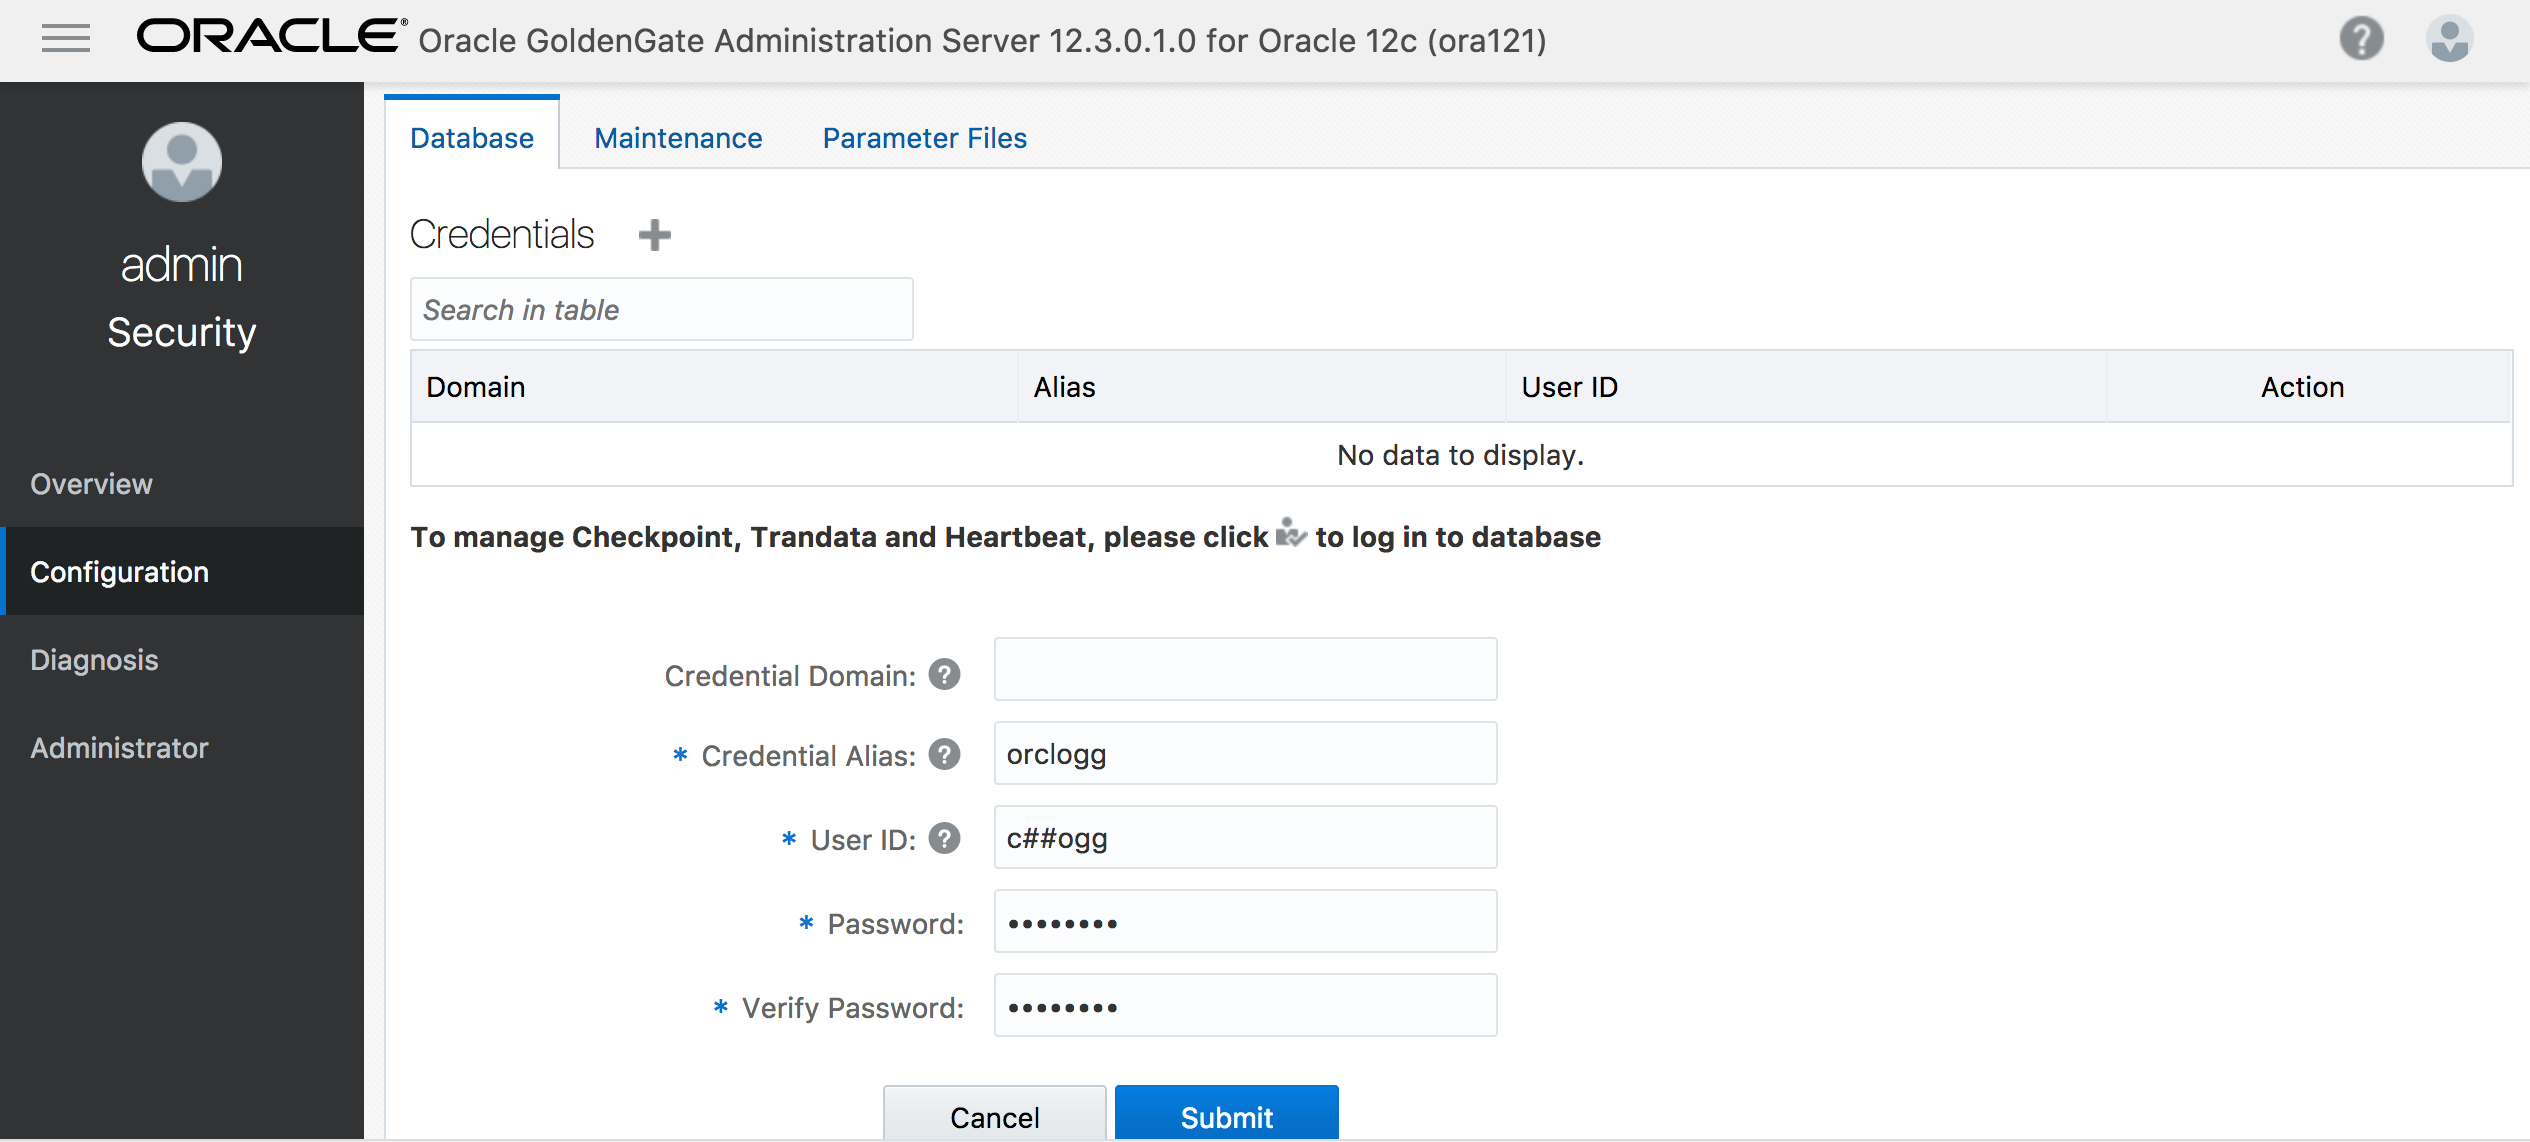 Having the credentials we can start with an extract. It is fairly simple, intuitive and doesn't take too much time. An extract can be added using "+" button on the overview tab. We are choosing what kind of the extract we want to create having options for integrating, non-integrated and initial load. Then we provide a name for the extract, credentials, and database we are going to connect.
 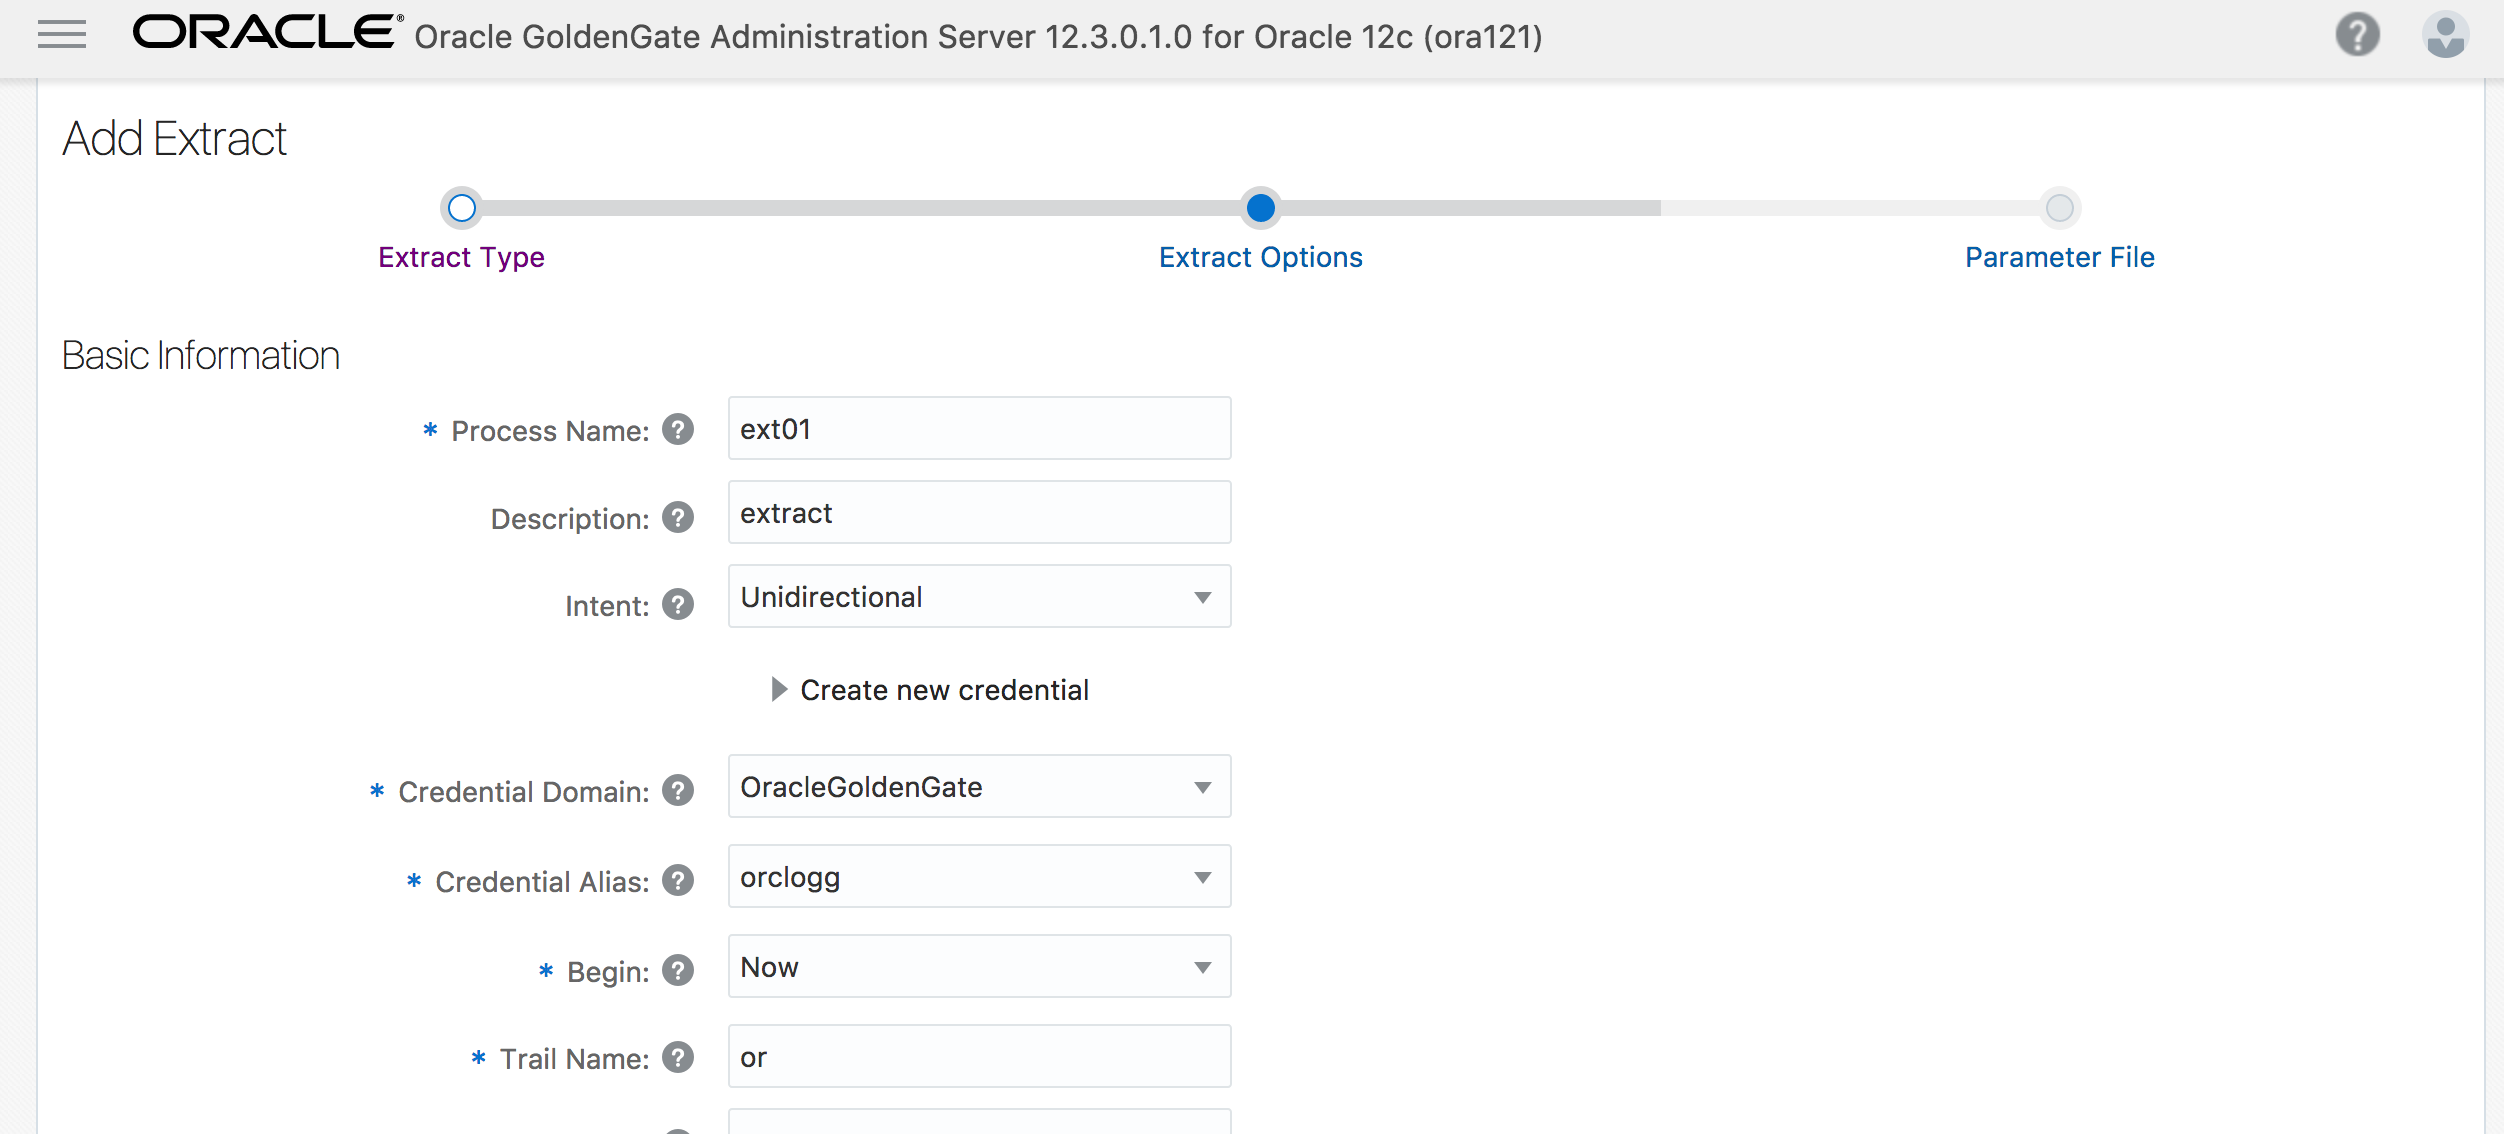 After pushing the "Next" button we are going to see our parameters file and we can make some changes there, like providing mapping and adding some options.
 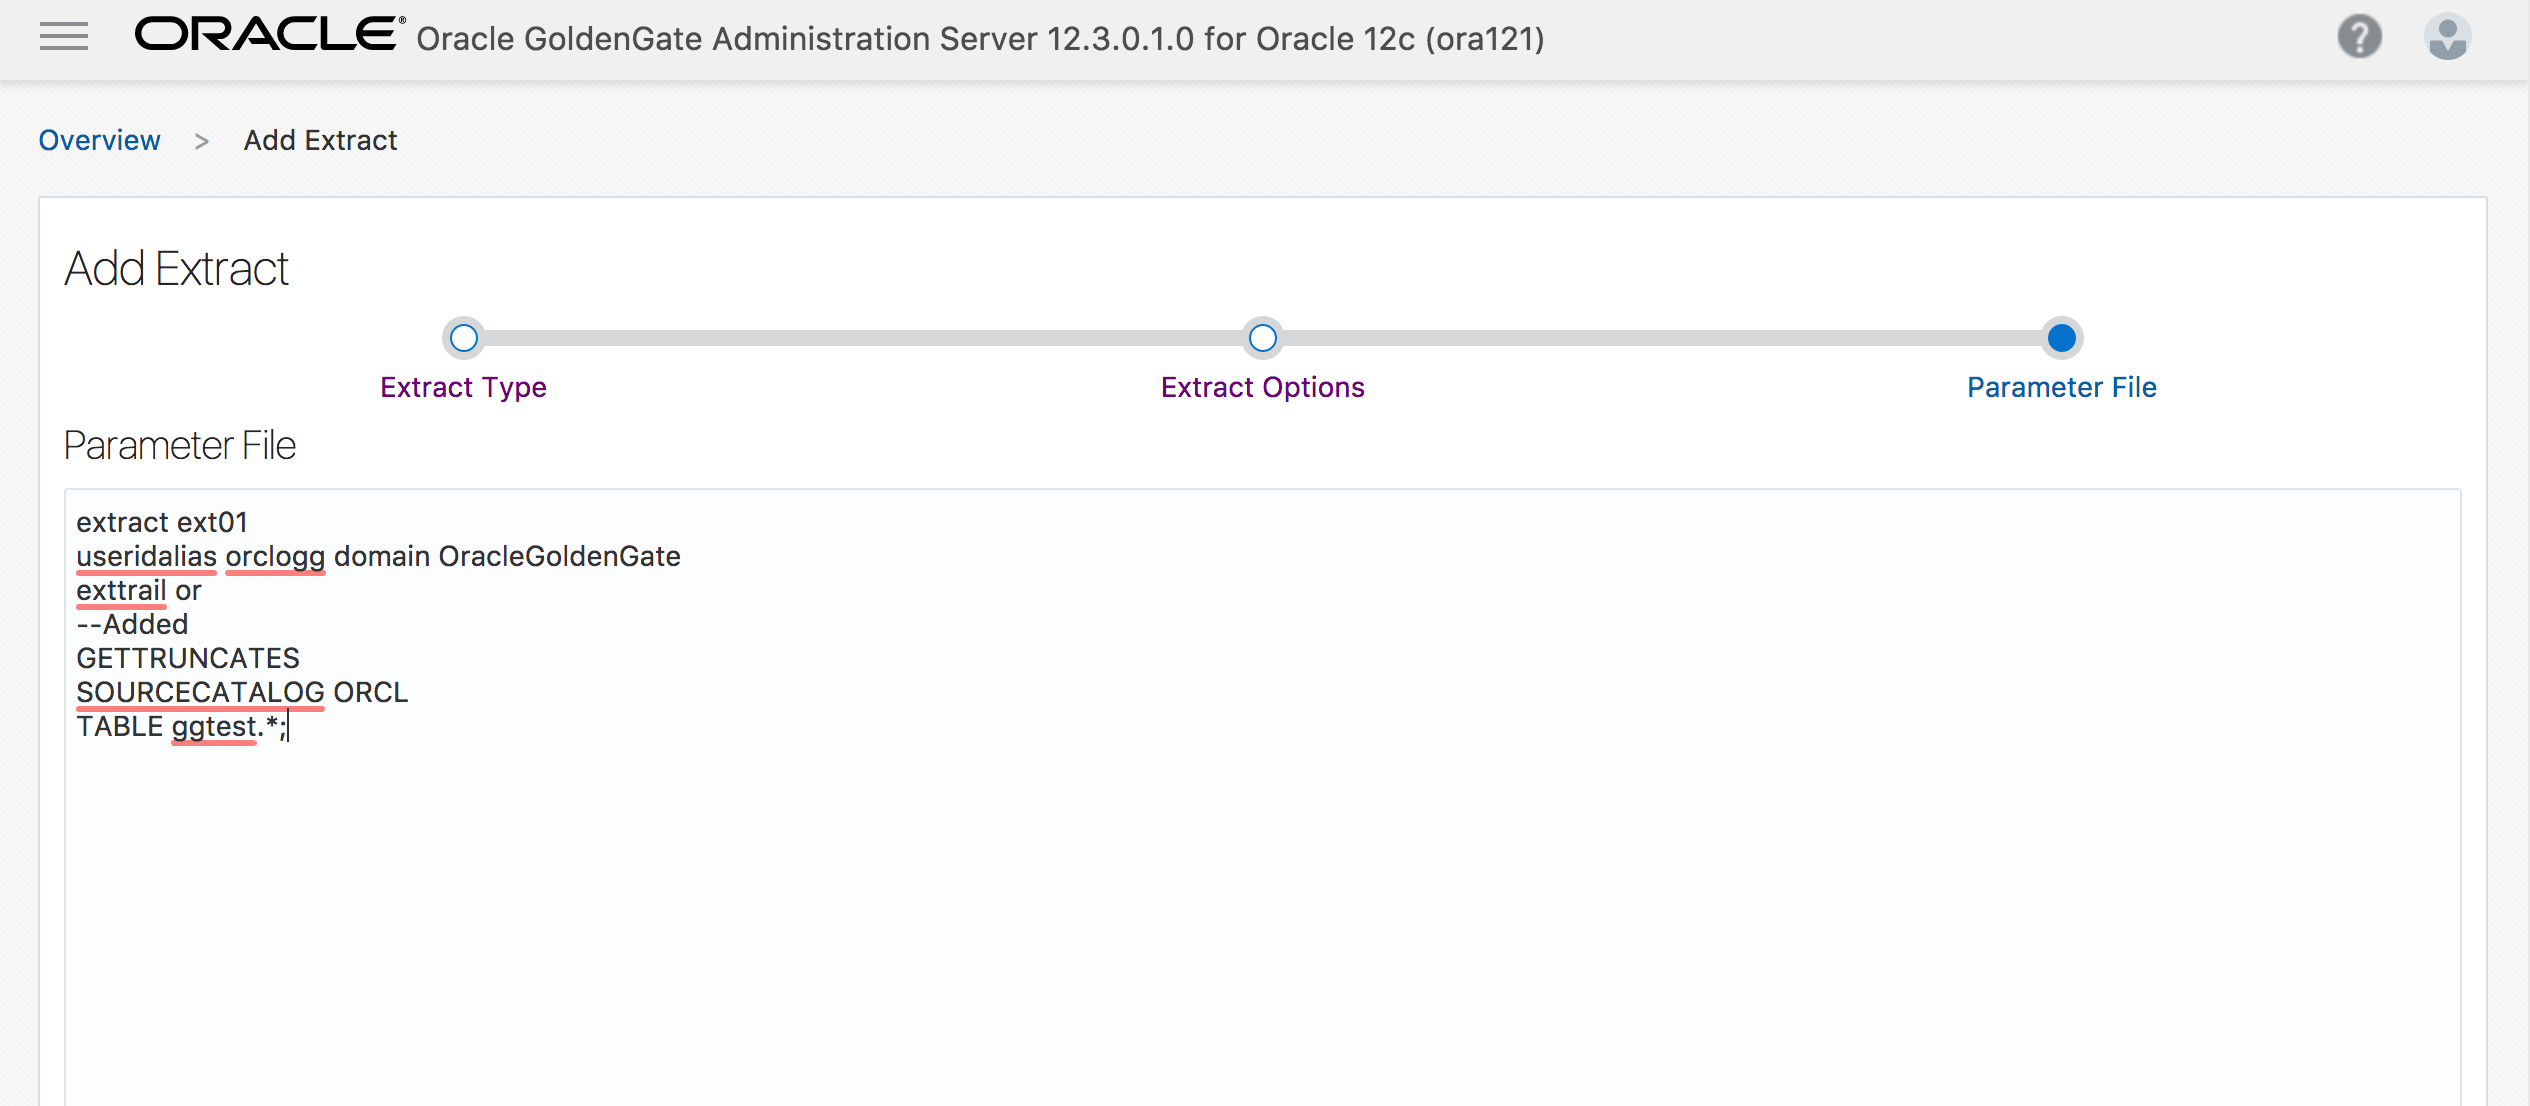 After pushing the button "Create and Run" we are getting our extract running.
 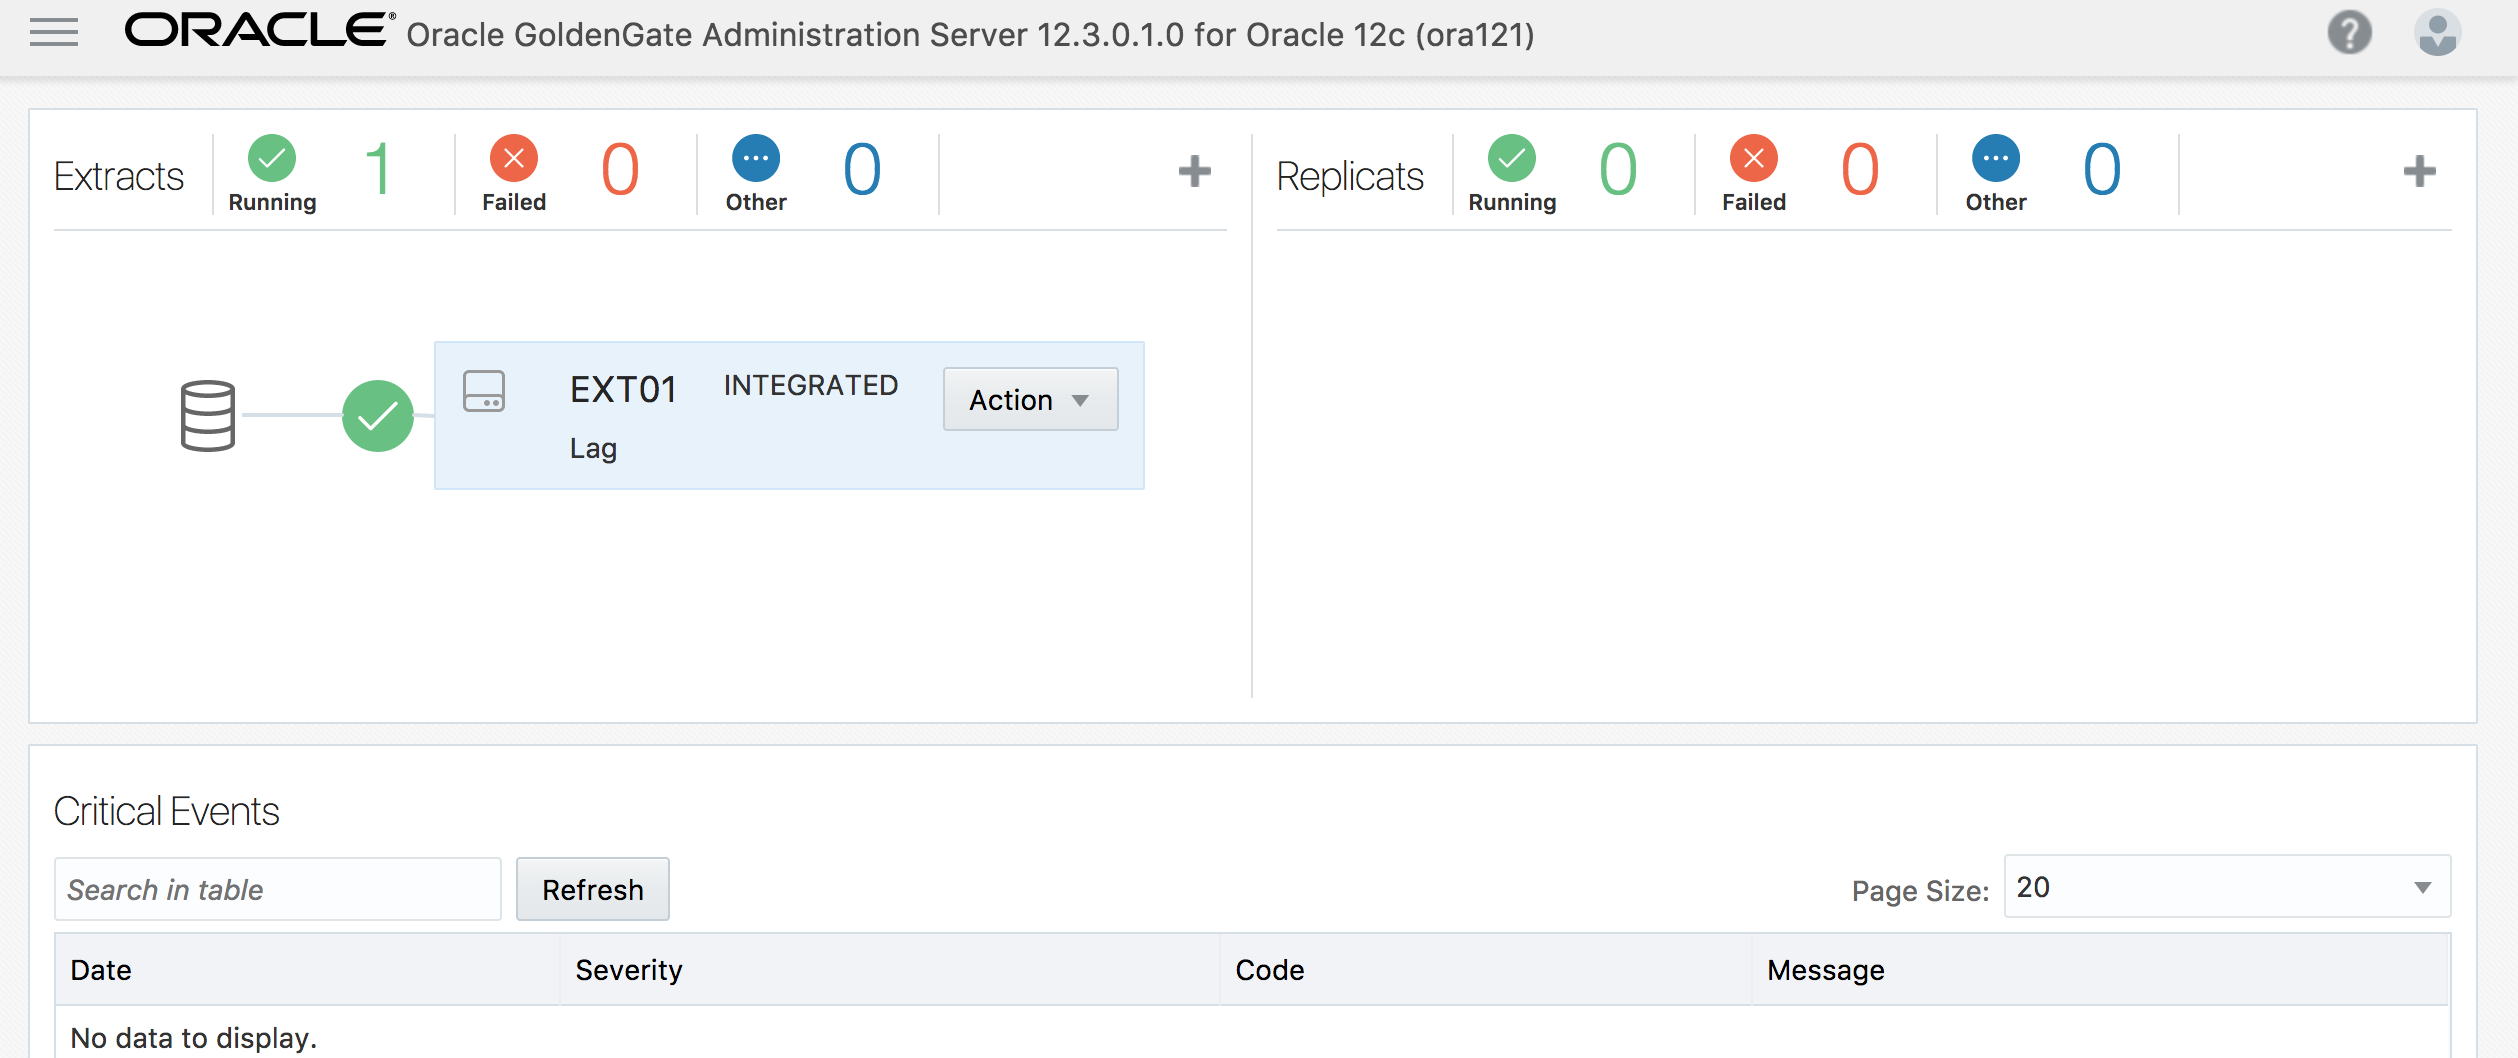 We had an option to define a certain directory for the trail files but I skipped the option to find where the trails would be placed by default. By default, the trail files can be found located under $OGG_DEP_HOME/var/lib/data where $OGG_DEP_HOME is your deployment home. And if you look into the file using the logdump utility you can see that they have the same format as the classic one. New:
 Logdump 79 >OPEN /u01/ogg_ora121/var/lib/data/or000000000
 Current LogTrail is /u01/ogg_ora121/var/lib/data/or000000000
 Logdump 80 >next

 2017/11/27 10:57:57.719.717 FileHeader Len 1399 RBA 0
 Name: *FileHeader*
  3000 0301 3000 0008 4747 0d0a 544c 0a0d 3100 0002 | 0...0...GG..TL..1...
  0006 3200 0004 2000 0000 3300 0008 02f2 852c 6c0d | ..2... ...3......,l.
  96a5 3400 0032 0030 7572 693a 6269 6764 6174 616c | ..4..2.0uri:bigdatal
  6974 653a 6c6f 6361 6c64 6f6d 6169 6e3a 3a75 3031 | ite:localdomain::u01
  3a6f 6767 6d73 3a62 696e 3a45 5854 3031 3600 000d | :oggms:bin:EXT016...
  000b 6f72 3030 3030 3030 3030 3037 0000 0101 3800 | ..or0000000007....8.
  0004 0000 0000 39ff 0008 0000 0000 0000 0000 3a00 | ......9...........:.

 Logdump 81 >
Old:
 Logdump 83 >open /u01/oggora/dirdat/or000000023
 LogTrail /u01/ogg_ora121/var/lib/data/or000000000 closed
 Current LogTrail is /u01/oggora/dirdat/or000000023
 Logdump 84 >next

 2017/11/01 14:18:12.064.131 FileHeader Len 1413 RBA 0
 Name: *FileHeader*
  3000 0305 3000 0008 4747 0d0a 544c 0a0d 3100 0002 | 0...0...GG..TL..1...
  0005 3200 0004 2000 0000 3300 0008 02f2 8323 59b6 | ..2... ...3......#Y.
  8b83 3400 002f 002d 7572 693a 6269 6764 6174 616c | ..4../.-uri:bigdatal
  6974 653a 6c6f 6361 6c64 6f6d 6169 6e3a 3a75 3031 | ite:localdomain::u01
  3a6f 6767 6f72 613a 4747 4558 5436 0000 1400 1264 | :oggora:GGEXT6.....d
  6972 6461 742f 6f72 3030 3030 3030 3032 3337 0000 | irdat/or0000000237..
  0101 3800 0004 0000 0017 39ff 0008 0000 0000 0000 | ..8.......9.........

 Logdump 85 >
The next step we need to take is to pass the captured information to the target system. In classic OGGc we used a DataPump process for that. But in the new version, we are using our Distribution server to add a new path for our replication. To connect to the Distribution server we again using either a link from the Service Manager or the host:port in the browser. 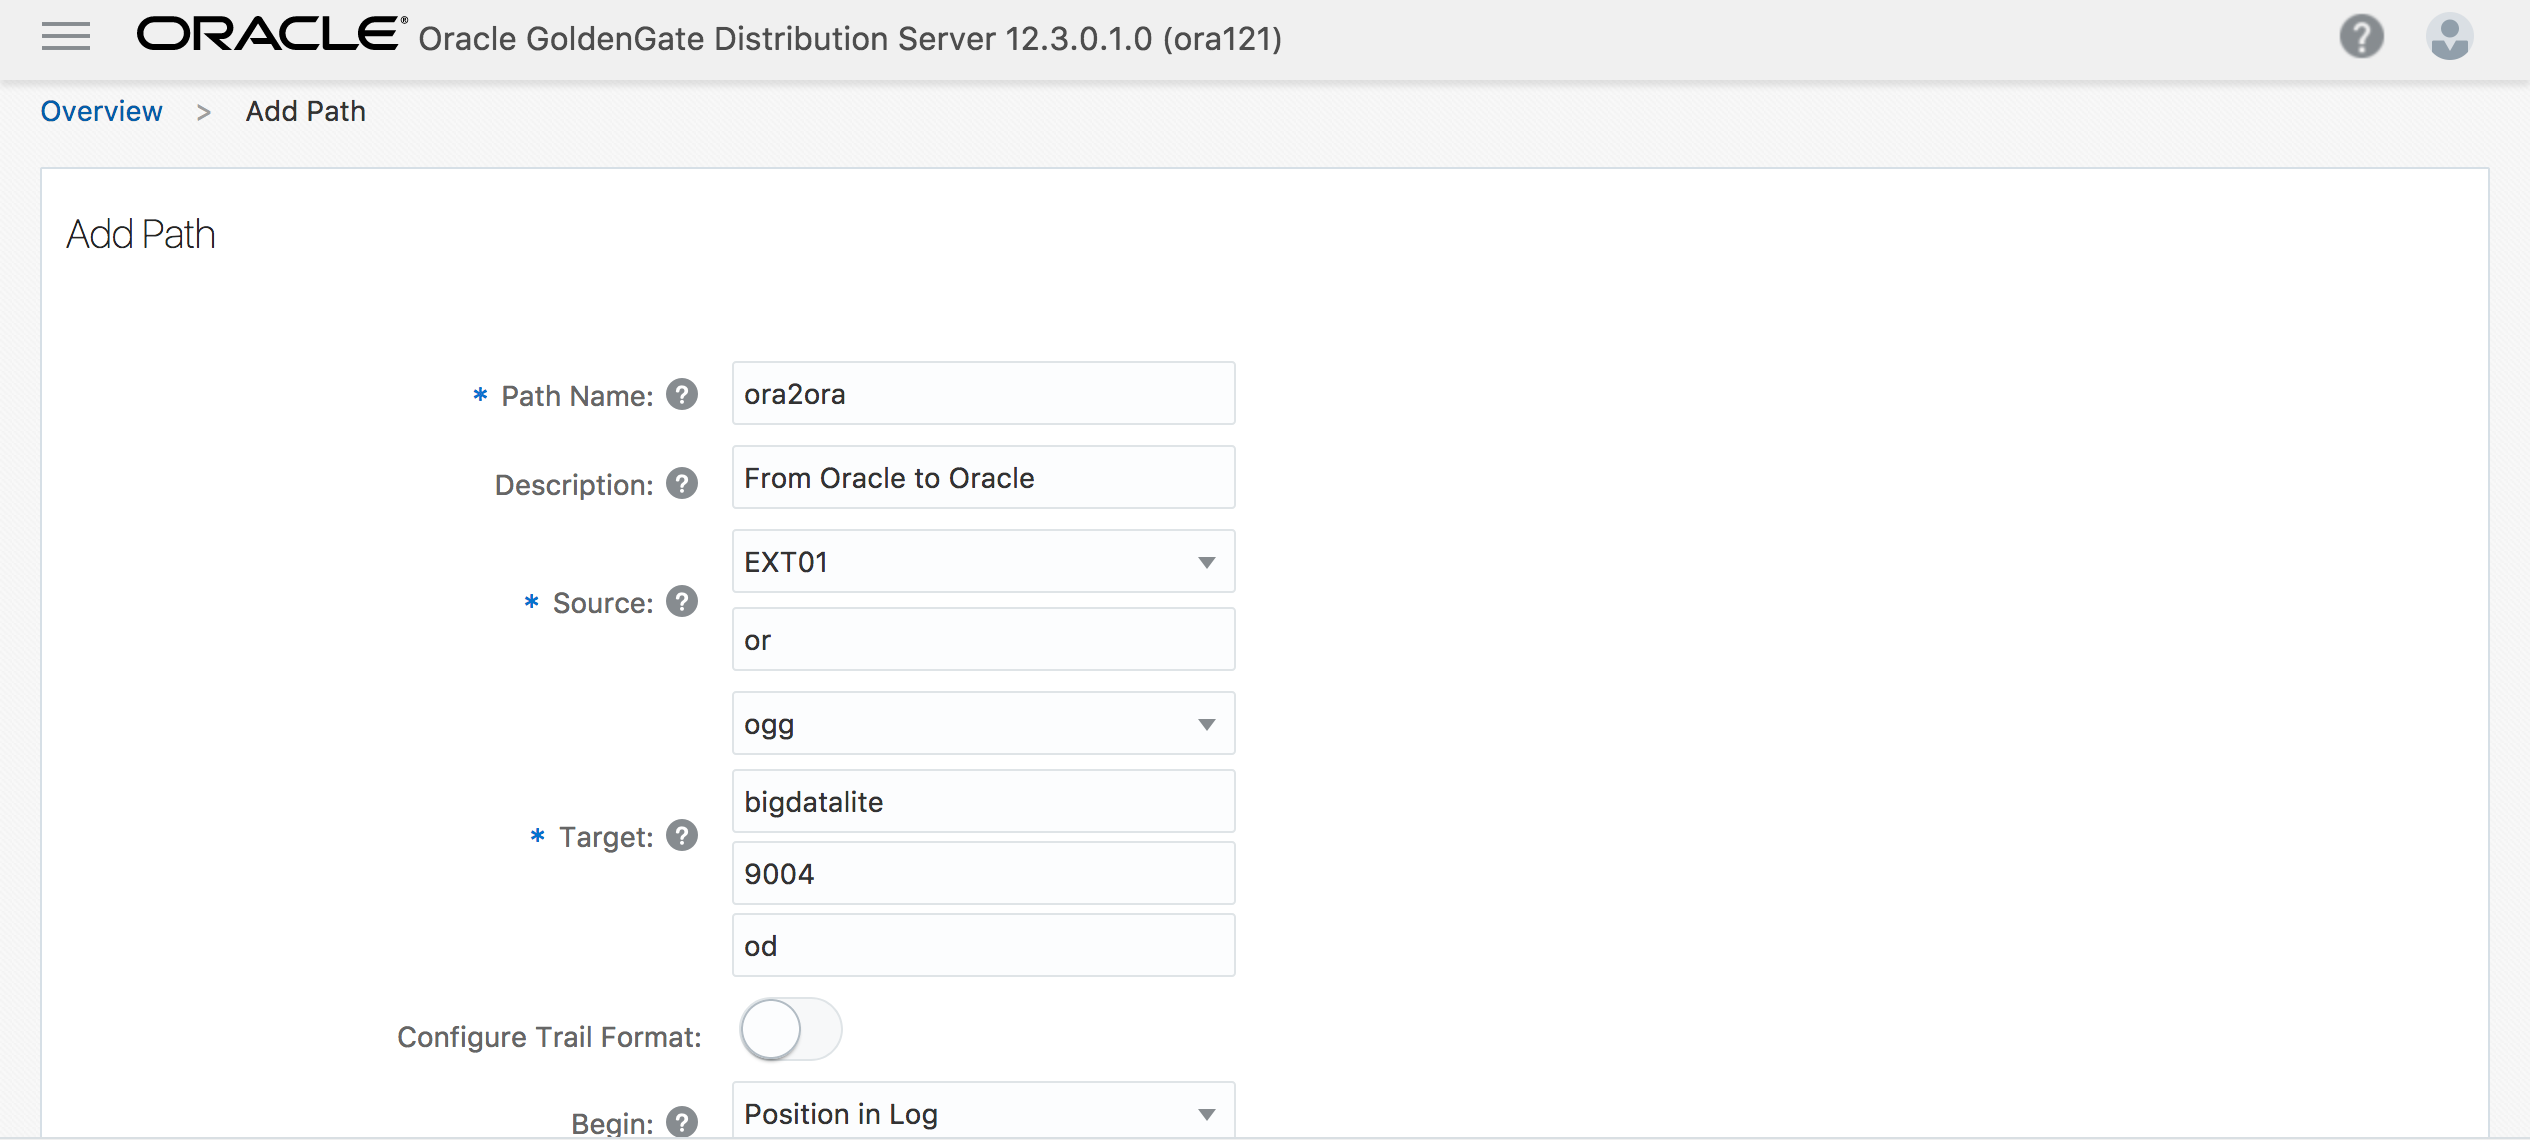 We are defining a new name for the path, format, destination host and port for the Receiver Server on the target side and we have some other parameters for fine-tuning. Since I am using the same server for source and target it places the trail file to the same folder as the source by default.
 [oracle@bigdatalite oggora]$ ll /u01/ogg_ora121/var/lib/data/
 total 572
 -rw-r----- 1 oracle oinstall 299338 Nov 27 16:01 od000000000
 -rw-r----- 1 oracle oinstall 276072 Nov 27 16:01 or000000000
 [oracle@bigdatalite oggora]$
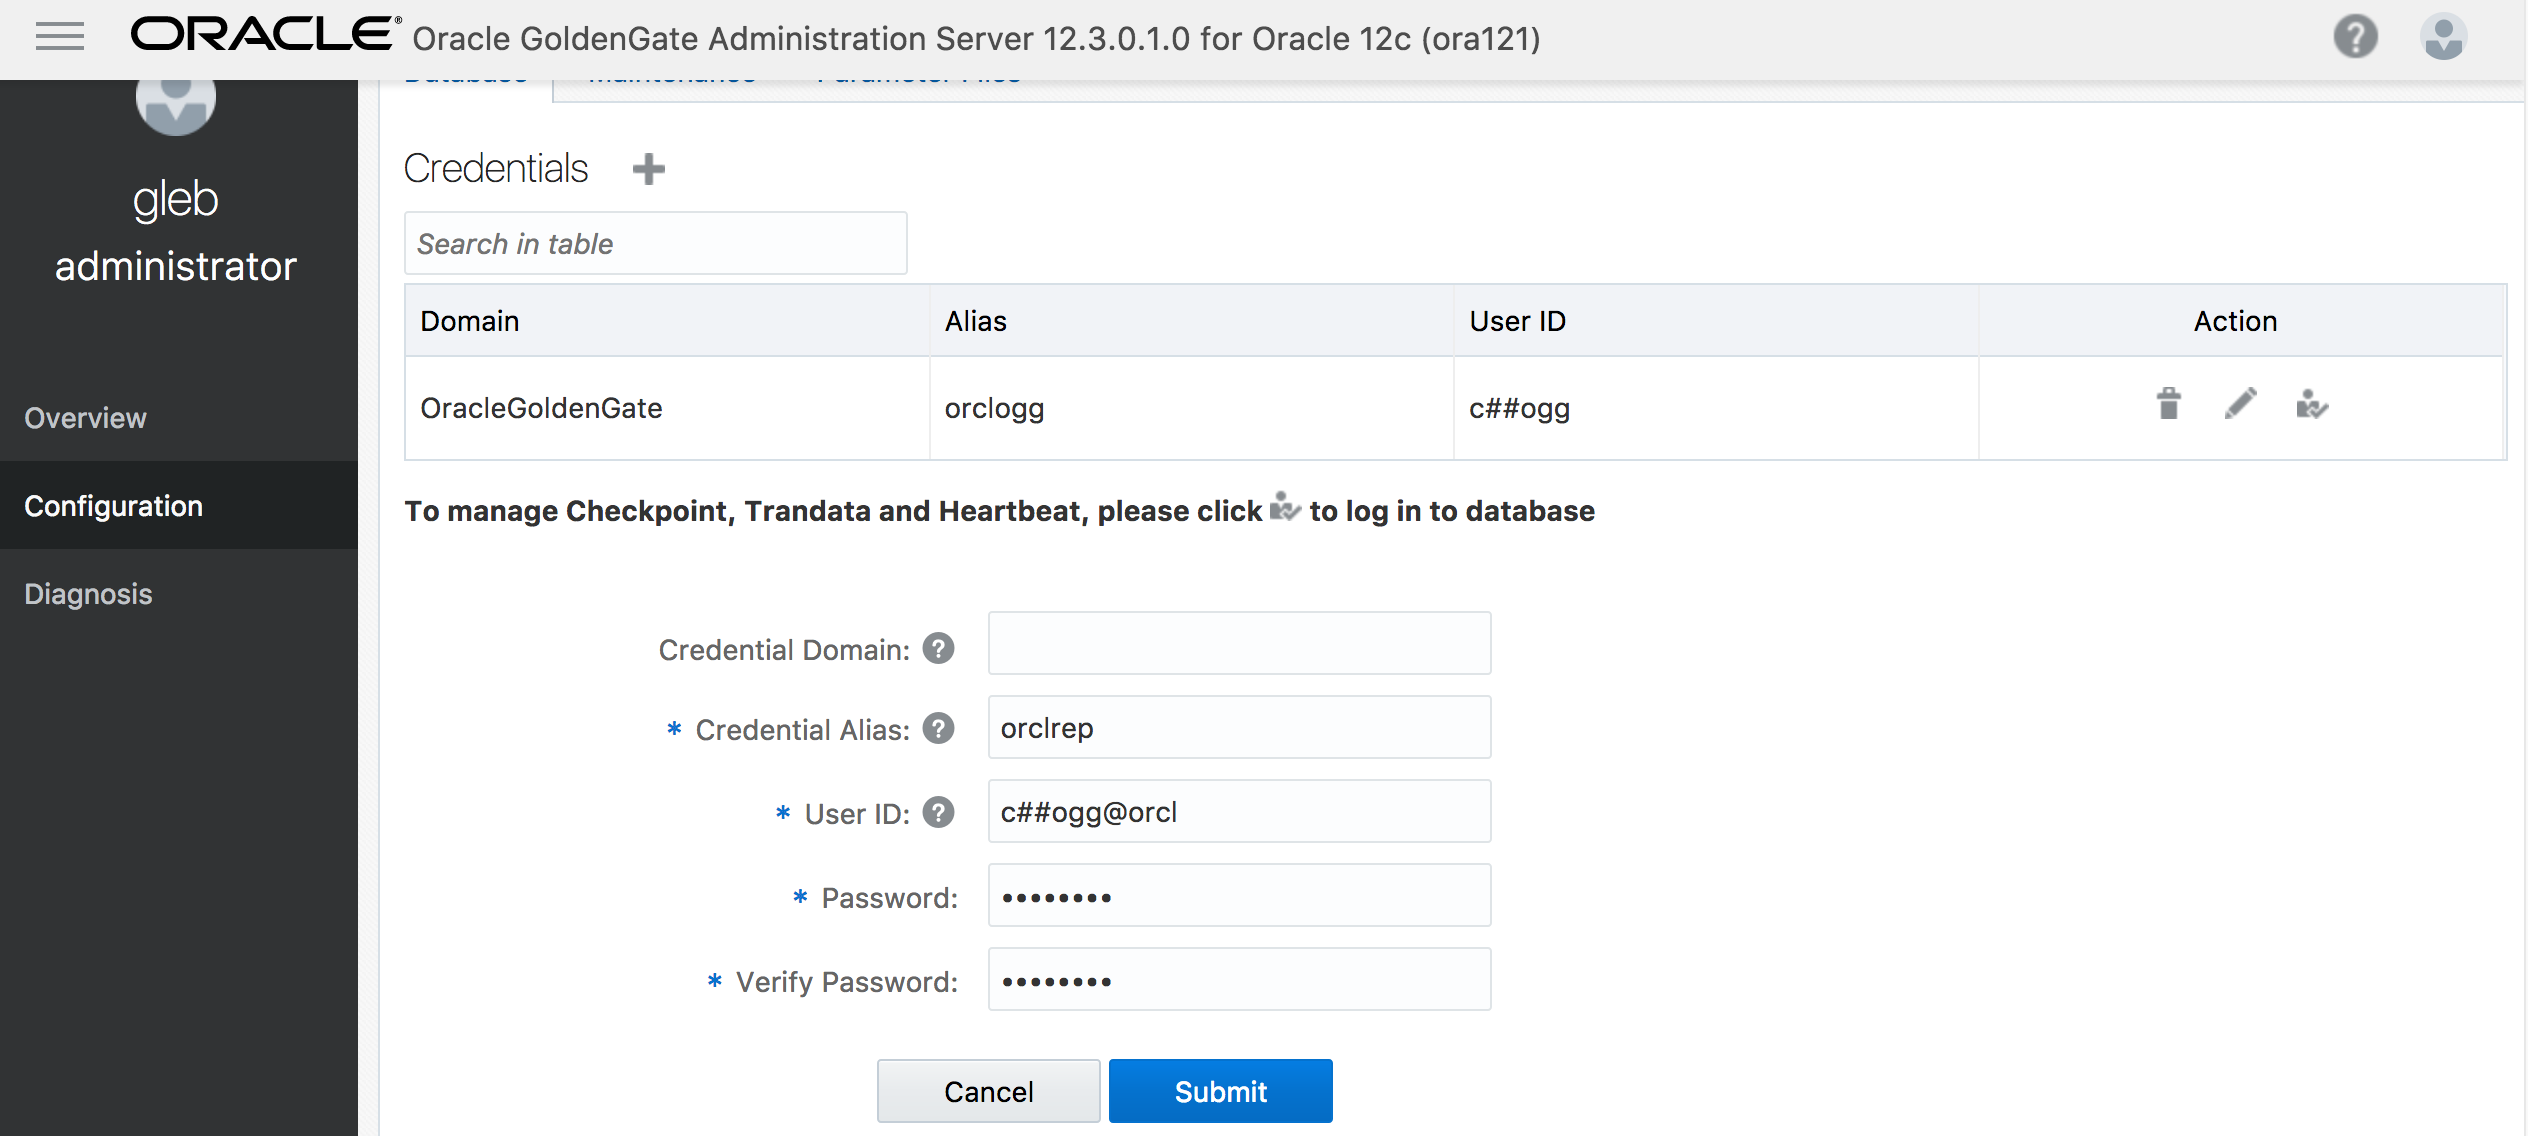
Before creating a replicat I need to create a new credential. The existing credential for extract connects by default to the cdb$root container but I need a credential to logon to my ORCL pluggable database. So, I am creating a new alias in my credential store to use it for the replicat.
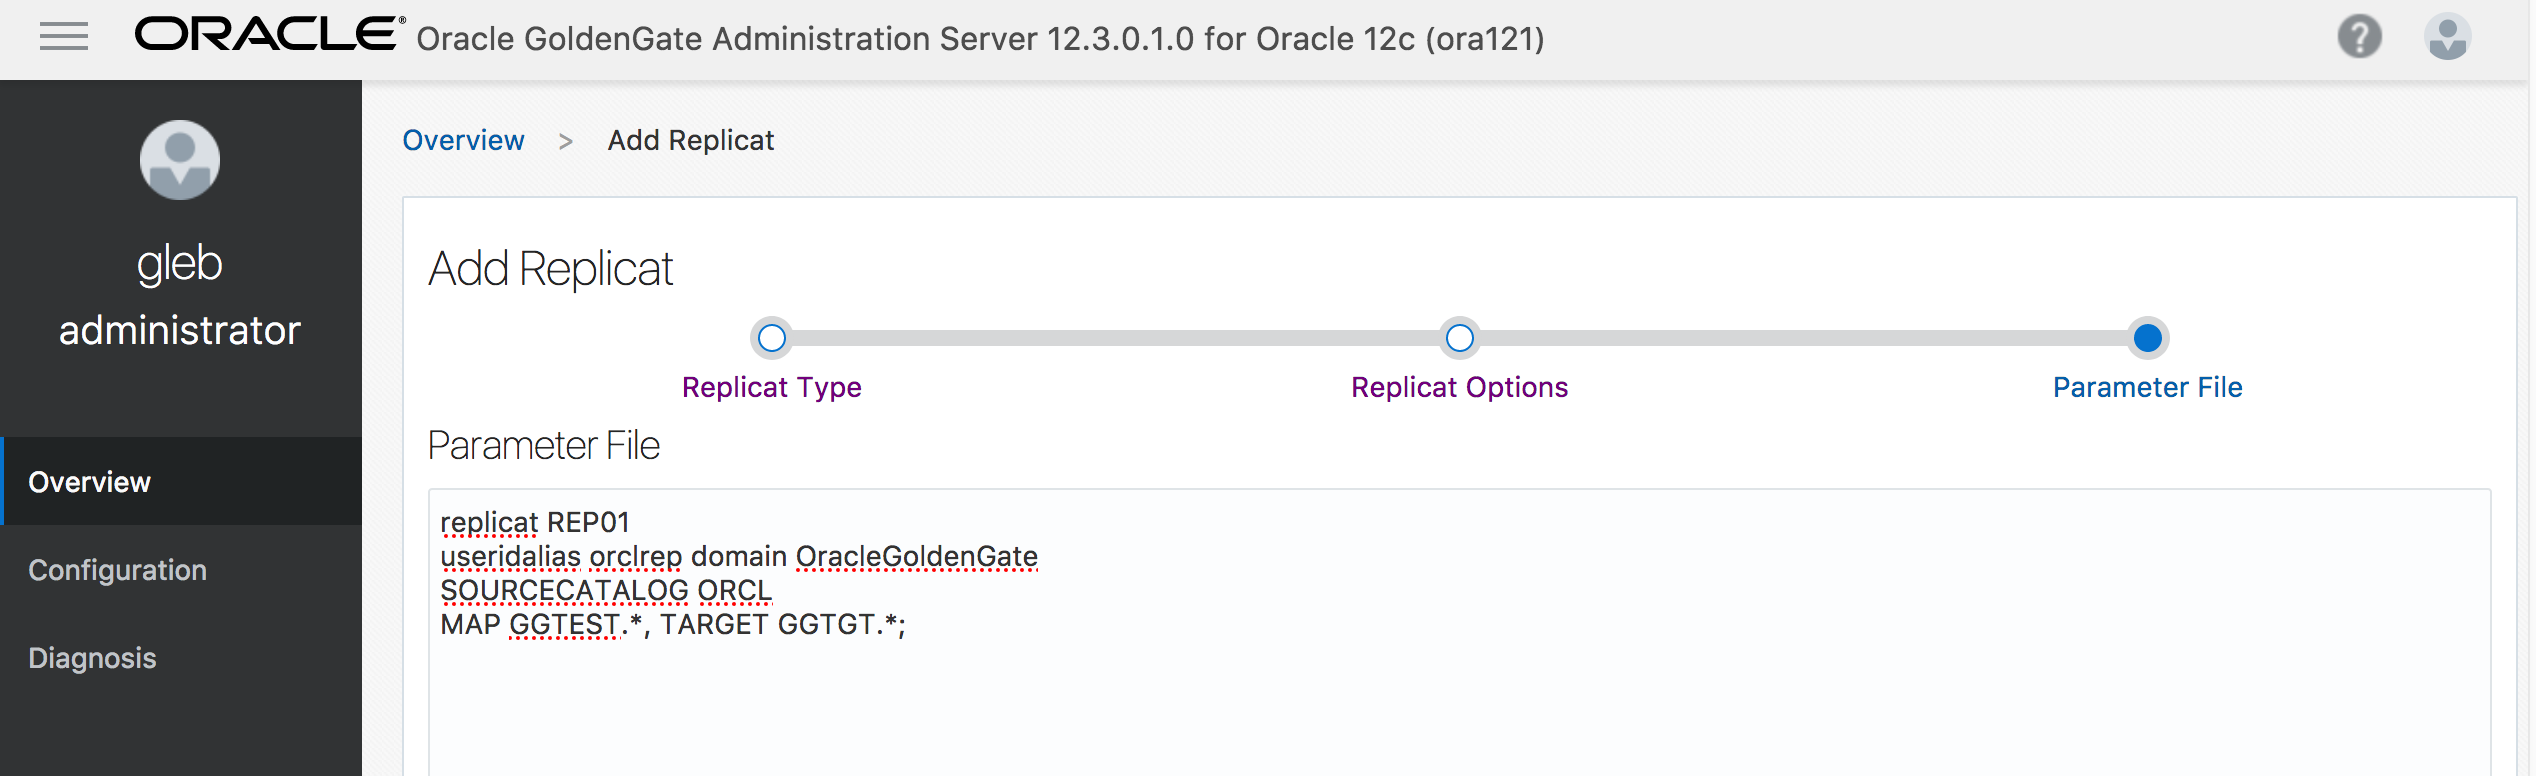
 In my replicat I am going to remap all the changes to the schema GGTGT in the same database. I am adding a replicat on the overview page of the Admin Service by clicking on the "+" button on the right side. The first step will be to pick up the replicat type from the available list. In my case, I've chosen the integrated replicat. On the next step, we are providing credentials and other configuration information.
 And on the final step, we adjust our parameters providing mapping and maybe adding some options to our replicat.
 Now our replication is running and can be tested. Here is initial state for the table "test_tab_1" in "GGTEST" and "GGTGT" schemas:
 orcl> select * from ggtest.test_tab_1;

  ID RND_STR_1 USE_DATE  RND_STR_2 ACC_DATE
 ---------------- ---------- ----------------- ---------- -----------------
  1 Test01 11/07/17 09:27:45 Test01 11/07/17 09:27:45
  2 Test02 11/07/17 09:28:02 Test02 11/07/17 09:28:02
  3 Test03 11/07/17 09:28:10 Test02 11/07/17 09:28:10
  4 Test04 11/24/17 10:32:17 Test04 11/24/17 10:32:17

 orcl> select * from ggtgt.test_tab_1;

  ID RND_STR_1 USE_DATE  RND_STR_2 ACC_DATE
 ---------------- ---------- ----------------- ---------- -----------------
  1 Test01 11/07/17 09:27:45 Test01 11/07/17 09:27:45
  2 Test02 11/07/17 09:28:02 Test02 11/07/17 09:28:02
  3 Test03 11/07/17 09:28:10 Test02 11/07/17 09:28:10
  4 Test04 11/24/17 10:32:17 Test04 11/24/17 10:32:17

 orcl>
We are inserting a row in the "GGTEST" schema and see the result in the "GGTGT" schema:
 orcl> insert into ggtgt.test_tab_1 values (5,'Test05',sysdate,'Test05',sysdate);

 1 row created.

 orcl> commit;

 Commit complete.

 orcl> select * from ggtgt.test_tab_1;

  ID RND_STR_1 USE_DATE  RND_STR_2 ACC_DATE
 ---------------- ---------- ----------------- ---------- -----------------
  1 Test01 11/07/17 09:27:45 Test01 11/07/17 09:27:45
  2 Test02 11/07/17 09:28:02 Test02 11/07/17 09:28:02
  3 Test03 11/07/17 09:28:10 Test02 11/07/17 09:28:10
  4 Test04 11/24/17 10:32:17 Test04 11/24/17 10:32:17
  5 Test05 11/27/17 17:28:43 Test05 11/27/17 17:28:43
Everything works fine and we see our insert was successfully replicated to another schema.
We can also see some reporting and some helpful diagnostic information using "Performance Metrics Service" for our deployment. I advise to go through all the tabs for all components and check all available metrics. It may help to identify a bottleneck in replication or some other problems. Here is an example of the Performance Process tab for an extract process: 
As a short summary, I want to say that the new interface and architecture provides more options, makes the management more visible and maybe easier for people who have only started to work with replication. Also, it provides a better "out of the box" interface for performance metrics and reports. I think it is the good move and I like how it is implemented. And we still have a command line interface even in the Microservices architecture. It is a bit different than the old "ggsci" but one familiar with the "ggsci" can easily switch to the new one.