Oracle Database 18c introduced a new feature called Centrally Managed Users (CMU) to allow simplified database user management through integration with Microsoft Active Directory (AD).
This is an exciting and much-needed enhancement. Previously, complex additional tiers such as Oracle Unified Directory (OUD)/Enterprise User Security (EUS) or a third-party password synchronization tool was required. But as of Oracle Database 18c, the Oracle database can perform user authentication and authorization directly against AD, without the need for additional licenses - CMU is an Enterprise Edition base feature.
This is the first of a four-part series on how Oracle DBAs can easily set up, test, and experiment with this new functionality, all in the cloud, with simple-to-follow commands and without the need of support from their Windows System Administrator colleagues.
A full and detailed explanation of what CMU is and does is beyond the scope of this article series. This series focuses on the necessary steps for implementation and testing. But to summarize, CMU's functionality includes:
- The mapping of either dedicated Oracle Database users or shared schemas to Active Directory users or Active Directory security groups.
- Database privilege management via Database roles mapped to Active Directory security groups.
- Database connections that authenticate using either:
- An Active Directory-managed password - "Directory Synchronization"
- No database credentials provided (no need to enter a username or password) - "Kerberos Authentication"
- Public Key Infrastructure - "PKI Authentication"
The publicly-available Oracle Database 19c Security Guide illustrates CMU as:
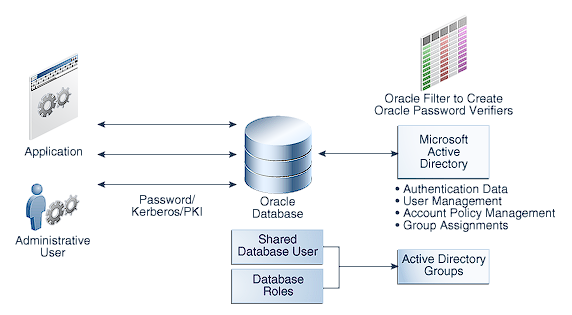
For a description of the Oracle documentation illustration see: https://docs.oracle.com/en/database/oracle/oracle-database/19/dbseg/img_text/dbseg_pb_001b.html
The end result is:
- Potentially fewer end users in the Oracle Database.
- Database users and/or roles with all authentication and authorization managed via Active Directory.
- Simpler overall user management workflows and likely less work for Oracle DBAs.
- Database-enforced Active Directory account policies when users log into the Oracle Database.
Overview
Oracle Database 18c CMU is a new feature that Oracle DBAs will want to get their hands on and start testing as soon as possible. But doing so involves components that are usually outside of the Oracle DBAs control - namely Microsoft Windows Servers and Microsoft Active Directory. Fortunately, the cloud makes testing this simple.
To properly try this new functionality prior to integrating it in their actual corporate environments, Oracle DBAs need a lab environment or testbed that includes:
- An Oracle Database 18c or higher.
- An Active Directory domain controller.
- A Windows-based "application server".
- A Linux-based "application server", also joined to the domain.
Local testing is usually simple for Oracle DBAs using local tools such as Oracle VirtualBox and Vagrant. But often Oracle DBAs lack access to local test Windows Server environments. Fortunately, the cloud remedies this.
This first article in the series describes the steps required to set up a suitable test environment in Oracle Cloud Infrastructure (OCI) focusing only on infrastructure provisioning. Subsequent articles cover configuration of the provisioned infrastructure and setting up both Single Sign-on (SSO) and Directory Synchronization services in CMU.
IMPORTANT: Even when testing, respect all Oracle and Microsoft license terms and conditions. Test environments must be suitably licensed at all times.
Approach
Rather than relying on screenshots of GUIs which can sometimes be more difficult to follow and prone to implementation errors, almost all steps in this series are performed at the command line to facilitate simple cutting & pasting.
All of the cloud setup commands are provided in OCI Command Line Interface (CLI) commands. OCI CLI is Python-based and can be installed on a DBA's Windows, MacOS, or Linux desktop or server.
For additional OCI CLI information see: https://docs.cloud.oracle.com/iaas/Content/API/Concepts/cliconcepts.htm
Terraform would be another, and arguably more practical, infrastructure deployment approach. However, for the sake of learning each individual step and experimentation, OCI CLI commands are used instead.
Just for fun and to be a little different, this article uses CLI scripting within Windows PowerShell. Translating the commands to Bash for Linux should be pretty simple and mostly involves changing end-of-line continuation characters and removing leading $ symbols from variable declarations.
The "jq" utility must also be installed on the machine running the OCI CLI. "jq" is similar to the sed utility but is specific to parsing JSON and is also available for Windows, MacOS, and Linux.
Assumptions
- OCI Tenancy for experimentation is already set up and ready for use. If not, see: https://cloud.oracle.com/tryit
- Compute shapes chosen are all available using an OCI trial account. However, the OCI resources required are probably beyond what Oracle currently offers in the "Always free" tier.
- CLI is configured to connect to the Tenancy home region as an OCI Administrator. For CLI installation see: https://docs.cloud.oracle.com/iaas/Content/API/SDKDocs/cliinstall.htm
- Oracle CMU is a new feature with Oracle Database 18c and therefore an 18c or 19c (Enterprise Edition) database is required. Testing will use an Oracle 18c Express Edition (XE) database for several reasons:
- XE 18c has all Enterprise Edition features (including CMU) without licensing costs. Instead, it is capacity-constrained.
- Testing using an OCI "User-managed Database Service" 18c or 19c managed database environment is another possibility, but CMU involves adjusting files at the OS level in the Oracle Home and adjusting the Oracle installation in the OCI DB Service is generally not suggested as it may compromise support or possibly cause technical issues.
- Using XE on Compute Service (IaaS) is likely the lowest cost option.
- Compute shapes, VM OS releases, OCI resource names, CIDR blocks, etc. can all be customized as required.
CLI Validation & Prerequisites
The first step is to validate that the CLI is working properly. An easy test is to list subscribed regions.
# Validate that OCI-CLI has been properly configured by listing the subscribed regions: |
If the above doesn't return output such as the following, then resolve OCI CLI setup and access issues before continuing:
PS > # Validate that OCI-CLI has been properly configured by listing the subscripted regions: |
Then save the Tenancy OCID and desired Availability Domain (AD) into an environment variable for future usage:
# Manually save the Tenancy OCID to an environment variable: |
Next, create a new compartment specifically for CMU testing (just for the logical organization of objects):
# List existing compartments: |
Creating Network Objects
The first step is to create a VNC providing an appropriately sized CIDR block:
# Create a new VCN in the compartment and capture the new VCN_ID in an environment variable: |
Since this is a simple demonstration of a test environment only, access to OCI resources in this testbed will be from the internet. And OCI servers will be able to access the Internet to download software, etc.
As a security measure, server access is allowed only from the external IP address of the CLI host. Ideally, a Bastion server and NAT Gateway should be deployed with internet-facing cloud infrastructure (example here)or access via an IPsec VPN or FastConnect network (find details in the public documentation).
To facilitate Internet access, we need to create an Internet Gateway (IGW) and route outbound traffic from our new VCN to the IGW:
# Add an IGW to the new VCN: |
Then, a new Security List allowing SSH and Remote Desktop only from the CLI host's external IP address is created:
# Capture our external IP for usage in internet facing security rules |
To allow full communication (ICMP pings and Active Directory LDAP traffic) between internal servers, INGRESS security rules allowing all traffic between the internal testbed servers (based on the 10.0.1.0/24 CIDR) were also included in the above command.
Finally, a subnet is created in the previously recorded Availability Domain
# Add a subnet to the new VCN (using the new security list): |
That should be it for networking, routing, and security-related requirements.
Creating Linux Servers
Two Linux Servers need to be added to the testbed environment:
- A database host server - will be used with Oracle Database 18c Express Edition (XE).
- A Linux-based application server -will have this server join our (to be created) Active Directory domain for Linux-based SSO testing.
Both will be created using Oracle Linux 7.7.
Linux Server access is based on SSH and public key authentication. The public and private keys must be created and available on the CLI host machine:
# Define an environment variable for the location of the public SSH key(s) to be added to Linux instances: |
Next, programmatically select the latest release of the Oracle Linux 7.7 image to use:
# List available Linux images and save the Image OCID: |
And now the two Linux machines can be created:
# Create a DB server with the shape VM.Standard2.1 : |
Creating Windows Servers
Two Microsoft Windows Servers are needed:
- A Windows server to act as an Active Directory Domain Controller (DC).
- A Windows-based application server to test SSO from Windows.
For both, Microsoft Windows 2016 Standard Edition is used as it is a readily available source OS ("image") in OCI:
# List available Linux images and save the Image OCID: |
Then the two Windows Servers can be created:
# Create a Domain Controller server with the shape VM.Standard.E2.1 : |
Finally, list all instances to ensure all were provisioned as expected:
# List all instances in the compartment: |
Next Steps
The next article in this series will show how simple it is for Oracle DBAs to set up and configure an Active Directory domain, domain-joined application servers (both Windows and Linux-based), and an Oracle 18c Database Server. The subsequent articles cover implementing both Directory Synchronization and Kerberos for database user authentication.