This is the second in a four-part article series related to testing Oracle Database 18c Centrally Managed Users (CMU) by leveraging the Oracle Cloud Infrastructure (OCI) for Oracle DBAs to create a lab or testbed. The first article covered how to create a CMU testbed.
Using OCI and the commands provided in this article series, Oracle DBAs can quickly and easily set up all required infrastructure including components such as domain-joined servers and an Active Directory domain controller (DC) without requiring assistance from their Windows Administrator colleagues.
So, while this article does reference numerous Windows and Linux administrative commands, it is intended for use by the Oracle DBA.
For Oracle DBAs, having "command-based" setup instructions is probably more reliable and simpler to follow than providing a series of screenshots. Consequently, this article details the Active Directory domain setup and configuration via PowerShell commands (to be run on the OCI-hosted Windows servers). Of course, configuring Windows components through the associated GUIs (such as Windows Server Manager) is an alternative.
Having the testbed Linux and Windows application servers join the Active Directory domain isn't required for basic CMU password ("directory synchronization") testing but will be required if/when testing CMU Kerberos authentication. Since having these test servers join the domain is relatively simple, the process is included in this article.
Infrastructure Validation
The first thing to do is to validate the OCI created in the previous article is available and running. There should be four servers listed and running.
As per the previous article, the OCI CLI commands shown here are in Windows PowerShell format. Adjusting to run from a MacOS or Linux Bash shell should be relatively simple and mostly involves removing leading "$"s from variable declarations and changing line continuation markers from "`" to "\". Additionally, Bash requires the "echo" command adjustments to display variable values.
OCI CLI commands:
# Extract the compartment OCID: |
Sample output:
PS > # Extract the compartment OCID: |
If any are not started, they can be started using a command such as:
oci compute instance action --action START --instance-id ocid1.instance.oc1.phx.anyhqljtcty5iiyclci7tvd4fno6alyhgrwmfv7e5cf3cguzaxy4obpydnoa |
To remotely access via SSH or RDP, the external (or "public") IPs of each server must be known. Either record from the OCI web console or from a command such as:
# Show the public IP for one of the VM instances: |
Sample output:
PS > # Show the public IP for one of the VM instances: |
Internal (or "private") IPs for each also must be known. Again, these are available from the OCI web console or CLI. For the remainder of this article, it is assumed that the private IPs used in the infrastructure provisioning steps from the previous article are used.
Preparing the Database Server
It makes the most sense to build the database server first. For testing CMU in this testbed, the database server configuration:
- Is based on a simple "VM.Standard2.1" shaped VM instance, though using a different shape would be fine.
- Uses the November 2019 Oracle Linux 7 image as the OS.
- Has no extra block volumes added - using the provided boot volume will suffice.
- Uses Oracle Database 18c Express Edition (XE) for license simplicity.
Testing with Oracle Database XE makes sense as XE has all Enterprise Edition features without licensing costs (but instead is capacity-constrained). Testing using an OCI "User-managed Database Service" 18c or 19c managed database environment is another possibility. However, CMU is not supported with Oracle Database Standard Edition and further, currently does not work with Oracle Autonomous Database suite of services.
On the database server VM "DBSERV1" created previously, log into the server as "opc" and sudo to the "root" user. Then install the Oracle pre-install RPM using:
curl -o oracle-database-preinstall-18c-1.0-1.el7.x86_64.rpm https://yum.oracle.com/repo/OracleLinux/OL7/latest/x86_64/getPackage/oracle-database-preinstall-18c-1.0-1.el7.x86_64.rpm |
Then download the Oracle Database XE software from Oracle's site. Note, Oracle no longer requires you to review and accept the licensing terms and conditions and hence this step can now be automated.
Download the XE software from https://www.oracle.com/database/technologies/xe-downloads.html.
Once downloaded and staged (in this example, in the "opc" user's home directory) on the database server, install with the single simple command:
wget https://download.oracle.com/otn-pub/otn_software/db-express/oracle-database-xe-18c-1.0-1.x86_64.rpm |
Then create the XE database instance using:
/etc/init.d/oracle-xe-18c configure |
And finally, adjust the Linux firewall to allow remote access to the listener port using:
firewall-cmd --permanent --zone=public --add-port=1521/tcp |
Sample output:
[root@dbserv1 ~]# firewall-cmd --permanent --zone=public --add-port=1521/tcp |
If you like, test that the XE and, specifically the default pluggable database called XEPDB1, is available:
. oraenv <<< XE |
Configuring the Active Directory Server and Domain Controller
It makes sense to configure the Active Directory domain controller next (so that other servers can join the domain).
Initial steps:
- Using Remote Desktop Client, connect to the DC1 server using the OPC username and the initial password provided in OCI web console.
- Change password on initial logon as prompted.
- Sign in.
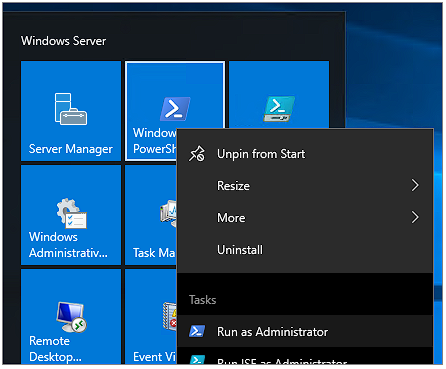
- Run PowerShell using the "Run as Administrator" option.
The "Run as Administrator" option can be found by right-clicking on the Start menu icon:
A prerequisite step is to manually set the local Administrator password which is unset by default. From the PowerShell prompt use:
net user Administrator <New Password> |
Sample output:
PS C:\Windows\system32> net user Administrator ***** |
The initial server build is just a basic server. It needs to have the Active Directory domain server role enabled which is simple enough to do via the following command (the pipe and Out-File argument is optional):
Install-WindowsFeature AD-Domain-Services -IncludeManagementTools | Out-File -FilePath C:\Users\opc\AD_Feature_Install.txt |
Sample output:
PS C:\Windows\system32> cd C:\Users\opc\ |
Next, a domain must be created. Use any domain name and top-level domain (TLD) you like. For these examples, we are using STAGECOACH.NET - change to your own value throughout.
To create the Active Directory domain forest, use a command similar to:
| Install-ADDSForest -DomainName <Your Domain Name> | Out-File -FilePath C:\Users\opc\AD_Forest_Create.txt |
IMPORTANT:
- The prompt for the "SafeModeAdministratorPassword" is for a new password, not the one specified earlier. Of course, both can be the same if you choose.
- After the AD domain forest has been created, the server will automatically reboot.
- It takes about 5 minutes to complete the reboot before the server can be connected again. Trying to log in before it's done will show the message "Please wait for the Group Policy Client".
- It is safe to ignore the various WARNINGs in the command output for the sake of this test environment.
- Ideally, a static IP address is assigned to the server prior to the AD configuration. This is not required for this OCI testbed.
Sample output:
PS C:\Users\opc> Install-ADDSForest -DomainName STAGECOACH.NET |
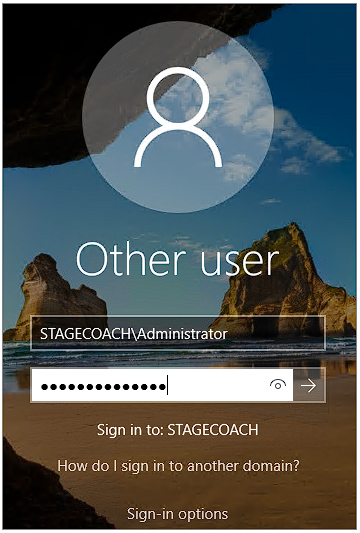
After the reboot completes, log into the server again, but this time using the newly-created domain:
And again run PowerShell as an administrator.
Then the output log from the command can be verified:
PS C:\Users\Administrator> cat ..\opc\AD_Forest_Create.txt |
And some basic validation commands can be run. Commands:
Get-Service adws,kdc,netlogon,dns |
Sample output:
PS C:\Users\Administrator> Get-Service adws,kdc,netlogon,dns |
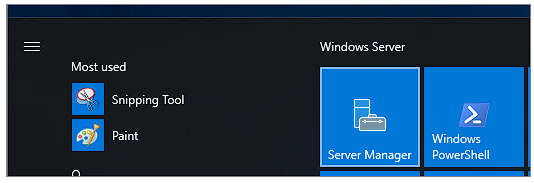
You can also check that the instance is now configured for Active Directory by running "Windows Server Manager" from the Start menu:
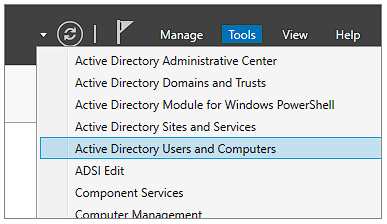
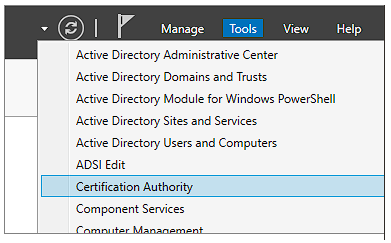
And verifying that a number of Active Directory tools are present can be done from the "Tools" menu at the top right:
The next step required on the newly created DC is to make the server a "Certification Authority" and install Active Directory Certificate Services. Example command (with optional redirection of output to a logfile):
Add-WindowsFeature Adcs-Cert-Authority -IncludeManagementTools | Out-File -FilePath C:\Users\opc\AD_Certification_Authority.txt |
Sample output:
PS C:\Users\Administrator> Add-WindowsFeature Adcs-Cert-Authority -IncludeManagementTools | Out-File -FilePath C:\Users\opc\AD_Certification_Authority.txt |
Then create the root CA (again with optional output redirection to a logfile):
Install-AdcsCertificationAuthority -CAType EnterpriseRootCA | Out-File -FilePath C:\Users\opc\AD_EnterpriseRootCA.txt |
Sample output:
PS C:\Users\Administrator> Install-AdcsCertificationAuthority -CAType EnterpriseRootCA | Out-File -FilePath C:\Users\opc\AD_EnterpriseRootCA.txt |
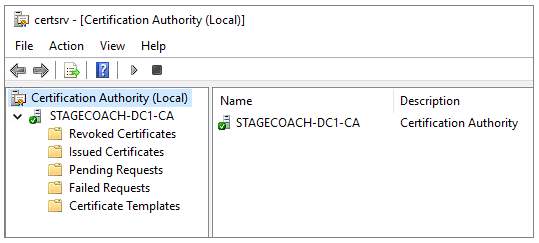
Confirm by again opening Server Manager and reviewing the Tools listing. The "Certification Authority" option should now be present:
Clicking on that brings up the Certification Authority tool which should show the domain controller on your domain:
The configuration of the AD domain controller is now complete. However, for future configuration steps, we'll need to copy files to and from the DC. Consequently, we can configure the OpenSSH for Windows which is available on GitHub.
Download and unzip the 64-bit OpenSSH utilities using the PowerShell commands:
[Net.ServicePointManager]::SecurityProtocol = [Net.SecurityProtocolType]::Tls12 |
And then add the OpenSSH utilities to the system PATH environment variable using the command:
[Environment]::SetEnvironmentVariable( |
Open up a Command Prompt ("Run -> CMD") to load the newly adjusted PATH and generate a new public/private keypair using:
ssh-keygen |
Example output:
C:\Users\Administrator>ssh-keygen |
That should be all that's required on the new domain controller for the time being.
Configuring the Windows Application Server for Windows-Based Testing
Next, we can configure the second Windows Server 2016 instance "APPWIN1" to be used later as a Windows application server to test database connections from.
Similar to the previous steps:
- Using Remote Desktop Client, connect to the APPWIN1 server using the OPC username and the initial password provided in OCI web console.
- Change password on initial logon as prompted.
- Sign in.
- Run PowerShell using the "Run as Administrator" option.
To join an Active Directory domain (regardless of the OS), it is necessary to set the Active Directory domain controller as the DNS server.
First, determine the logical name of the network adapter. For the OCI-provisioned instance, it should be "Ethernet 3".
Command to confirm:
Get-NetAdapter |
Sample output:
PS C:\Windows\system32> Get-NetAdapter |
Next, set the DNS server for that adapter to the internal/private IP address of the Active Directory Domain Server. For the DC1 server provisioned in the previous steps, the private IP specified during instance creation was 10.0.1.100. Therefore the command becomes:
netsh interface ip set dns name="Ethernet 3" static 10.0.1.100 |
Sample output (note that the command takes 15 seconds or so to complete and the error message can be safely ignored):
PS C:\Windows\system32> netsh interface ip set dns name="Ethernet 3" static 10.0.1.100 |
Next, we need to actually join the domain. Command:
add-computer –domainname <Domain Name> -Credential Administrator@<domain> -restart –force |
Example using the sample domain STAGECOACH.NET:
add-computer –domainname STAGECOACH.NET -Credential Administrator@stagecoach.net -restart –force |
Enter the password when prompted and let the APPWIN1 server reboot. After the reboot completes, log on again, this time logging into the domain and open PowerShell again as an administrator.
Now that the app server setup is complete and it has joined the new domain, we can download the Oracle Client. The "basic" and "sqlplus" components are required at a minimum if configuring for CMU using password authentication with Active Directory synchronization. (Kerberos Single Sign-On will require the full client).
The latest version of the Oracle 19c client can be downloaded using the non-version specific "permanent links".
Example commands:
[Net.ServicePointManager]::SecurityProtocol = [Net.SecurityProtocolType]::Tls12 |
Sample output:
PS C:\Users\Administrator> [Net.ServicePointManager]::SecurityProtocol = [Net.SecurityProtocolType]::Tls12 |
Unzip the downloaded zip files using:
expand-archive -path '.\instantclient-basic-windows.zip' -destinationpath 'C:\Oracle' |
And add the Oracle Instant Client utilities to the system PATH environment variable using the command:
[Environment]::SetEnvironmentVariable( |
Oracle Instant Client on Windows is dependent on the Microsoft Visual Studio Redistributable which can easily be downloaded from Microsoft and installed via the commands:
[Net.ServicePointManager]::SecurityProtocol = [Net.SecurityProtocolType]::Tls12 |
Finally, open a command prompt (Run -> CMD) to load the newly adjusted PATH and test using SQL*Plus:
C:\Users\Administrator>> sqlplus -L -s a/a@//10.0.1.101:1521/XE |
The command failed with the ORA-01017 error message. But that is expected and shows that it is successfully communicating and attempting to authorize against the Oracle database.
One additional step that we can do at this time is give "Domain Users" the ability to log into this test Windows application server via Remote Desktop. In reality, allowing only specific users to log in to servers is advisable, but since this is a simple testbed, adding "Domain Users" can be done instead for simplicity and convenience. It's easy to implement via the PowerShell command:
Add-LocalGroupMember -Group "Remote Desktop Users" -Member STAGECOACH\"Domain Users" |
Configuring the Linux Application Server for Windows-Based Testing
The last demo VM instance in the testbed is a second Linux instance to simulate a Linux Application server and test remote Oracle connections from. It has the same purpose and same test expectations as the previously created Windows App Server, just differing in OS.
Just like with the Windows App Server, the Linux App Server will join the Active Directory domain and use the Oracle 19c Instant Client.
On the Application Server VM "APPLINUX1" created previously, log into the server as "opc" and sudo to the root user.
Again, using the latest release of the Oracle 19c Instant Client from the "permanent links" will suffice for testing CMU using Active Directory password synchronization, but the full client will be needed for Kerberos single sign-on.
Download and install the Oracle 19c Instant Client "basic" and "sqlplus" components using:
yum install -y https://download.oracle.com/otn_software/linux/instantclient/oracle-instantclient-basic-linuxx64.rpm |
Configuring an Oracle Linux 7 server to join a Windows Active Directory domain is surprisingly simple. First, install some required packages via yum:
yum -y install realmd sssd krb5-workstation krb5-libs samba-common-tools |
Just like when configuring the Windows app server, there is the requirement to set the domain controller as the DNS server.
Still as root from the APPLINUX7 instance, adjust the DNS nameserver to use the internal IP of the domain controller:
sed -i.bak '/nameserver 169.254.169.254/ s/.*/nameserver 10.0.1.100/' /etc/resolv.conf |
IMPORTANT: OCI instances revert the value of /etc/resolv.conf on each DHCP lease renewal or instance reboot. OCI instances include a /etc/oci-hostname.conf file; however, (at the time of writing) that file does not provide any option to preserve /etc/resolv.conf. The Oracle-recommended solution from My Oracle Support is to instead make the /etc/resolv.conf file immutable using the command:
chattr -R +i /etc/resolv.conf |
References on this specific issue:
- Oracle Cloud Infrastructure Documentation - DHCP Options
- Setting PRESERVE_HOSTINFO=2 in /etc/oci-hostname.conf Does Not Prevent /etc/resolv.conf to be Overwritten (Doc ID 2507035.1)
Discover the Active Directory realm - which is also the DNS domain (in these examples I continue to use the test domain name "STAGECOACH.NET" - change as appropriate):
realm discover STAGECOACH.NET |
And then join the Active Directory realm using the administrator password set previously:
realm join --verbose STAGECOACH.NET -U Administrator@stagecoach.net |
Sample output (note the NT_STATUS_UNSUCCESSFUL error which was ignored):
[root@applinux1 ~]# realm discover STAGECOACH.NET |
Possibly (depending on OS image used), password-authenticated SSH logins are disabled. Enable by adjusting the SSHD config and restarting the SSHD service:
sed -i.bak '/^PasswordAuthentication/ s/no/yes/' /etc/ssh/sshd_config |
Another change that will be required if later testing CMU with Kerberos authentication is the setting for the Kerberos credential cache (or "ccache"). In Oracle Linux 7 this defaults to the Linux specific value of KEYRING which is in unswappable kernel memory only accessible by the current user. Unfortunately, though, the Oracle client currently cannot access Kerberos credentials cached in KEYRING. Consequently, for CMU Kerberos testing from Linux, we'll need to change this value to the old default value of FILE which the Oracle client can read:
sed -i.bak '/default_ccache_name/ s~^[ \t]*default_ccache_name.*~\# & \ndefault_ccache_name = FILE:/tmp/krb5cc_%{uid}~' /etc/krb5.conf
|
Finally, test logging into the APPLINUX1 server using Active Directory credentials, connecting via SSH from the desktop or the DBSERV1 machine. For example:
ssh "Administrator@stagecoach.net"@10.0.1.102 |
Sample connection test:
$ ssh "Administrator@stagecoach.net"@10.0.1.102 |
Validate that we can reach the database using SQL*Plus and an EZconnect connection. Again, the ORA-01017 error is expected and tells us that communication with the database succeeded (even though the authentication failed - that happened against the DB):
[administrator@STAGECOACH.NET@applinux1 ~]$ sqlplus -L -s a/a@//10.0.1.101:1521/XE |
Next Steps
The steps above built on top of the infrastructure provisioned in the first article by:
- Installing Oracle Database 18c XE on DBSERV1 to act as our Oracle DB where CMU will be used.
- Creating an Active Directory Forest and turning DC1 into our domain controller.
- Preparing APPWIN1 a sample Windows-based, domain-joined application server to test CMU connections from through SQL*Plus.
- Preparing APPLINUX1 a sample Linux-based, domain-joined application server to test CMU connections from through SQL*Plus.
In the next two articles in this series, we'll set up both Oracle Database directory synchronization with AD and Single Sign-on using Kerberos and AD.