This is the third in a four-part article series related to testing Oracle Database 18c Centrally Managed Users (CMU) by leveraging the Oracle Cloud Infrastructure (OCI) for Oracle DBAs to create a lab or testbed. The second article covered Configuring Windows And Linux Servers For CMU Testing.
Implementing Oracle Centrally Managed Users (CMU) via "password synchronization" with Active Directory (AD) is the most practical configuration for many use cases as the authentication process from the perspective of the application remains unchanged. Applications still prompt for credentials - the key difference is that the database communicates with Active Directory for password validation.
Consequently, the database must be configured so that it can securely communicate with AD and that database users and groups are created accordingly. This article walks through how to configure and test at both the AD and database level.
Active Directory One-time Configuration Steps
The first requirement is to have an Active Directory user that the database software will use to communicate with AD. When the database receives an authorization request (i.e. a "database logon") it needs to talk to AD to validate the user-provided credentials. Hence, a user is required for Oracle Database software to AD interaction.
As usual, this user can be added via the "Active Directory Users and Computers" GUI utility. However, for simplicity, a PowerShell equivalent command can be used.
On the Domain Controller DC1, open a PowerShell window as Administrator. Then a new user, in this case called "orasync" can be created. (IMPORTANT: update the UserPrincipalName and Path to show your actual domain vs the STAGECOACH.NET domain being used in this example):
New-ADUser ` |
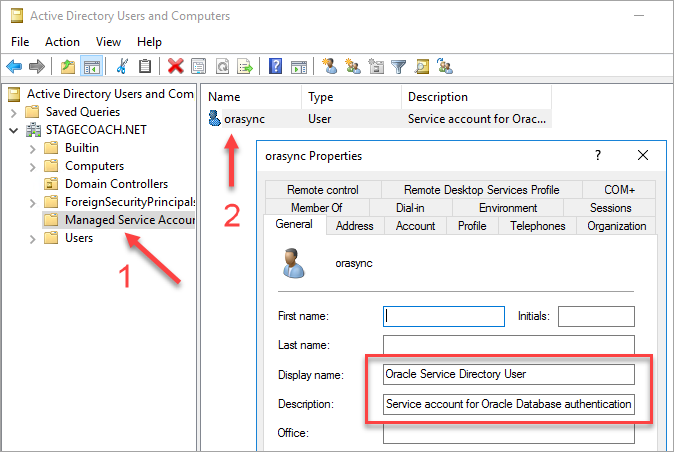
Putting the service account user in the "Managed Service Accounts" folder in Active Directory is a preference to reduce clutter. It's in no way mandatory.
We can do a simple confirmation that the user was created using the PowerShell command dsquery:
dsquery user -name orasync |
Sample output:
PS C:\Users\Administrator> dsquery user -name orasync |
A more detailed output can be provided using the PowerShell command Get-ADUser:
Get-ADUser -Identity "orasync" -properties DistinguishedName |
Sample output:
PS C:\Users\Administrator> Get-ADUser -Identity "orasync" -properties DistinguishedName |
These same results can also be confirmed using the GUI utility "Active Directory Users and Computers":
The permissions that this user requires on the Active Directory side are not overly clear from the official documentation. However, the following simple dsacls commands seem to provide what is required (again, change the domain name as required):
dsacls "CN=orasync,CN=Managed Service Accounts,DC=STAGECOACH,DC=NET" /I:P /G "STAGECOACH\orasync:WP;lockoutTime" |
The dsacls commands produce a lot of output which can be ignored.
In the previous article, an SSH public-private keypair for the Domain Controller DC1 was created. Since we will need to copy files to and from the database server, the domain controller's public key should be copied to the database server.
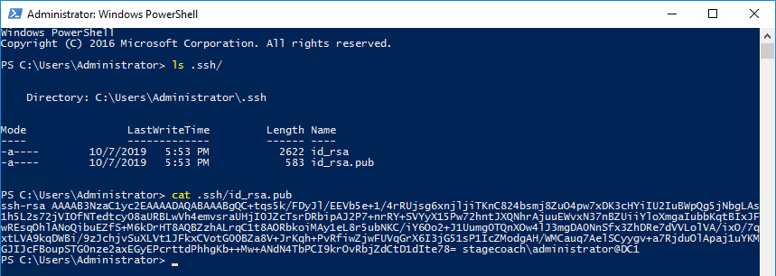
On the Active Directory Domain Controller DC1, first display and copy the public key:
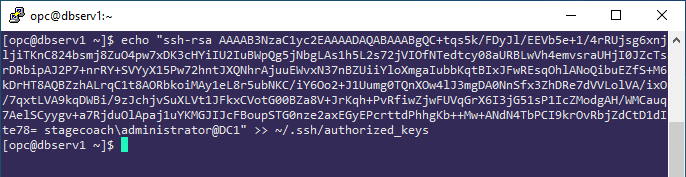
Copy the public SSH key from the Windows host to the database server DBSERV1 into the ~/.ssh/authorized_keys file for the "opc" user. Be careful not to include carriage returns or end of line markers when copying.
Example:
Even though the database software is installed on Linux, the Oracle Home contains a Windows executable file for the "Oracle Password Filter":

On the Active Directory domain controller DC1, the Oracle Password Filter executable can be copied from the database server DBSERV1 using scp run from the PowerShell window:
scp opc@10.0.1.101:/opt/oracle/product/18c/dbhomeXE/bin/opwdintg.exe .\Desktop\ |
Sample output:
PS C:\Users\Administrator> scp opc@10.0.1.101:/opt/oracle/product/18c/dbhomeXE/bin/opwdintg.exe .\Desktop\ |
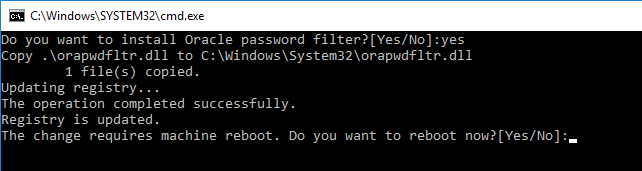
After copying, run the executable:
.\Desktop\opwdintg.exe |
The utility runs in a Command Shell window automatically:
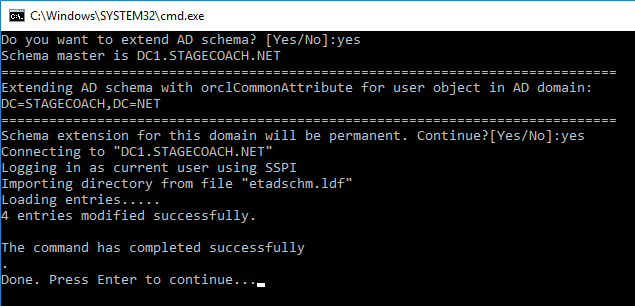
And ends with a prompt to reboot the domain controller:
After the Domain Controller DC1 instance reboots, log in again and once again open a PowerShell window.
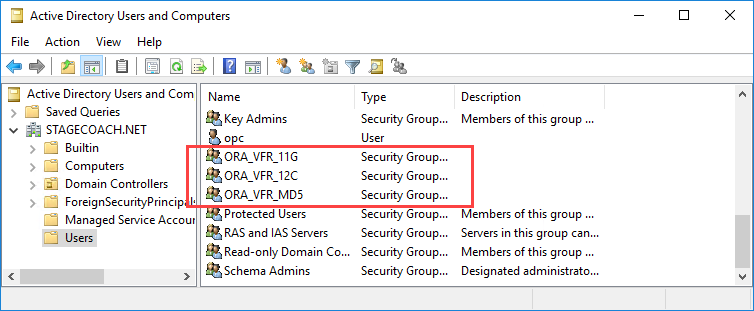
The installation added three new security groups to Active Directory which can be viewed from both the command line and the GUI "Active Directory Users and Computers".
The three groups are related to the different password verifiers that may be required and can be confirmed from the PowerShell command line using:
Get-ADGroup -Filter {name -like "ORA*"} | Select Name,ObjectClass,GroupCategory
|
Sample output:
PS C:\Users\Administrator> Get-ADGroup -Filter {name -like "ORA*"} | Select Name,ObjectClass,GroupCategory
|
Or using the "Active Directory Users and Computers" utility:
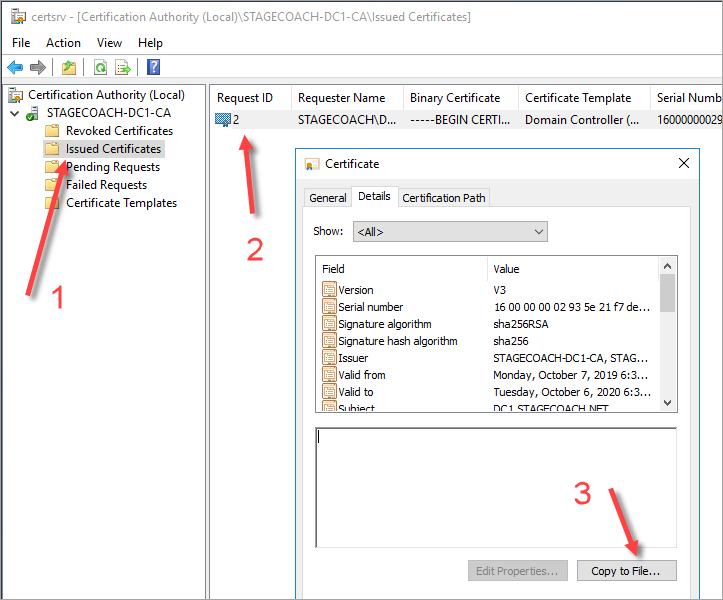
To make communications secure, the domain controller's certificate must be exported and provided to the database server. This can be done relatively easily using some basic PowerShell commands:
# Extract details of the Server's self-issued certificate: |
Sample output:
PS C:\Users\Administrator> $Cert = Get-ChildItem Cert:\LocalMachine\My | ` |
Or the same can be done using the Windows Certification Authority tool (maybe use this if there are any complexities or issues with the above PowerShell commands):
Lastly, copy the exported certificate file to the database server to later be imported. For example, again using SCP run from a Powershell window on the DC1 server:
scp .\$Env:computername.cer opc@10.0.1.101:/tmp/ |
Database Home One-time Configuration Steps
The database home must be configured so that it can communicate with the Active Directory Domain Controller. The location of the domain controller(s) is specified in the dsi.ora file. And the associated DSI_DIRECTORY_SERVERS parameter can reference the domain controller(s) via either internal IP address or FQDN.
Configure the dsi.ora file in the default location, running as the "oracle" user on the database server DBSERV1:
. oraenv <<< XE |
Sample output:
[oracle@dbserv1 ~]$ . oraenv <<< XE |
An Oracle credential wallet file must be created to securely hold the Active Directory credential (created above) and the server's certificate.
On the database server, DBSERV1 as the "oracle" user, create a new wallet that will contain the credentials for the orasync user and the certificate needed for secure communication with the domain controller (run each command individually as the orapki and mkstore commands require a wallet password):
. oraenv <<< XE |
Import the certificate transferred from the domain controller into the same Oracle wallet using:
orapki wallet add -wallet . -cert /tmp/*.cer -trusted_cert |
Sample output:
[oracle@dbserv1 wallet]$ orapki wallet add -wallet . -cert /tmp/*.cer -trusted_cert |
And validate that everything is in the wallet as expected:
orapki wallet display -wallet . |
IMPORTANT: There is a trailing period in the above command indicating that the wallet files are in the current working directory.
Sample output showing that there is a DN, PASSWORD, USERNAME, and trusted certificate saved in the wallet:
[oracle@dbserv1 wallet]$ orapki wallet display -wallet . |
The database needs to know where to find this wallet file which we specify in the SQLNET.ORA file:
cat <<EOT >> ${ORACLE_HOME}/network/admin/sqlnet.ora
|
And we also need to, at the very minimum, adjust the LDAP_DIRECTORY_ACCESS initialization parameter (we would also need to adjust other parameters as administrative privilege [aka SYSDBA] access via directory synchronization is required):
echo "ALTER SYSTEM SET ldap_directory_access='PASSWORD' SCOPE=both;" | sqlplus -s / as sysdba |
Sample output:
[oracle@dbserv1 wallet ~]$ echo "ALTER SYSTEM SET ldap_directory_access='PASSWORD' SCOPE=both;" | sqlplus -s / as sysdba |
A common source of problems with CMU directory synchronization comes down to firewall issues. Even though a hostname or IP was specified in the dsi.ora file, communication may be redirected to a different socket and consequently we should ensure that the LDAP ports are accessible regardless of whether IP addresses or hostnames or FQDNs are used.
Still on the database server DBSERV1, test all permutations for accessing the CMU testbed domain controller:
(echo > /dev/tcp/10.0.1.100/636) >/dev/null 2>&1 && echo "OPEN" || echo "CLOSED" |
If any of the above tests do not resolve and return the "OPEN" message, then there's a firewall or routing problem. In lieu of configuring a separate DNS environment, for testing purposes, it's easiest to simply update /etc/hosts file as the "root" user:
echo "10.0.1.100 DC1.STAGECOACH.net DC1" >> /etc/hosts |
Then re-test access to the LDAP ports. Sample output:
[root@dbserv1 ~]# (echo > /dev/tcp/10.0.1.100/636) >/dev/null 2>&1 && echo "OPEN" || echo "CLOSED" |
At this point, the one-time setup in the RDBMS home is complete.
Creating a Database User and Testing from the Database Server
We're now ready to configure the database and test authentication through CMU. To minimize involved components, it's easiest to first test from the database server.
As a prerequisite, an Active Directory test user must exist. In this article we're using a sample user called "Simon". If needed, create a test user using either the New-ADUser PowerShell command as shown previously or through the "Active Directory Users and Computers" GUI tool:

What's not shown through the GUI is the user's "Distinguished Name" (DN) which will be required when adding to the Oracle database.
It's easy to extract the AD DN of the test user from a PowerShell window on the DC1 server:
Get-ADUser -Identity "simon" -properties DistinguishedName |
Sample output:
PS C:\Users\Administrator> Get-ADUser -Identity "simon" -properties DistinguishedName |
The top line of output is what will be relevant when adding the user to the Oracle database.
But before the database can authenticate against Active Directory, the Oracle password filter (installed into the domain controller) must catch, hash, and store a shadow copy of the user's password. Consequently:
- The user must be added to one of the newly created Active Directory security groups such as ORA_VFR_12C.
- The user's password must be changed.
Until both steps are done, the database user (once created) will fail to authenticate.
The user can be added the group through the "Active Directory Users and Computers" utility if using a GUI is preferable: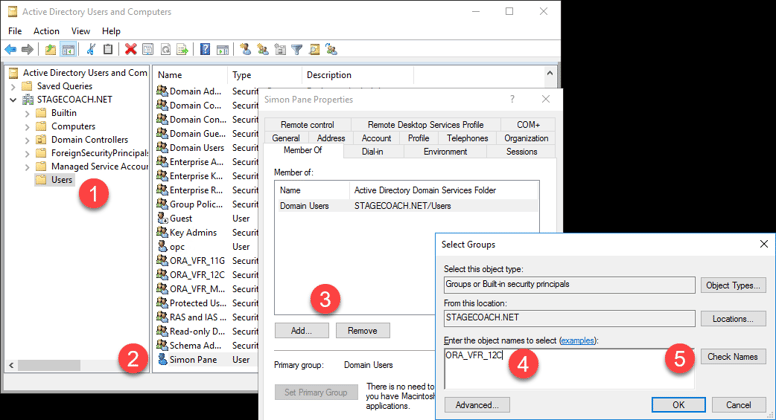
Though for Oracle DBAs, it's probably simpler and more practical (plus more scalable) to add the user to the security group using a very simple PowerShell command:
Add-ADGroupMember -Identity "ORA_VFR_12C" -Members simon |
And to verify that the user has been added:
Get-ADPrincipalGroupMembership "simon" | select name |
Sample output:
PS C:\Users\Administrator> Get-ADPrincipalGroupMembership "simon" | select name |
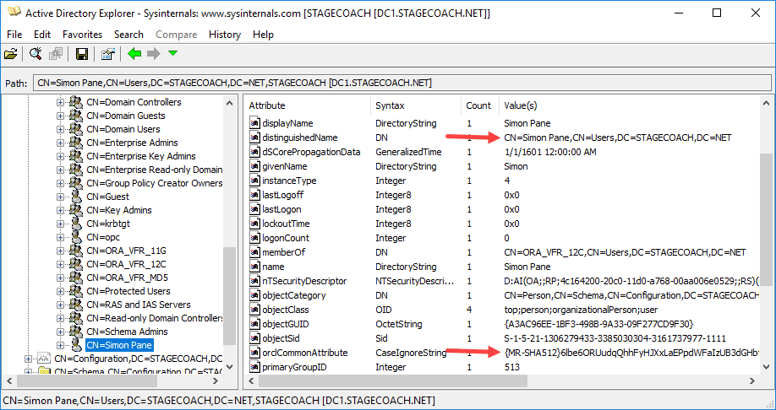
After adding the user to the verifier security group, the user's password must be changed. After changing, a new hash value will be recorded in the orclCommmonAttribute field in Active Directory which can easily be validated with:
Get-ADUser -Identity "simon" -properties orclCommonAttribute |
Sample output:
PS C:\Users\Administrator> Get-ADUser -Identity "simon" -properties orclCommonAttribute |
If the orclCommonAttribute is blank or isn't shown, then the setup isn't complete. Ensure that the user is in the ORA_VFR_12C security group and then reset the user's password.
If you prefer to check the user through a GUI, then the "Active Directory Explorer" utility from the Microsoft SysInternals site can be downloaded from: https://docs.microsoft.com/en-us/sysinternals/downloads/adexplorer. This utility (which is just a simple, stand-alone executable not requiring an installer or reboot) shows properties like the DistinguishedName and orclCommonAttribute fields which the standard "Active Directory Users and Computers" utility does not.
To programmatically download "Active Directory Explorer" (which is optional - only do so if desired):
wget https://download.sysinternals.com/files/AdExplorer.zip -OutFile .\AdExplorer.zip |
Once you know the Active Directory distinguished name and are sure that the password filter has recorded a password hash in the orclCommonAttribute field, the user can be created in the database and tested.
Going back to the Database Server DBSERV1, adding to the database is simple. It just requires use of the IDENTIFIED GLOBALLY option:
ALTER SESSION SET CONTAINER = XEPDB1; |
For testing convenience, rather than using an EZconnect string, we can create an Oracle Net entry the service:
cat << EOT >> ${ORACLE_HOME}/network/admin/tnsnames.ora
|
And finally, we can test the connection with:
sqlplus "STAGECOACH\simon"@ORCL |
Or using an alternative format:
sqlplus "simon@stagecoach.net"@ORCL |
Or even simply with:
sqlplus simon@ORCL |
Sample output:
[oracle@dbserv1 ~]$ sqlplus "STAGECOACH\simon"@ORCL |
Hence, things are working well from the database server. The next logical thing is to test from the other Linux and Windows secondary servers.
Testing from the Application Servers
Testing from either the Linux or Windows application server is simple. No extra client (or app server) setup is required as the clients simply communicate with the database server as normal using the normal protocols. It's the database server DBSERV1 that is configured to communicate with Active Directory. The database does all of the authentication and/or authorization work, not the client. So there's really nothing to set up on the client.
For simplicity we'll use an Oracle Net EZconnect connection string with the FQDN of the DB Server. We can even do this from the "opc" user for simplicity.
(NOTE: There is additional client setup/configuration required and the OS login used when connecting does matter when CMU is implemented using Kerberos, but not for password based authentication.)
Test a simple connection using a known credential. For example:
sqlplus system@//dbserv1.ad1.cmuvnc.oraclevcn.com:1521/XEPDB1 |
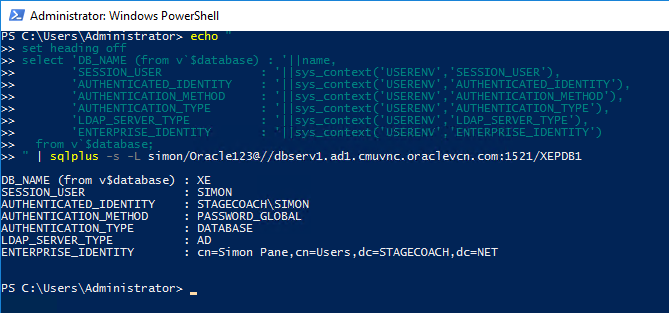
For a more elaborate test, we can use SQLPlus and enhance the command to:
- Leverage SYS_CONTEXT and the USERENV namespace to obtain additional connection properties.
- Connect using our Active Directory username and password.
Example Bash shell command:
echo " |
Sample output:
[opc@applinux1 ~]$ echo " |
And that's it - note the values shown above. Proof that we connected from a simulated Linux application server to the database but using a global password authenticated against Active Directory.
Testing using PowerShell from the Windows test server APPWIN1 also works. Only real change is the character used to negate special characters in the shell (i.e. negating the "$" from being a special character):
Hence, the Windows-formatted equivalent command becomes:
echo " |
Sample output:
The conclusion that nothing special was required on the application server side - we didn't even need to configure the SQLNET.ORA or TNSNAMES.ORA. Of course, doing so might be desirable for other purposes.
Next Steps
Now that CMU is set up and working using password-based authorization and directory synchronization to Active Directory, more of the CMU features can be experimented with. For example:
- Authentication via Active Directory security groups and Oracle database "shared schemas".
- Authorization via database "global roles" mapping to AD security groups.
And of course, independently setting up and testing CMU with Kerberos authentication as detailed in the fourth and final article in this series.