This is the fifth in a series of blog posts that covers setting up the load balancer for a high available setup of Oracle Enterprise Manager 13.5 using Oracle Cloud Infrastructure’s resources.
Recap
This is the fifth of a six-part series on how to deploy a high available installation of OEM 13.5 using Oracle Cloud Infrastructure (OCI) services.
Details of previous posts:
- First: Initial configuration of the OCI environment and the setup of a 2-Node RAC VM Database
- Second: How to launch and configure the first application machine
- Third: Setup of the Data Guard Standby DB, the shared storage area and the deployment of the second application machine.
- Fourth: How to install and configure OEM 13.5 on the first application machine
- Fifth: How to set up an OCI Load balancer
- Sixth: How to install (extend) OEM 13.5 on the second host, then include it in the load balancer rotation
This post shows how to configure the Load Balancer and secure the Oracle Management Service as well as the Management Agents with our custom SSL Keys.
Generate the Load Balancer’s SSH Keys
Since we’ll be using a secured connection through HTTPS, we’ll need to create our own SSH certificates to allow such connections to flow through the Load Balancer.
To create the new certificate we’ll use the first application machine “vloemapp01”:
- Using “ssh-keygen”, generate a RSA Key with a passphrase to make it even more secure.
Note: You’ll have to enter this passphrase every time you use the RSA Key file:
[root@vloemapp01 ~]# ssh-keygen -b 2048 -t rsa -f OEM135_LB.key
Generating public/private rsa key pair.
Enter passphrase (empty for no passphrase):
Enter same passphrase again:
Your identification has been saved in OEM135_LB.key.
Your public key has been saved in OEM135_LB.key.pub.
The key fingerprint is:
SHA256:io9dWT82/XXXXXXXXXXXXXXXXXXXXXXXXXXXXXXXXXXXXX root@vloemapp01
The key's randomart image is:
+---[RSA 2048]----+
|      ..o++.   oE|
|       o +X+    +|
|        * X.   o |
|       o +.   o .|
|      . A X. . ..|
|     . . = ..   +|
|    . . A   =. +o|
|     + . . + +oVB|
|    . o   . o.+AX|
+----[SHA256]-----+
- Create a certificate signing request (CSR) for our new key using “openssl”
Note: Be sure to enter the Fully Qualified Domain Name (FQDN) of your Load Balancer in the “Common Name” field:
[root@vloemapp01 ~]# openssl req -new -key OEM135_LB.key -out OEM135_LB.csr
You are about to be asked to enter information that will be incorporated
into your certificate request.
What you are about to enter is what is called a Distinguished Name or a DN.
There are quite a few fields but you can leave some blank
For some fields there will be a default value,
If you enter '.', the field will be left blank.
-----
Country Name (2 letter code) [XX]:US
State or Province Name (full name) []:ASHBURN
Locality Name (eg, city) [Default City]:ASHBURN
Organization Name (eg, company) [Default Company Ltd]:OEM
Organizational Unit Name (eg, section) []:
Common Name (eg, your name or your server's hostname) []:oem135slb01.sub0XXXXXXXX.oemvcn.oraclevcn.com
Email Address []:

Please enter the following 'extra' attributes
to be sent with your certificate request
A challenge password []:
An optional company name []:
- Generate a self-signed certificate:
[root@vloemapp01 ~]# openssl x509 -req -days 365 -in OEM135_LB.csr -signkey OEM135_LB.key -out OEM135_LB.crt
Signature ok
subject=/C=US/ST=ASHBURN/L=ASHBURN/O=OEM/CN=oem135slb01.sub0XXXXXXXXXX.oemvcn.oraclevcn.com
Getting Private key
[root@vloemapp01 ~]# openssl x509 -in OEM135_LB.crt -noout -text
Certificate:
    Data:
        Version: 1 (0x0)
        Serial Number:
            84:60:37:4a:3b:00:7e:c3
    Signature Algorithm: sha256WithRSAEncryption
        Issuer: C=US, ST=ASHBURN, L=ASHBURN, O=OEM, CN=oem135slb01.subXXXXXXXXXX.oemvcn.oraclevcn.com
        Validity
            Not Before: Jul 29 00:56:30 2021 GMT
            Not After : Jul 29 00:56:30 2022 GMT
        Subject: C=US, ST=ASHBURN, L=ASHBURN, O=OEM, CN=oem135slb01.sub0XXXXXXXXXX.oemvcn.oraclevcn.com
        Subject Public Key Info:
            Public Key Algorithm: rsaEncryption
                Public-Key: (2048 bit)
                Modulus:
                    00:dd:ea:ed:fb:d8:63:7f:39:11:37:5e:bf:3a:0e:
                    f7:85:e6:9e:6e:0b:f1:73:32:a8:f3:04:80:13:f0:
                    c4:b5:ce:6c:6b:3e:63:37:1b:2a:dd:22:4b:10:c9:
                    e8:98:12:42:4d:22:6b:9d:a8:37:26:a2:f2:01:6a:
                    79:96:0c:9f:9d:4d:83:fc:aa:ad:19:d6:04:16:72:
                    b1:0a:58:d6:98:ee:5f:fe:51:92:44:c2:01:89:65:
                    c0:42:be:ee:bc:70:bd:b4:d1:4b:14:aa:c7:a1:2b:
                    c8:e1:d2:32:96:b4:1e:ae:6b:c2:44:95:5d:0d:08:
                    b2:a3:15:89:3b:45:30:17:ea:7c:aa:2b:81:c9:e8:
                    35:5d:66:bf:d0:b6:72:23:ac:e4:d6:08:f4:14:53:
                    c8:3f:0e:f8:12:a4:7b:a0:d7:52:e7:18:d3:29:8b:
                    6e:b7:a2:4f:eb:3d:7f:c3:bc:4e:c3:2d:94:49:6e:
                    82:47:ca:b6:a7:f6:91:00:6d:70:48:87:d0:b8:06:
                    3c:dd:cf:3d:8e:17:a7:04:35:19:4d:11:ff:17:2b:
                    91:56:d5:2b:d8:34:1b:58:1a:bd:66:b4:a2:01:77:
                    5f:50:38:d3:d5:06:a3:1c:43:8e:c2:7c:22:b5:5e:
                    fa:8b:ed:ce:2b:16:3e:0b:f5:45:7b:ad:85:13:7c:
                    04:e1
                Exponent: 65537 (0x10001)
    Signature Algorithm: sha256WithRSAEncryption
         c0:5b:a2:7f:47:12:05:79:9f:81:40:08:57:b8:17:7a:2c:7c:
         50:4b:e6:f6:0e:2f:22:22:c7:9f:8c:e5:ce:b2:01:3c:c4:32:
         86:46:41:03:12:7d:9e:6b:04:5b:d9:8d:f9:a3:05:06:8b:30:
         2e:5b:db:94:c1:60:ad:ea:c2:9e:41:77:11:f5:61:5a:7c:ea:
         97:d1:18:07:7c:8b:00:ab:3a:a9:07:75:07:6f:b6:8d:e6:6b:
         fa:90:eb:da:20:03:a6:1f:3a:25:a4:c4:bd:0f:94:3c:ed:93:
         13:5e:32:f3:18:70:24:12:06:24:0b:23:47:03:8e:f5:f8:3d:
         dd:92:f0:bb:8a:52:e9:75:db:17:6a:62:b9:37:a5:81:72:7b:
         14:cb:f7:ee:75:28:9e:04:ac:a0:b3:bc:04:6e:c9:b8:f1:5b:
         64:2e:93:ec:86:5b:db:57:72:bc:39:fd:21:98:79:69:43:f6:
         b9:b2:d2:43:ba:2a:92:3f:aa:2c:d4:6a:fa:ed:19:37:37:a4:
         70:7b:59:98:90:41:90:1d:ee:bf:6b:32:9d:12:41:2a:22:09:
         cc:6e:31:51:81:71:d1:04:14:a8:48:d3:e3:9b:aa:03:5b:8b:
         c4:cf:05:0a:37:0f:f1:45:eb:7e:10:81:d4:bc:f6:1d:31:46:
         1e:a6:20:b3
- And finally convert the self-signed certificate to PEM format:
[root@vloemapp01 ~]# openssl x509 -in OEM135_LB.crt -out OEM135_LB.pem -outform PEM
- Just for your information, you can check the certificate in use by OEM with:
[oracle@vloemapp01 ~]$ emctl secdiag openurl -url https://vloemapp01:4903/empbs/upload
- And you can also use “emctl” to dump the certificates in a file if you need to troubleshoot an issue:
[oracle@vloemapp01 ~]$ emctl secdiag dumpcertsinfile -file /tmp/customca.txt
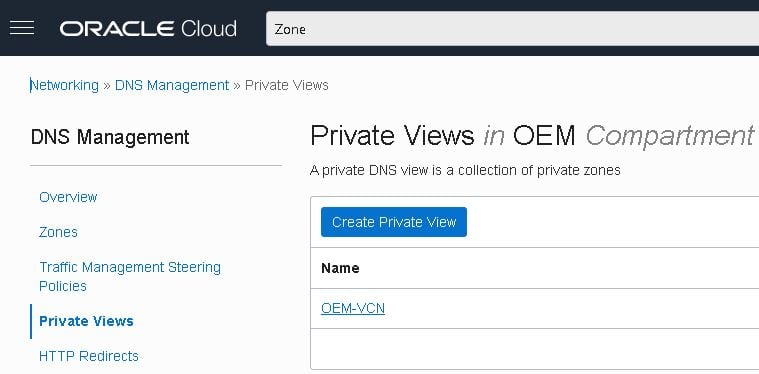
Create a DNS Private View and register your Load Balancer
The agents must communicate with the management service through the load balancer, so the latter must be properly registered in your DNS.
The VNC’s subnet DNS does not allow changes, so you’ll need to create a new DNS Private View first.
- Go to “Networking -> DNS Management -> Private Views” and click on “OEM-VCN” view:
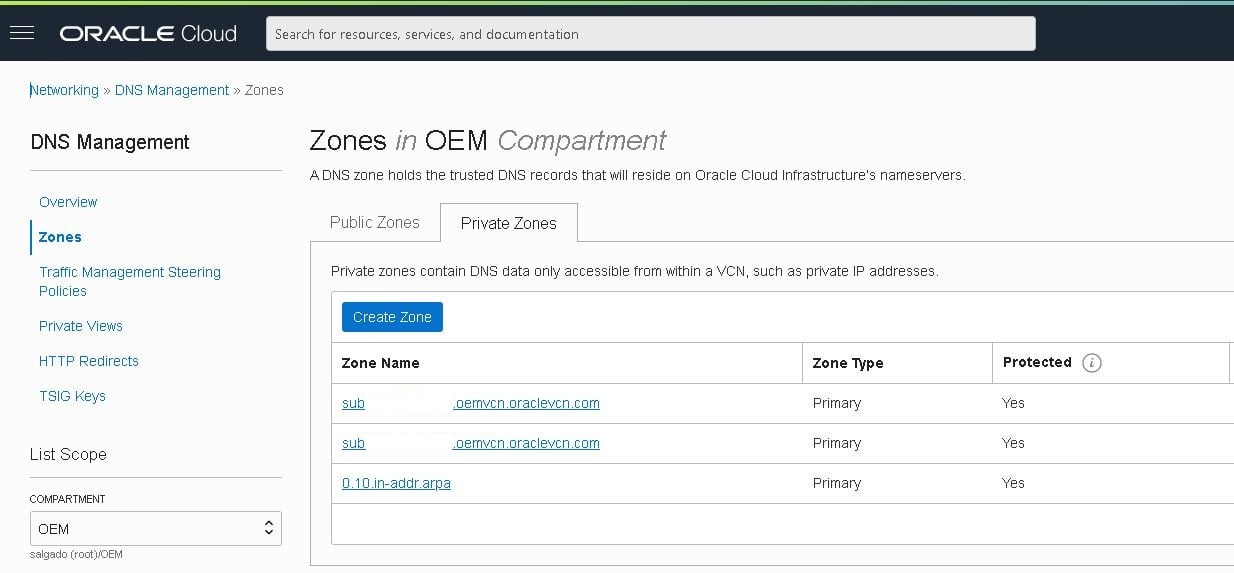
- Then click the “Create Zone” button:
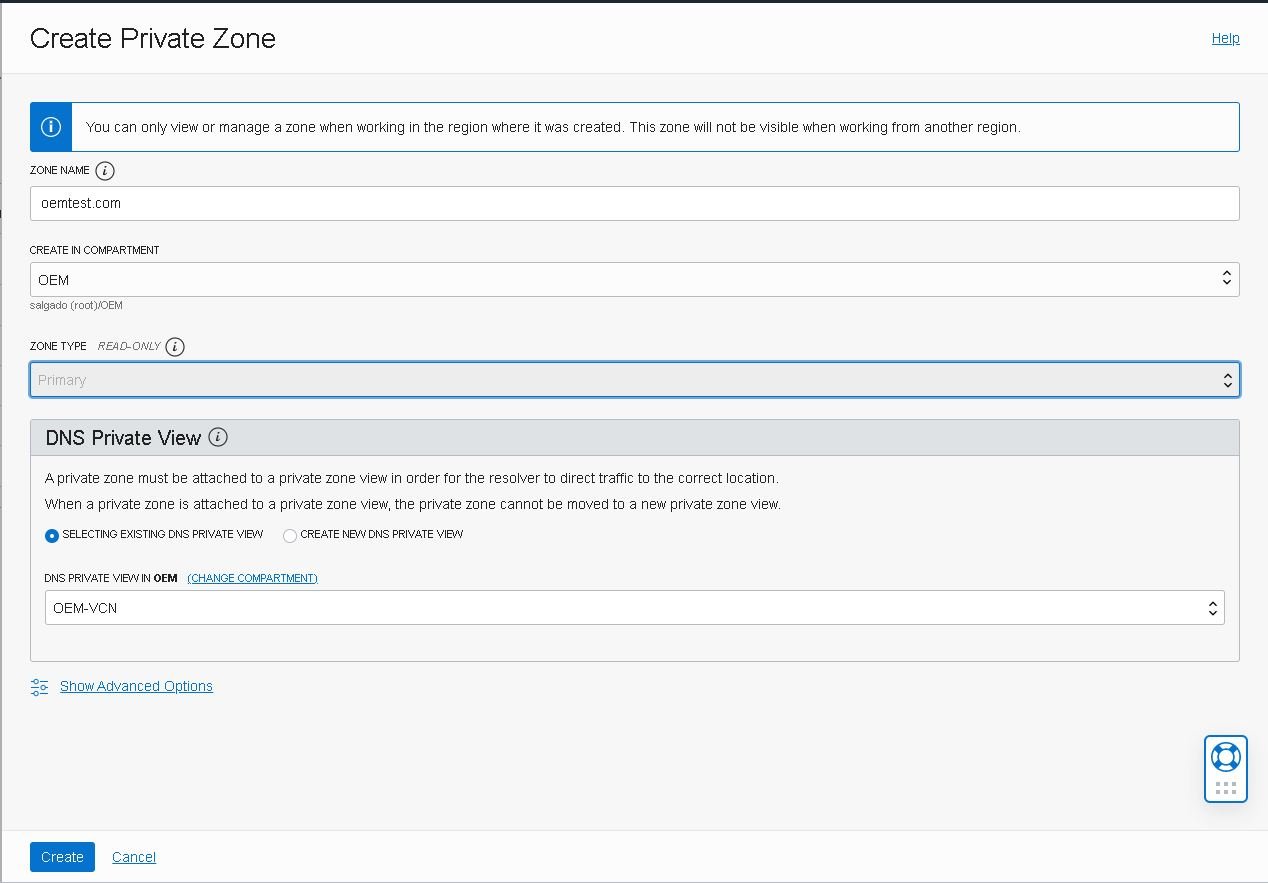
- Fill in the details and click the “Create” button:
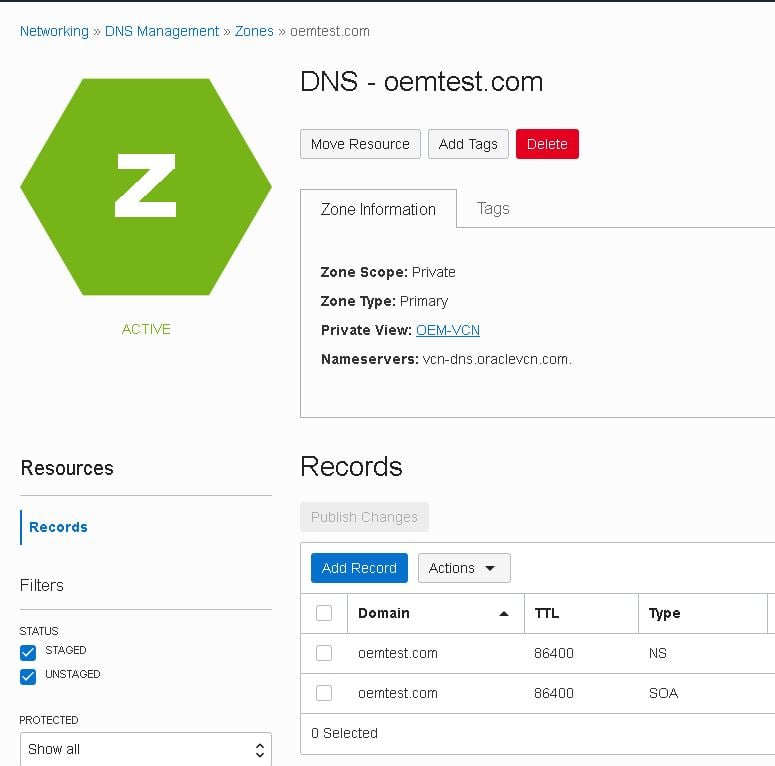
- After creating the new view, access its details then click the “Add record” button:
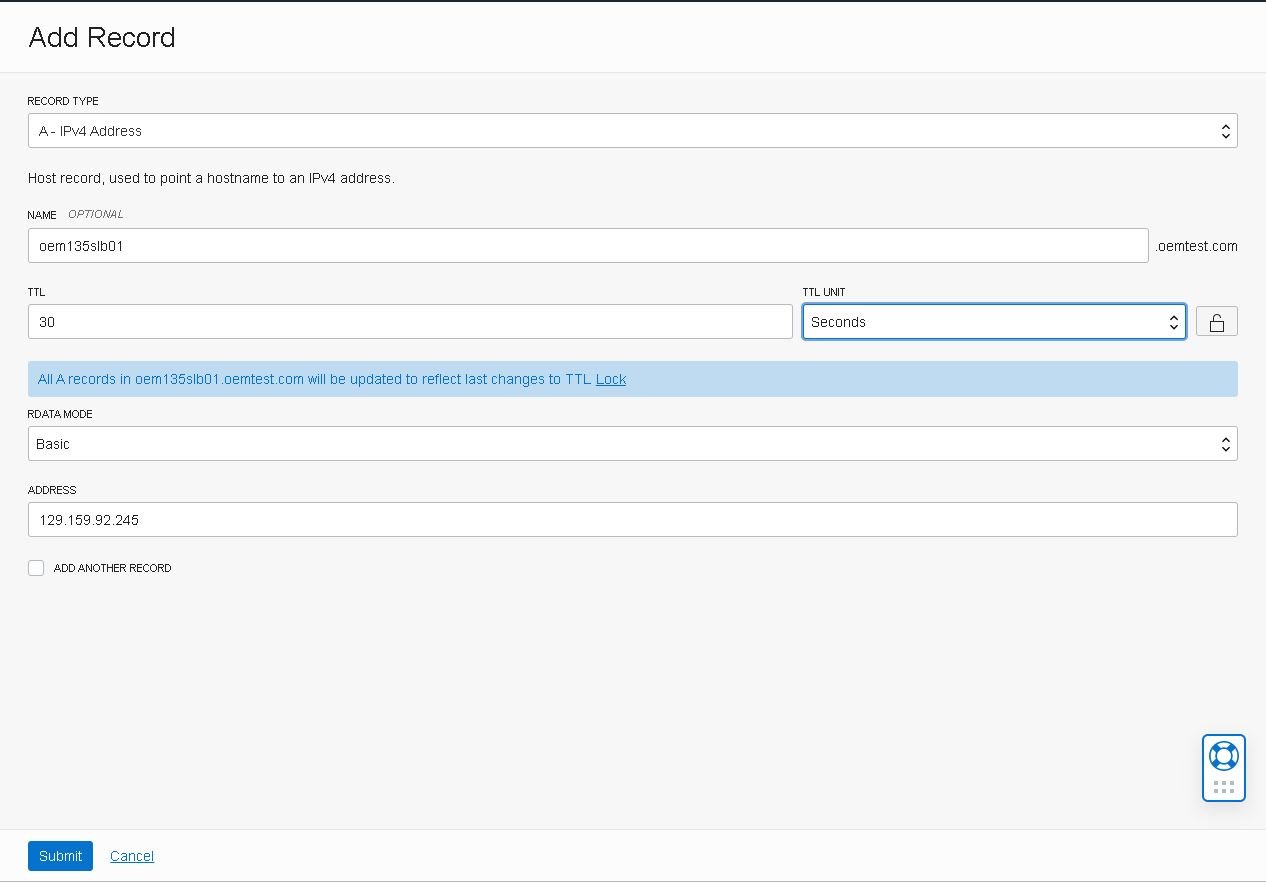
- Fill in the record type, “A – IPv4 Address”, the host name, oem135slb01, its IP address, the TTL time, 30 seconds and click the “Submit” button:
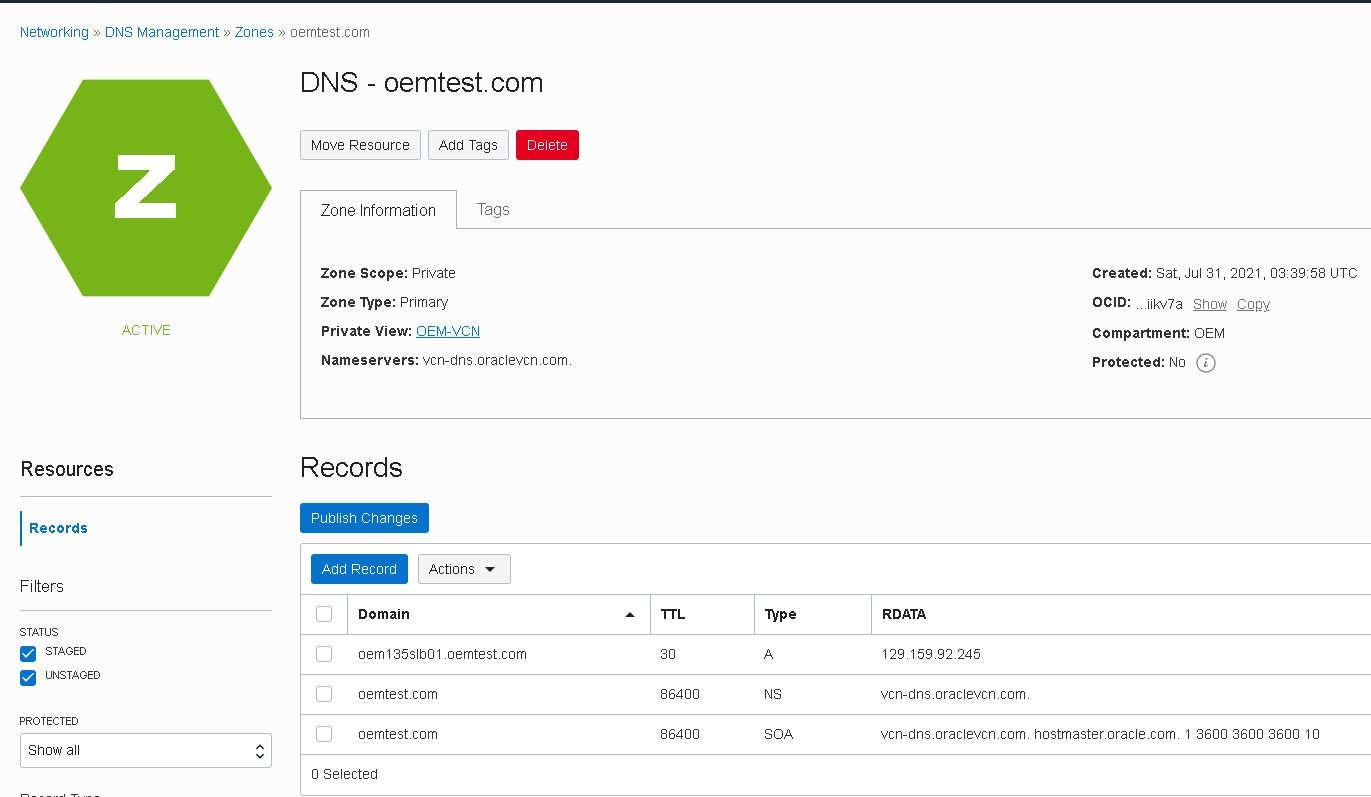
- Next, click the “Publish changes” button:
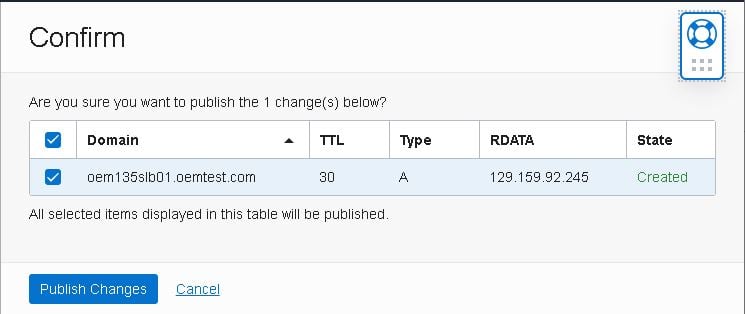
- Confirm the changes by clicking the “Publish Changes” button again:
- Add your newly created domain in the “Search” field of /etc/resolv.conf of both application machines and make sure the name server matches the IP of the server displayed in your console:
[root@vloemapp01 ~]# ping vcn-dns.oraclevcn.com
PING vcn-dns.oraclevcn.com (169.254.169.254) 56(84) bytes of data.
64 bytes from 169.254.169.254 (169.254.169.254): icmp_seq=1 ttl=64 time=0.154 ms
^C
--- vcn-dns.oraclevcn.com ping statistics ---
1 packets transmitted, 1 received, 0% packet loss, time 0ms
rtt min/avg/max/mdev = 0.154/0.154/0.154/0.000 ms
[root@vloemapp01 ~]#  cat /etc/resolv.conf
search  subXXXXXXXXXXX.oemvcn.oraclevcn.com oemvcn.oraclevcn.com oemtest.com
nameserver 169.254.169.254
- The “resolv.conf” file might be automatically updated after a reboot. To prevent this, execute the following command:
-- Set PRESERVE_HOSTINFO to 2 on /etc/oci-hostname.conf
[root@vloemapp01 ~]# cat /etc/oci-hostname.conf
# This configuration file controls the hostname persistence behavior for Oracle Linux
# compute instance on Oracle Cloud Infrastructure (formerly Baremetal Cloud Services)
# Set PRESERVE_HOSTINFO to one of the following values
#   0 -- default behavior to update hostname, /etc/hosts and /etc/resolv.conf to
#        reflect the hostname set during instance creation from the metadata service
#   1 -- preserve user configured hostname across reboots; update /etc/hosts and
#           /etc/resolv.conf from the metadata service
#   2 -- preserve user configured hostname across instance reboots; no custom
#        changes to /etc/hosts and /etc/resolv.conf from the metadata service,
#        but dhclient will still overwrite /etc/resolv.conf
#   3 -- preserve hostname and /etc/hosts entries across instance reboots;
#        update /etc/resolv.conf from instance metadata service
PRESERVE_HOSTINFO=2

-- Set an immutable attribute to /etc/resolv.conf using "chattr":
[root@vloemapp01 ~]# chattr -R +i /etc/resolv.conf
Source:
Security list details
- Added required Ingress and Egress rules to allow the Management Service to communicate with the agents on all the hosts:
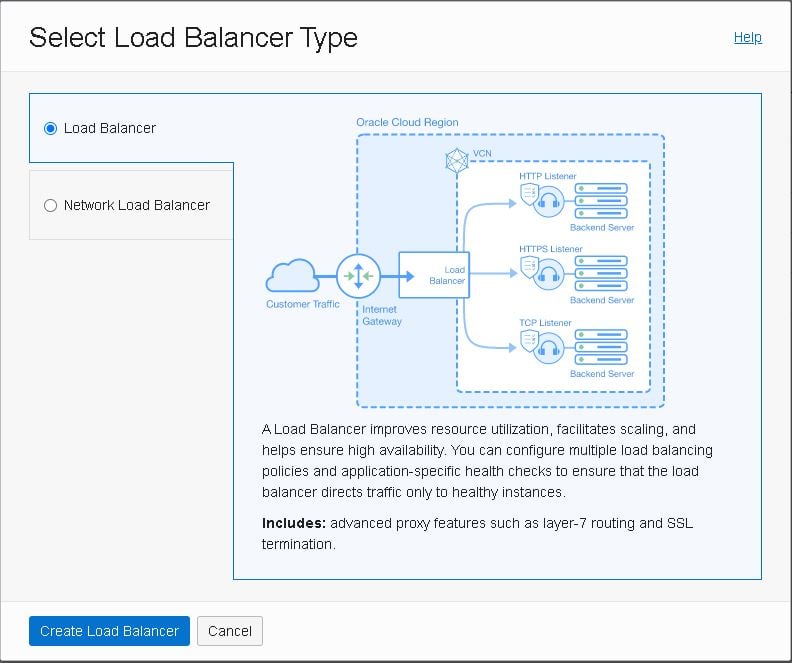
Creating the load balancer
The load balancer is fundamental in ensuring high availability; it controls and balances traffic between clients and the Oracle Management Service (OMS).
All communication with the Oracle Enterprise Manager goes through the load balancer.
After creating the load balancer we’ll have to set up the following:
- Listeners: responsible for receiving incoming connections, then balancing it across the backend servers in the set.
- Backend sets: Set of backend servers configured to service incoming connections. The set also includes monitoring rules to detect which servers are online.
Besides the load balancer, we need at least two application servers to ensure high availability for our enterprise manager.
- To create your load balancer, go to “Load Balancers” under “Networking” and click “Create Load Balancer”:
- Select “Load Balancer” as shown below:
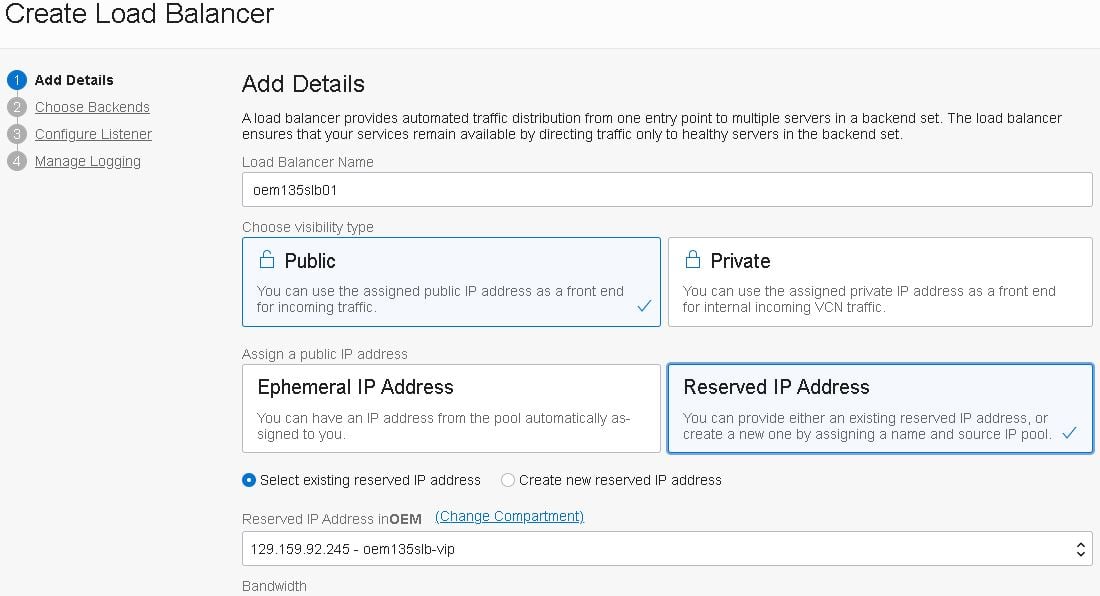
- Next, add the basic details for the Load Balancer, such as name and visibility type, then select the Public IP reserved previously:
- Select the Virtual Cloud Network and its public sub-net, as well as the security group used to control traffic:
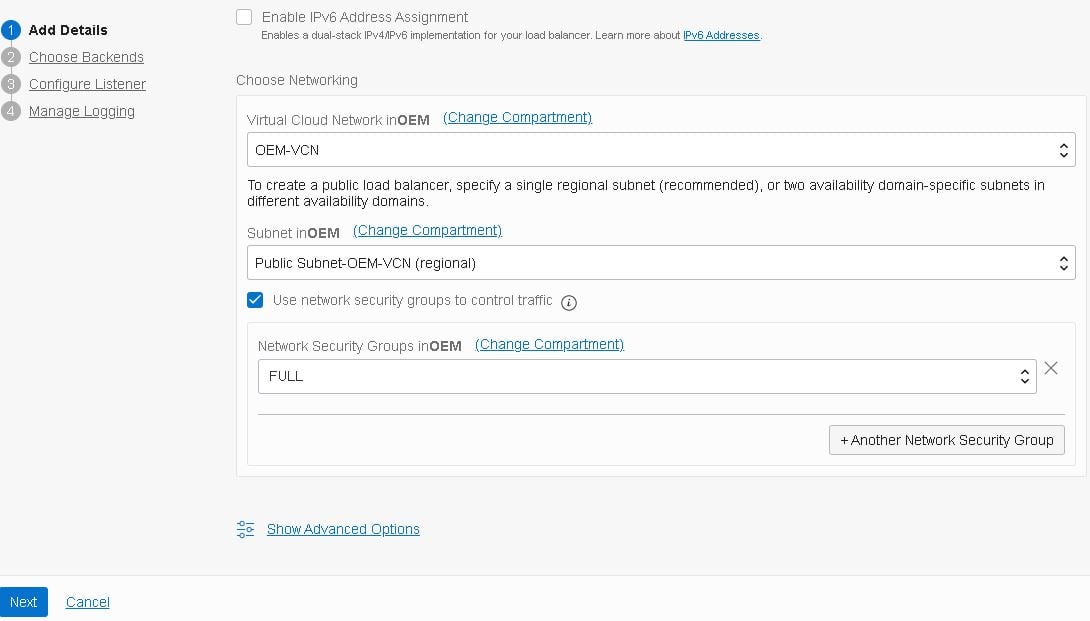
Note: As this is just a test, I’ve created a group named FULL which allows full traffic both ways. In an actual deployment, you’d create more restrictive groups to prevent unauthorized access.
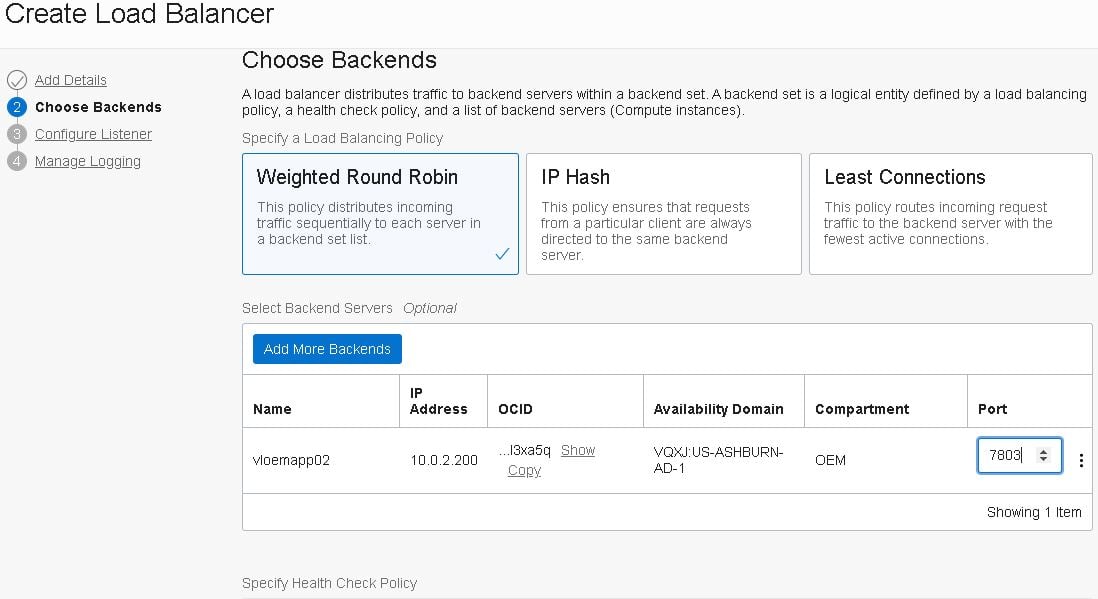
- Add the first backend server; these servers will handle incoming connections.
- To achieve high availability, we must have one Backend Set containing at least two backend servers for each service in our application. At this point, we only have one OMS server, so we’ll add another backend server in the next post:
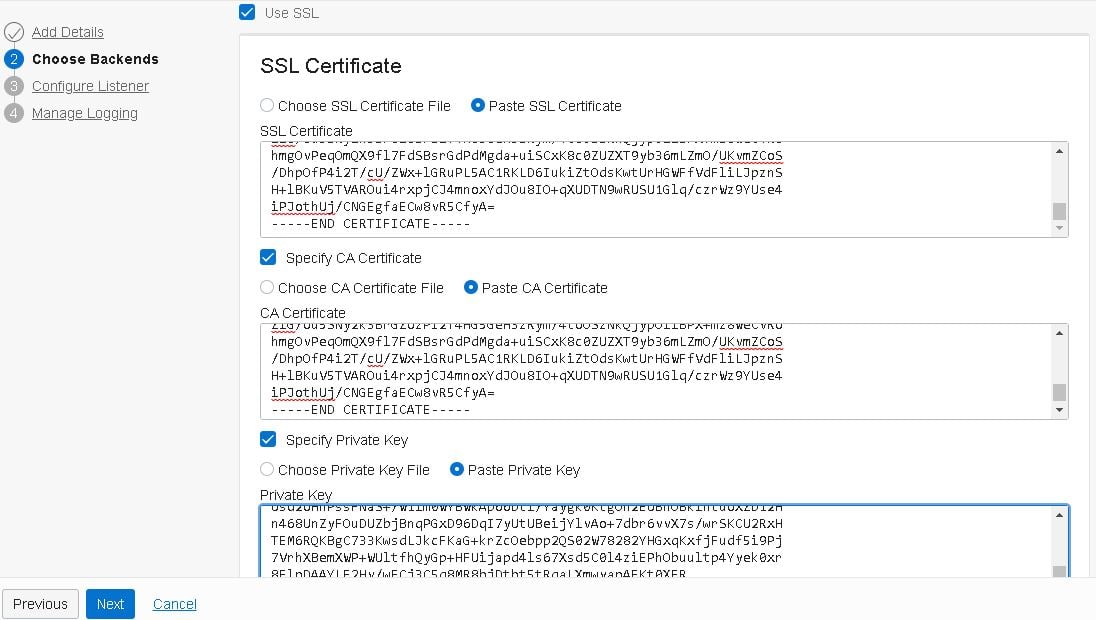
Include the public, private and signed certificates generated previously. This is a self-signed certificate, therefore both the public and signed ones are identical. Click “Next”:
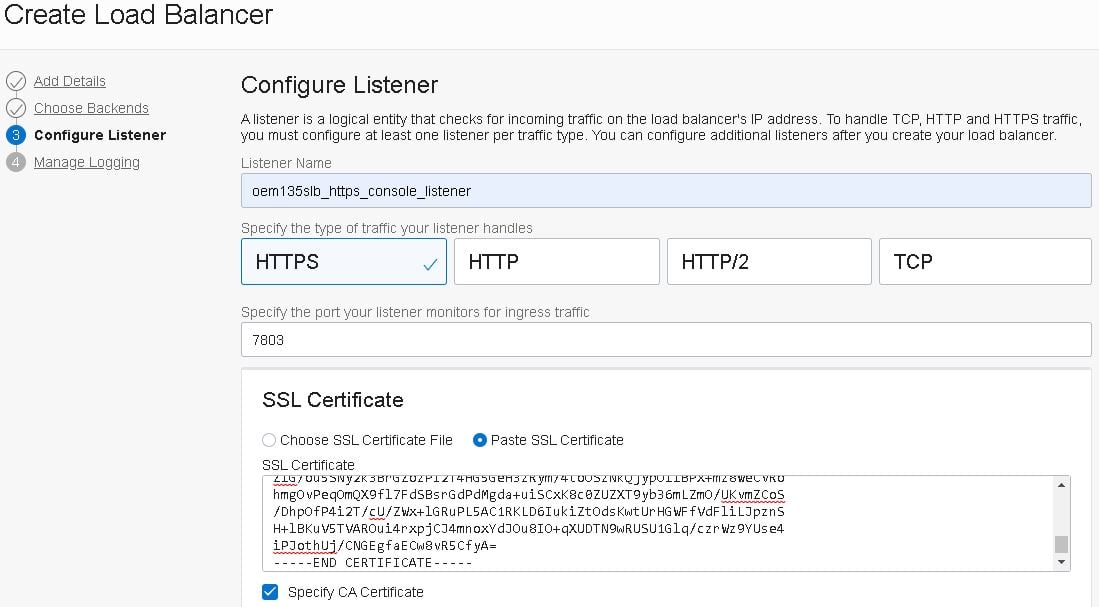
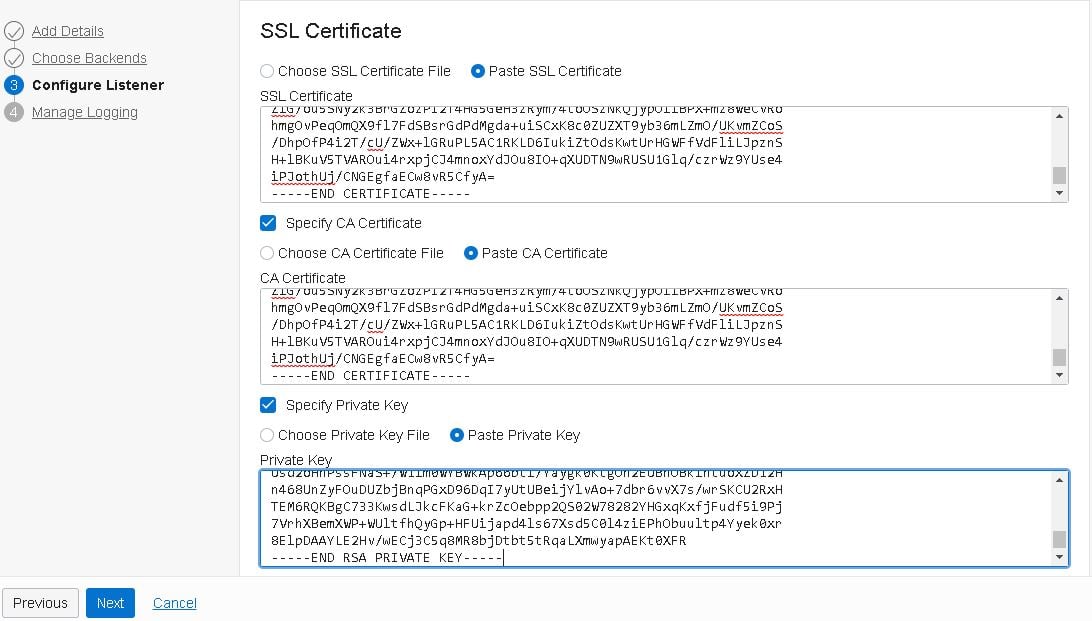
- Configure the HTTPS Console listener and include the same certificates used in the backend set:
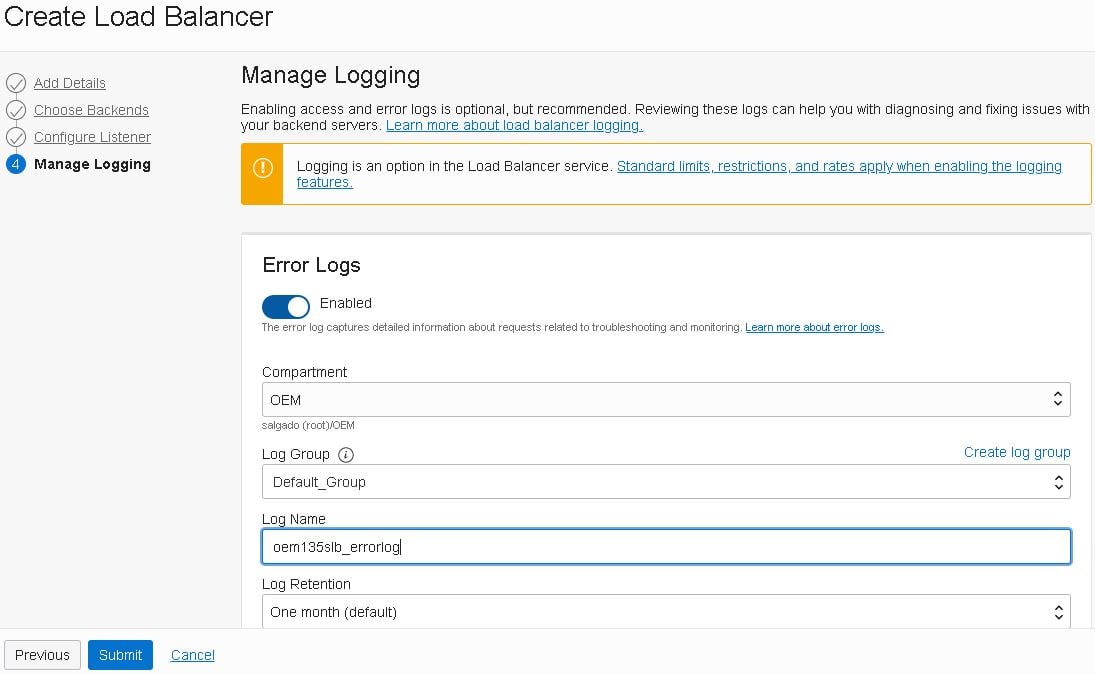
- Enable logging for your load balancer and click the “Submit” button:
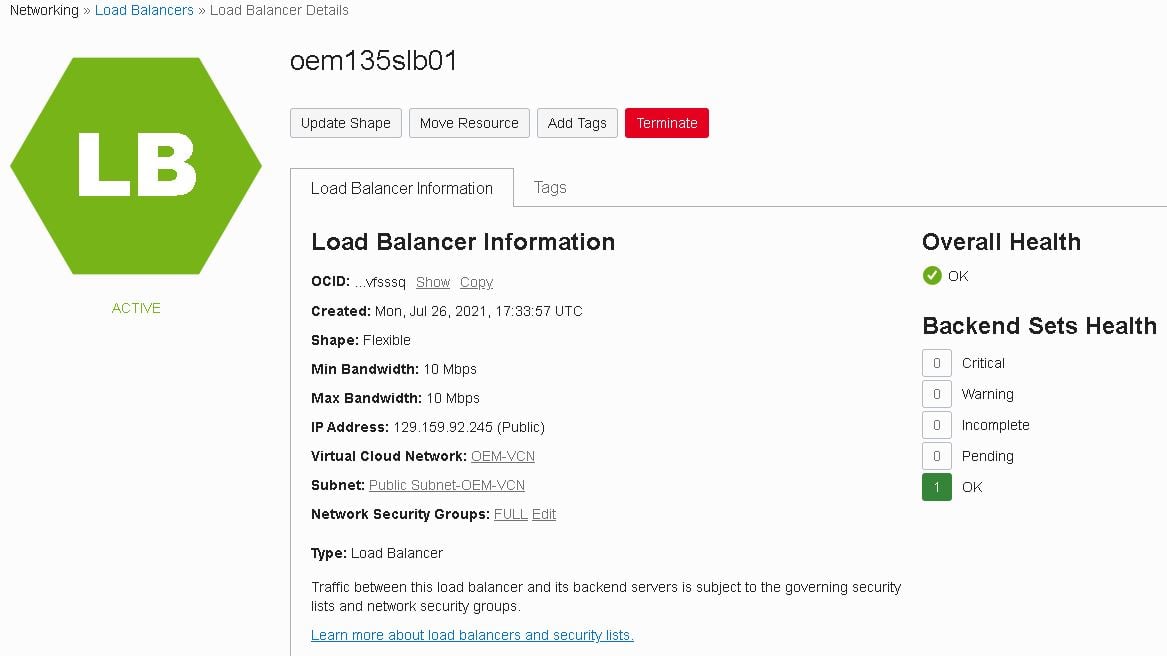
- If everything went as expected, you should see your new load balancer after a few minutes:
Adjust the existing backend set and listener
Now that the load balancer is up and running with the HTTPS Console backend set and listener configured, we need to adjust some advanced settings on both.
- On the “Backend Sets” page, click on the the dots menu at the far right and select “Edit”:

- Adjust the options according to the details below and click “Save Changes”:
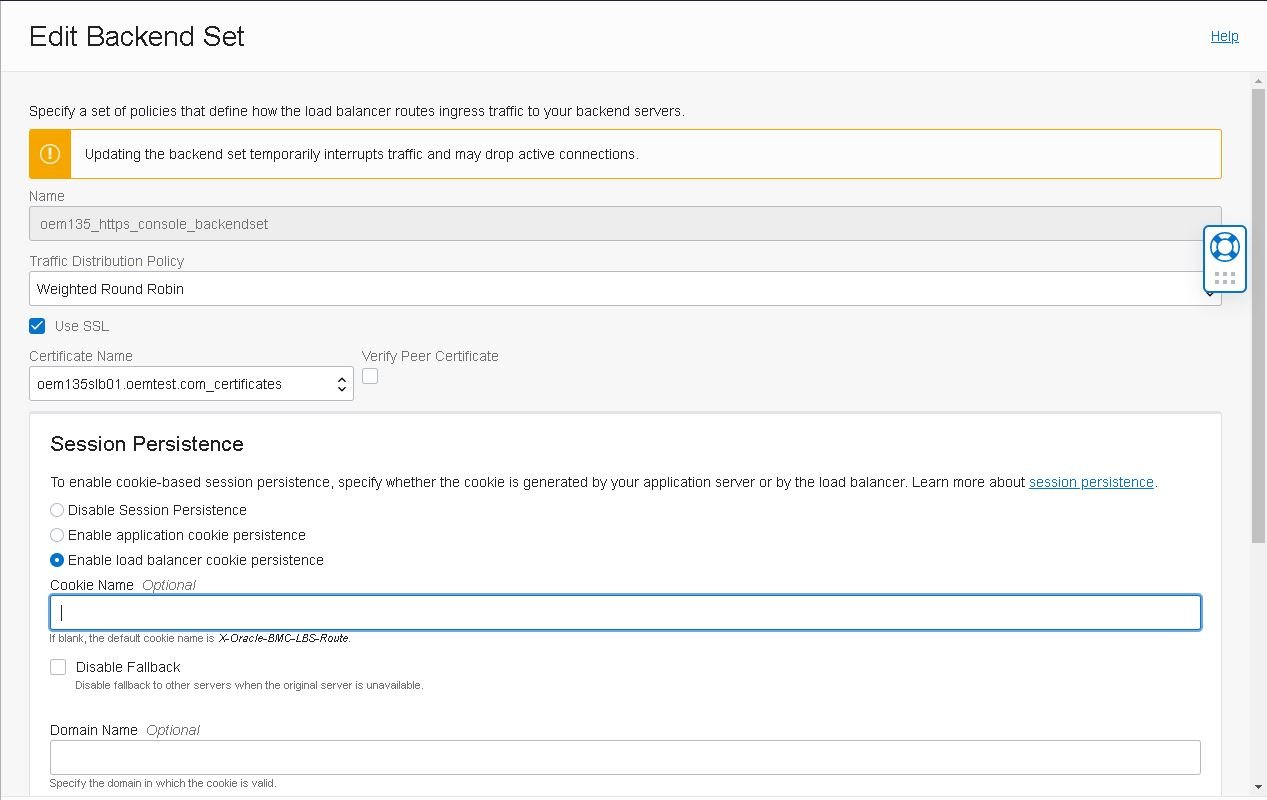
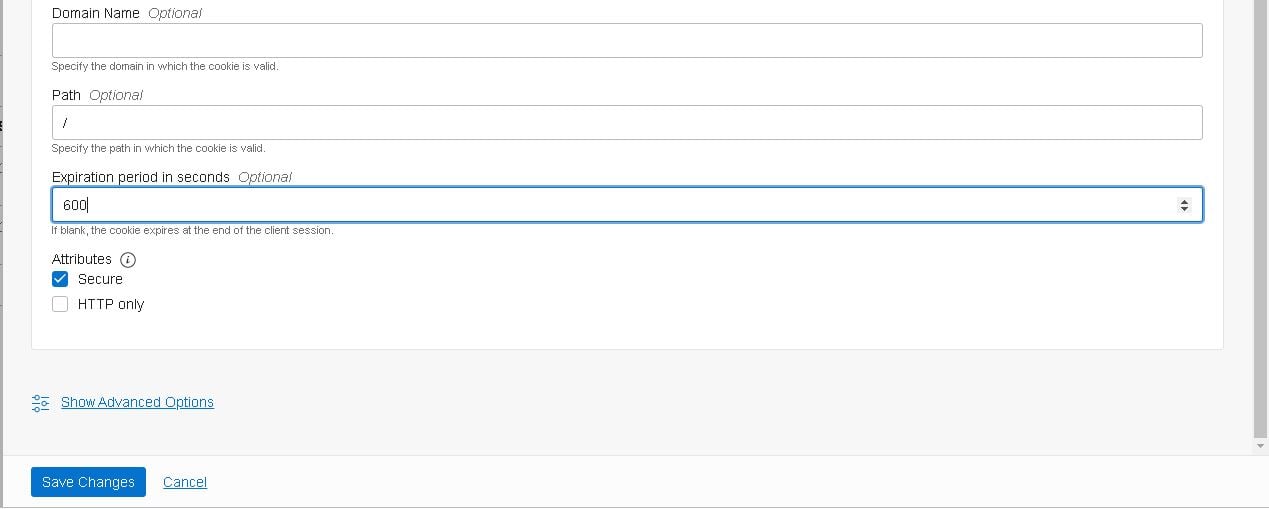
Note: Set the expiration period carefully as a long one may cause delays and a short one can cause users to be re-routed while still actively working.
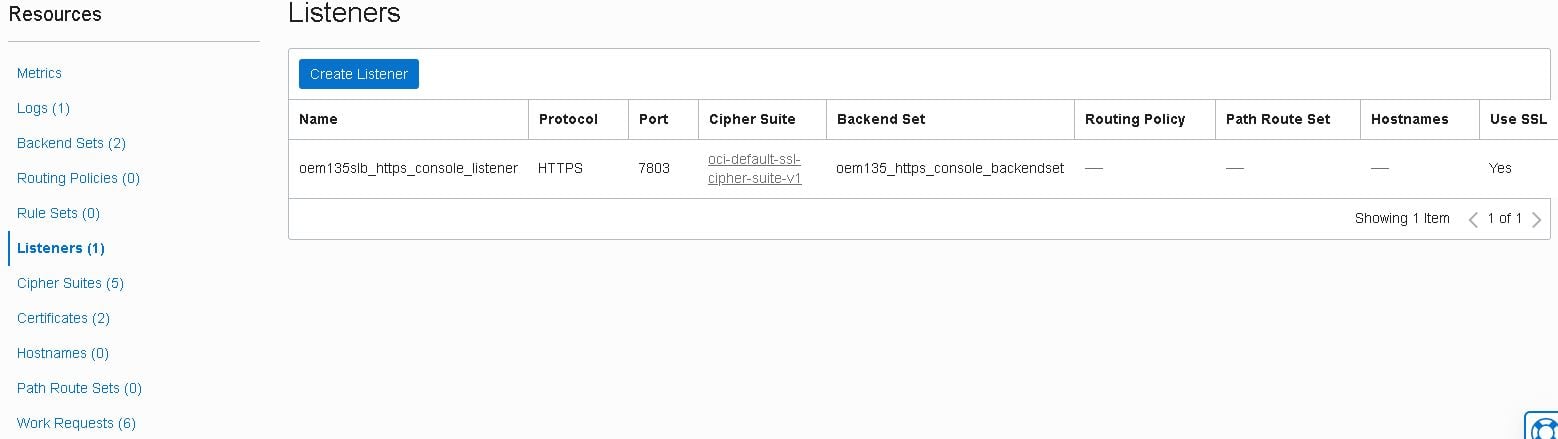
- Check if the configurations of the listener are as follows, double check that the certificates match the ones used in the backend set and click “Save Changes”:
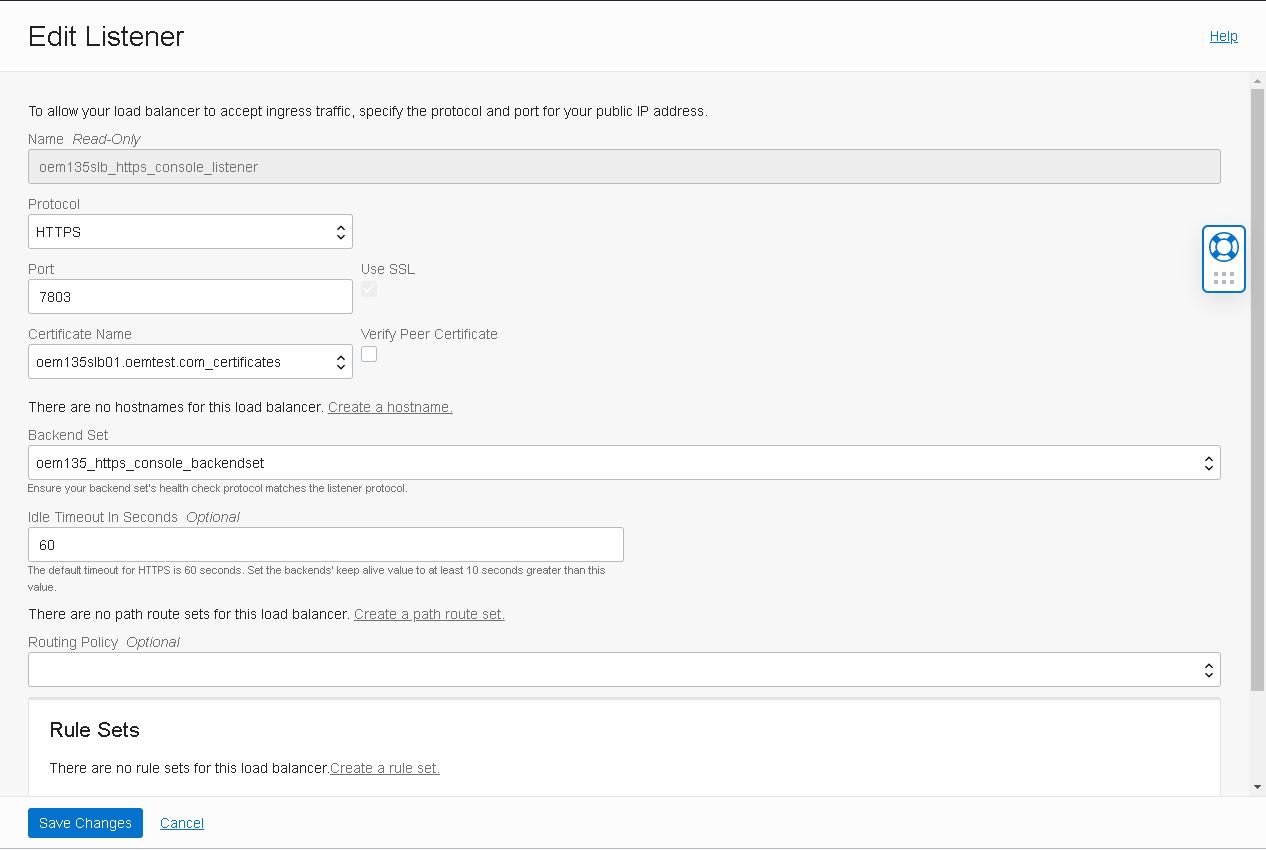
Note: Make sure that you have the correct certificate selected. We’ll use the same certificate on the listener as well to secure the management service and the agents so they can all communicate securely.
Create additional backend sets and listeners
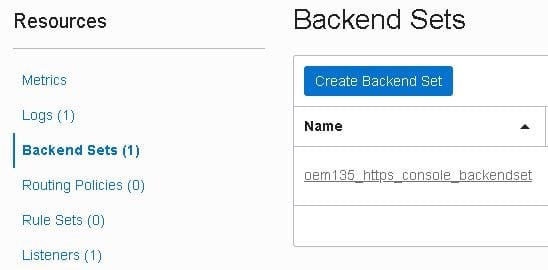
- Create another backend set to handle the HTTPS Upload port. Go to the “Backend Sets” section and click the “Create Backend Set” button:
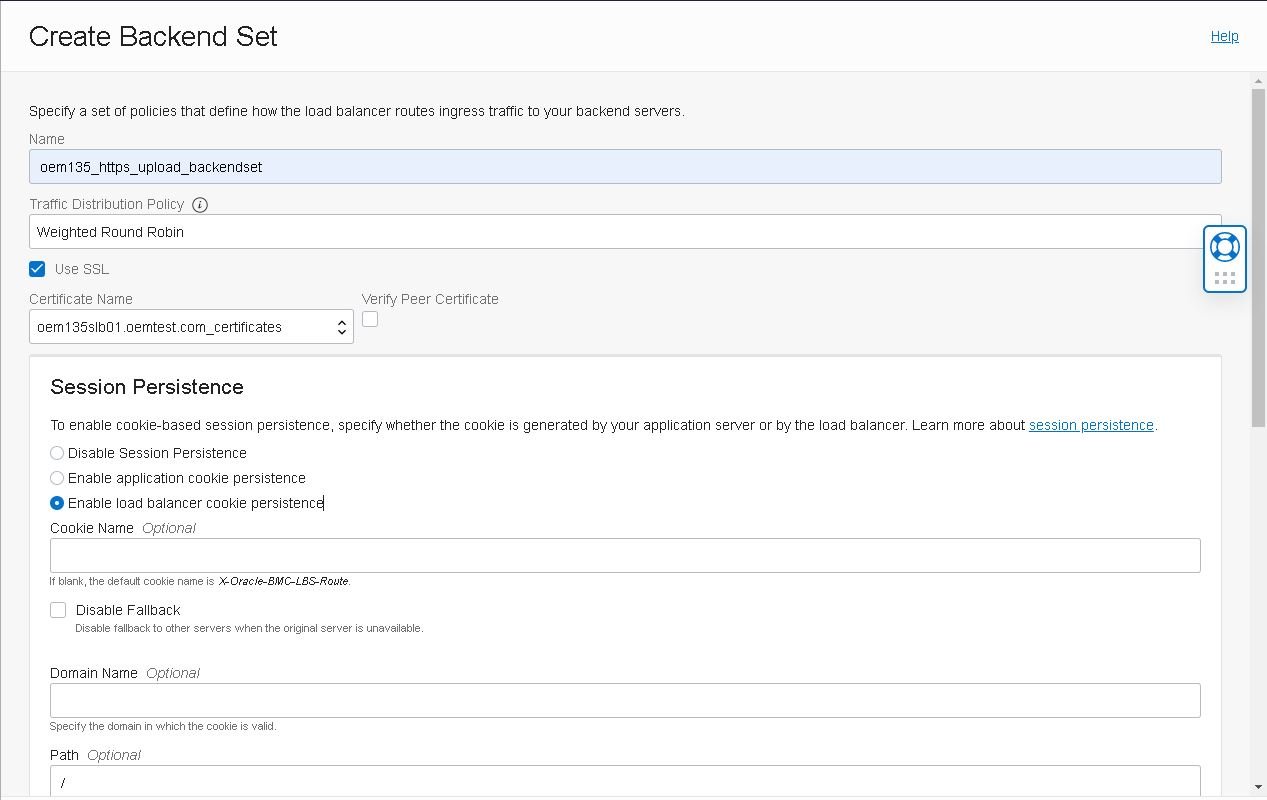
- Enter the backend set name, select the traffic distribution policy, mark the “Use SSL” checkbox and finally, select the same certificate used in the first set:
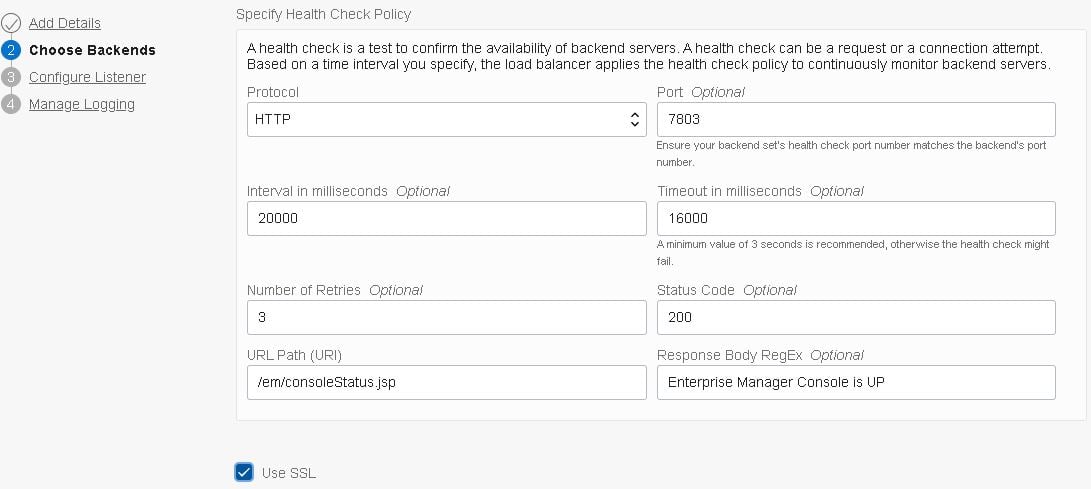
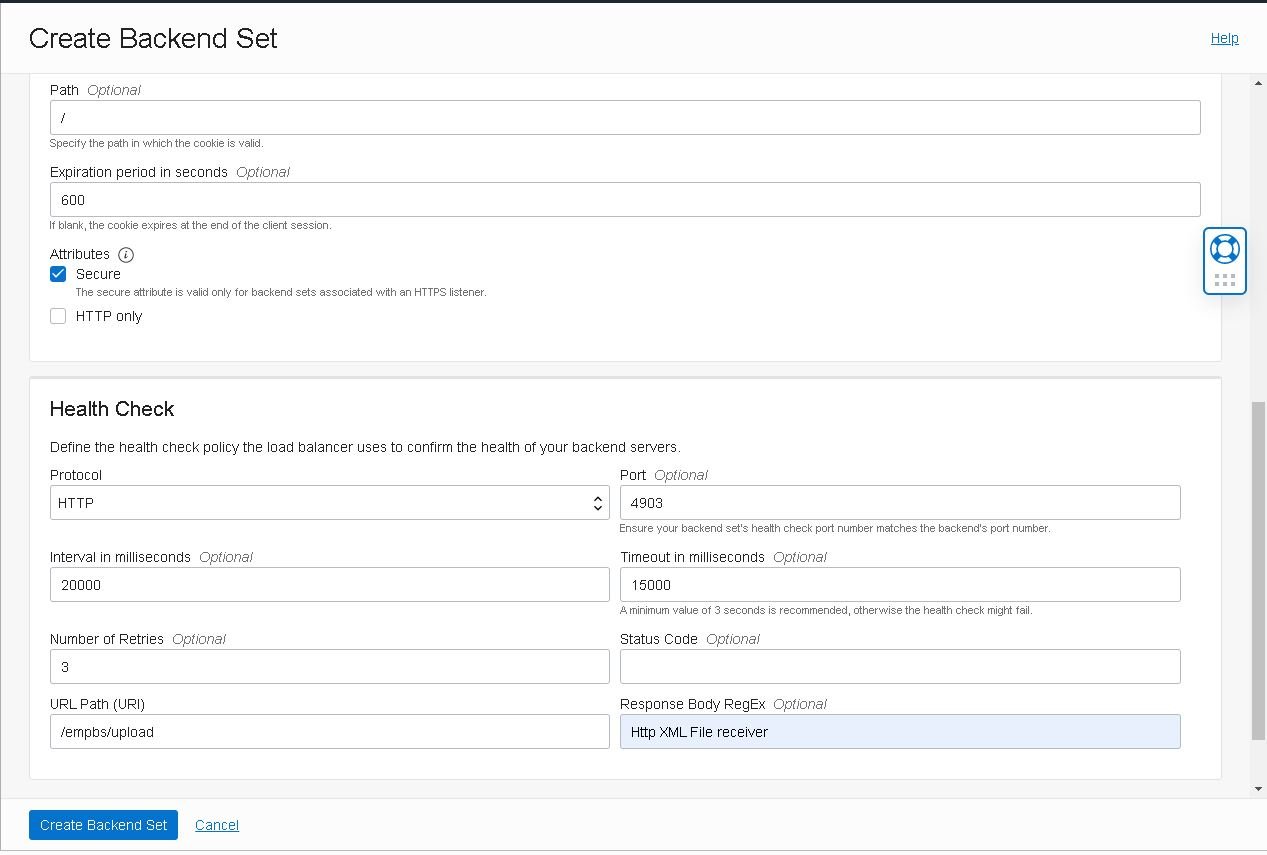
- Enter the details for the Health Check policy for this particular backend set:
Note: Health check policies are required to detect if the server is ready to receive connections. There should be no performance overhead as these are executed only once every 20 seconds.
- Now create a listener to serve connections through the HTTPS Upload port 4903. Start by clicking the “Create Listener” button inside the “Listeners” section of your load balancer:
- Enter the listener name, select the “HTTPS” protocol, port “4903” and the same certificates used in the backend set. Then, click on “Create Listener”:

Note: Make sure to select the same certificate used for the backend set.
- Create the remaining Listeners and Backend Sets as described in the official documentation:”Configuring a load balancer” – https://docs.oracle.com/en/enterprise-manager/cloud-control/enterprise-manager-cloud-control/13.4/emadv/enterprise-manager-high-availability.html#GUID-9D128F49-4F2A-40F3-BA29-18E5C8E7F3F6
Securing the Oracle Management Service
After setting up the load balancer, secure the Management Service using the same certificates in place at the load balancer.
- Create a file named /home/oracle/customca.txt containing your public SSH key and its signature. The file should look something like this:
-----BEGIN CERTIFICATE-----
XXXXXXXXXXXXXXXXXXXXXXXXXXXXXXXXXXXXXXXXXXXXXXXXXXXXXXXXXXXXXXXX
XXXXXXXXXXXXXXXXXXXXXXXXXXXXXXXXXXXXXXXXXXXXXXXXXXXXXXXXXXXXXXXX
-----END CERTIFICATE-----
-----BEGIN CERTIFICATE-----
XXXXXXXXXXXXXXXXXXXXXXXXXXXXXXXXXXXXXXXXXXXXXXXXXXXXXXXXXXXXXXXX
XXXXXXXXXXXXXXXXXXXXXXXXXXXXXXXXXXXXXXXXXXXXXXXXXXXXXXXXXXXXXXXX
-----END CERTIFICATE-----
- To allow OMS and the load balancer to communicate securely, re-secure OMS using the command below. Enter Sysman’s and the agent registration password when requested:
[oracle@vloemapp01 ~]$ emctl secure oms \
-host "oem135slb01.oemtest.com" \
-secure_port 4903 \
-slb_port 4903 \
-slb_console_port 7803 \
-console \
-slb_jvmd_https_port 7803 \
-trust_certs_loc /tmp/customca.txt \
-lock_console \
-lock_upload
Oracle Enterprise Manager Cloud Control 13c Release 5
Copyright (c) 1996, 2021 Oracle Corporation. All rights reserved.
Securing OMS... Started.
Enter Enterprise Manager Root (SYSMAN) Password :
Enter Agent Registration Password :
Securing OMS... Successful
Restart OMS
- Restart OMS:
[oracle@vloemapp01 ~]$ emctl stop oms
Oracle Enterprise Manager Cloud Control 13c Release 5
Copyright (c) 1996, 2021 Oracle Corporation. All rights reserved.
Stopping Oracle Management Server...
Oracle Management Server Successfully Stopped
Oracle Management Server is Down
JVMD Engine is Down
[oracle@vloemapp01 ~]$ emctl start oms
Oracle Enterprise Manager Cloud Control 13c Release 5
Copyright (c) 1996, 2021 Oracle Corporation. All rights reserved.
Starting Oracle Management Server...
WebTier Successfully Started
Oracle Management Server Successfully Started
Oracle Management Server is Up
JVMD Engine is Up
Securing the Oracle Management Agents
Now that we secured the management server with the load balancer keys, you’ll need to secure the agents as well.
- Log into the application machine and run the following command to re-secure the agent with the new keys:
[oracle@vloemapp01 ~]$ {AGENT_HOME}/bin/emctl secure agent -emdWalletSrcUrl https://oem135slb01.subXXXXXXX.oemvcn.oraclevcn.com:4903/em
- Repeat the above step to the Database machines and any other hosts that have OEM’s management agent installed.
Have you tried implementing your own load balancer setup? Share your questions or concerns in the comments and don’t forget to sign up for Part 6 here.

