This is the second in a series of blog posts that covers the details to deploy a high available setup of Oracle Enterprise Manager 13.5 using Oracle Cloud Infrastructure’s resources.
Recap
This series will demonstrate how to deploy a high available installation of OEM 13.5 using OCI’s services.
This setup will comprise the following resources:
- A two-node RAC VM database
- A data guard standby database
- Two application hosts
- A load balancer
- Shared storage area
The first post of this series demonstrated the initial Oracle Cloud setup (compartment and VCN) and the creation of the two-node VM RAC repository database.
This post will cover the requirements and the setup of the first application machine.
General notes
As this is just an experimental implementation that will not be used once it’s completed, I’ve overlooked some important network security and licensing aspects. This section will address the most important ones.
Licensing
Oracle Enterprise Manager includes a restricted license that may apply to basic configurations. For advanced configurations, such as the one discussed in this series, consult the Oracle licensing documents or your Oracle account manager to ensure that all components are sufficiently licensed.
Security
As this is just a test environment and the idea is to give an overall look at the main features available at Oracle’s Cloud Infrastructure, I’ll overlook some important security aspects of an actual setup, such as:
- Utilization of bastion hosts
- Security lists
- Security groups
- Properly configured firewalls
For an actual deployment, you should have a network engineer review your VCN and tighten its security as much as possible.
Application machines
Besides the repository database, Oracle Enterprise Manager (OEM) also requires at least one application machine. This machine will host the Middleware (WebLogic), as well as the OEM application itself, called Oracle Management Service (OMS).
To reach the third level of High Availability for OEM, you’ll require at least two application machines running in active-active mode.
The CPU and memory capacity for each machine depends on the size of your deployment, according to the following rules:
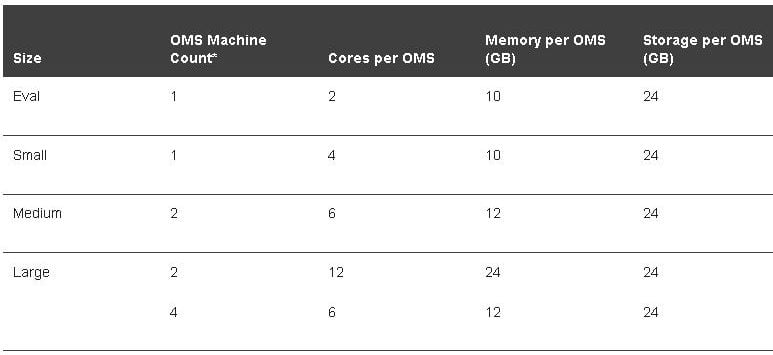
Source: https://docs.oracle.com/cd/E63000_01/EMADV/sizing.htm#EMADV11829
To standardize the installation, the following nomenclature will be used:
Resources nomenclature (uppercase): {AD}X{RE}XX{NAME}XX
{AD}   - Availability Domain, plus the number of the AD.
{RE}   - Resource with 2 letters (BV - Block Volume, CI - Compute Instance, DB - Autonomous DB), plus the number of the resource, when there could be more than one.
{NAME} - Name, plus number, of the resource.

Examples:

AD3BV01APPOEM01
AD3CIAPPOEM01
Host names nomenclature (lowercase): {type}{os}{app}
{type} - Type with 1 letter (V - Virtualized, B - Bare metal)
{os}   - OS Identification with 1 letter (L - Linux, W - Windows, U - Unix)
{app}  - Application specific denomination with up to 6 letters, Example: oemapp
    - Number with 2 digits in case there are multiple servers with the same purpose:
Note that for ease of access each application machine will have its own Public IP Address, in an actual deployment you should avoid having public IPs exposed, as well as review the network security rules, and use a Bastion host to keep your environment safe.
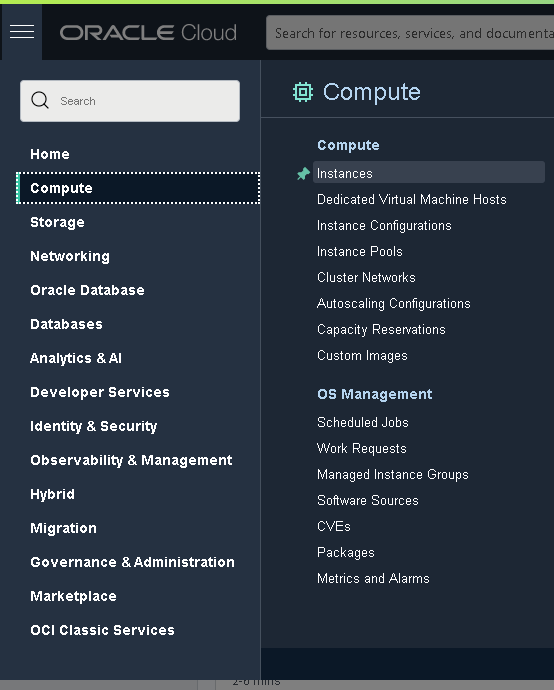
Launch the instance
To launch the first virtual machine that will be used as the host for OMS, head to the “Instances” subsection within the “Compute” section, as shown below:
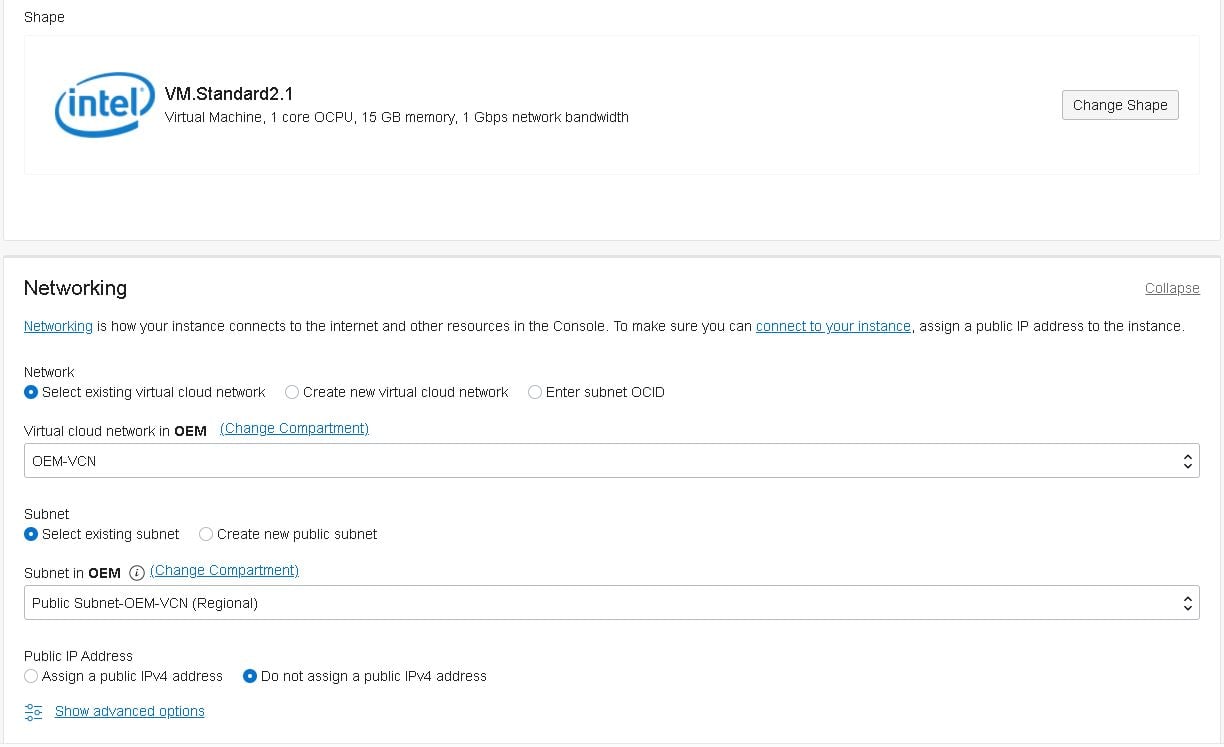
Now click on the “Create Instance” button and fill in the details as follows:
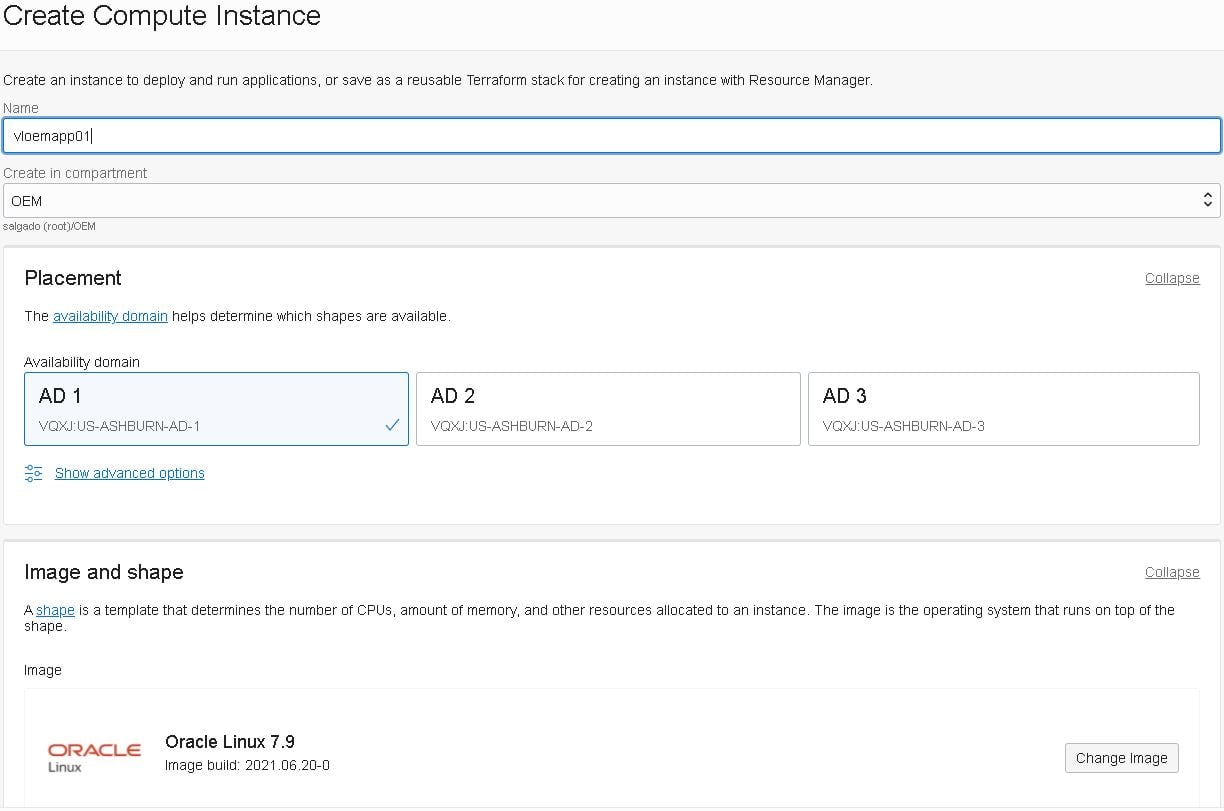
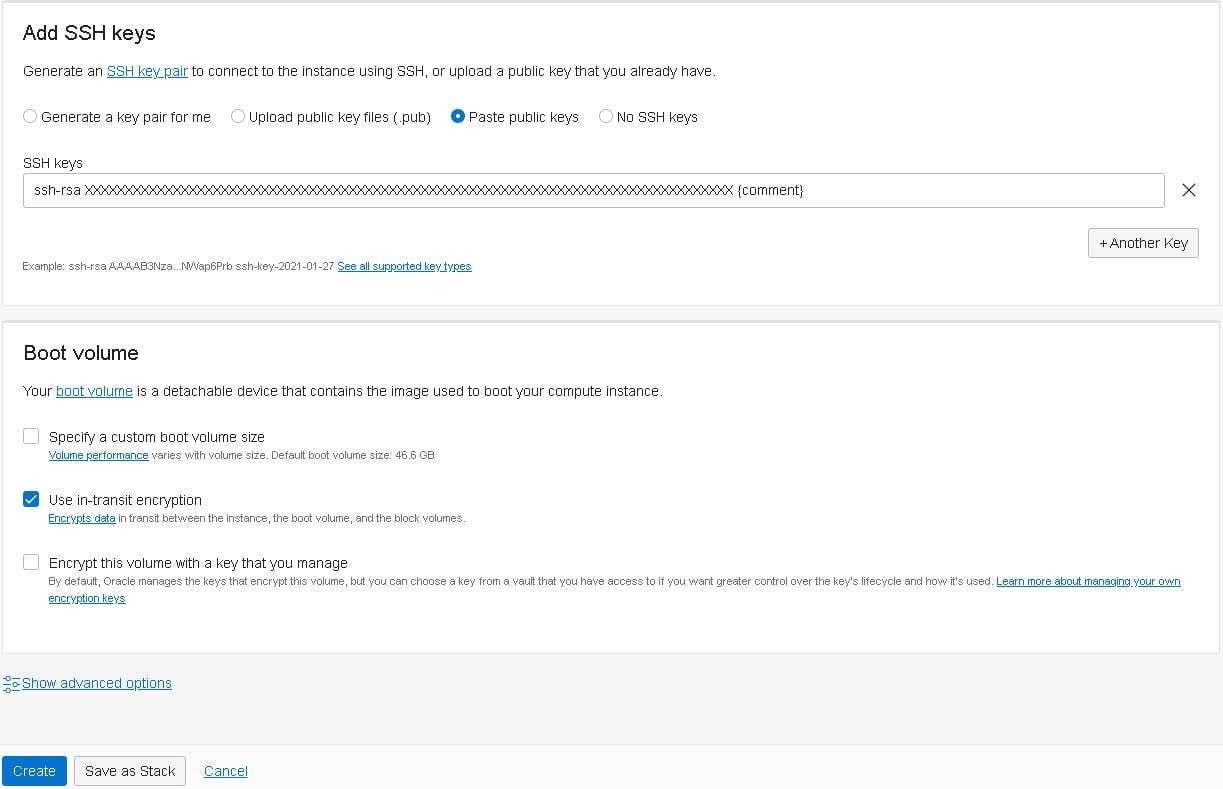
- Note: If you don’t know how to create the SSH keys, follow this guide.
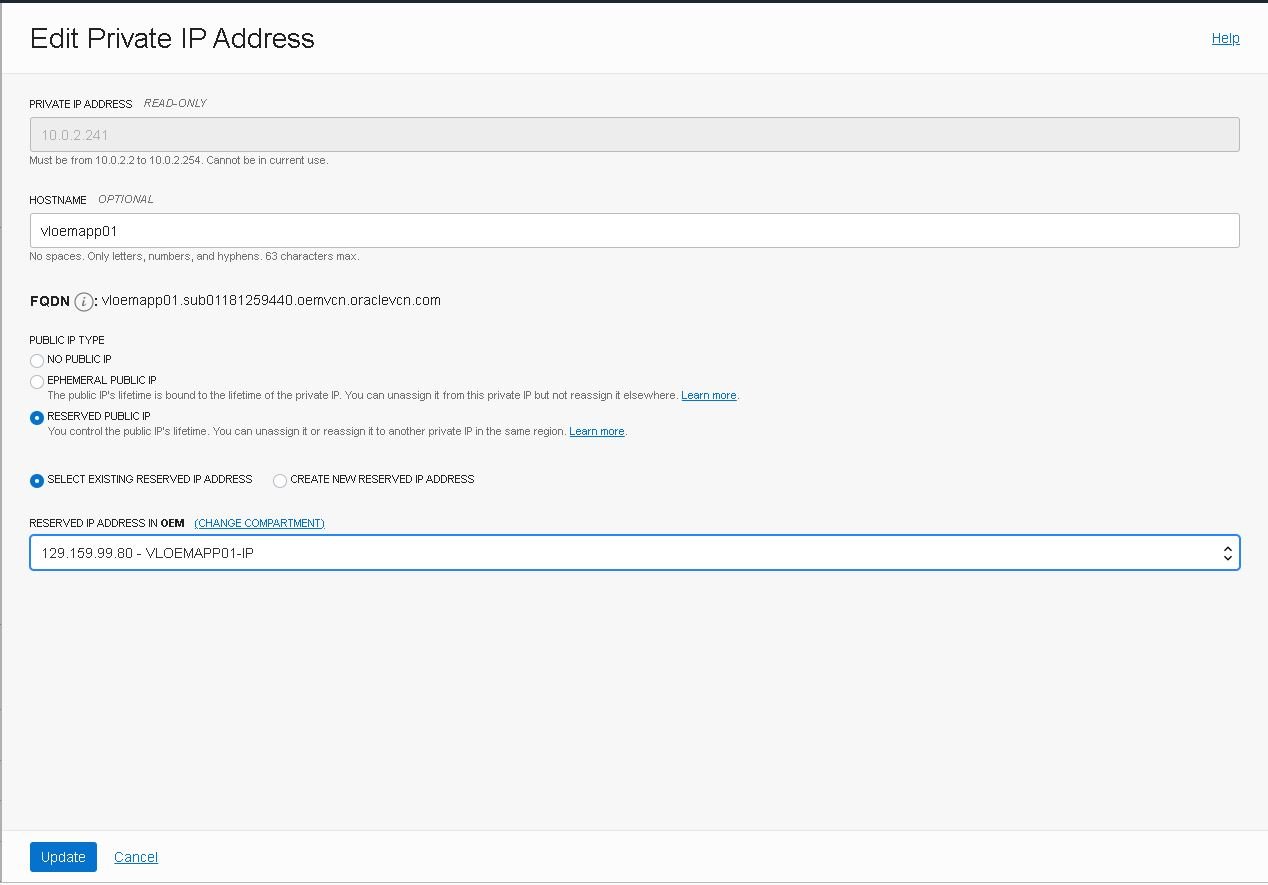
When the new instance shows as running, it’s time to assign one of the reserved public IPs to this instance. Click on the newly created instance, then click on “Attached VNICs” and finally on the “vloemapp01(02) (Primary VNIC)”:
Note: During my tests I launched vloemapp02 first, that’s why some screenshots show 02 instead of 01.

On the “VNIC Details” page, click on the “IPv4 Addresses” link located in the left-bottom of the page:

Next click on the three buttons at the end of the first line and select “Edit”, then select the following options and click on “Assign”:
- Note: As this is just a test environment I’m not going through a bastion host, but in a real-world scenario you should not expose your network like that. Learn more about bastion hosts.
Connect to the instance and install required packages
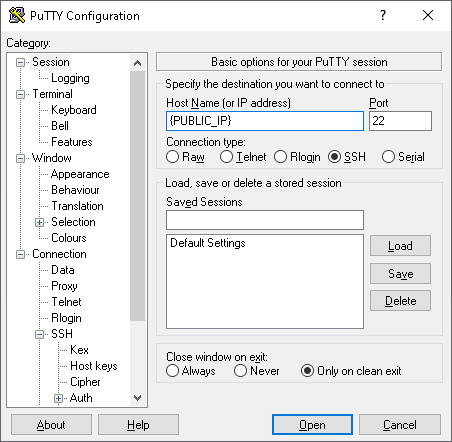
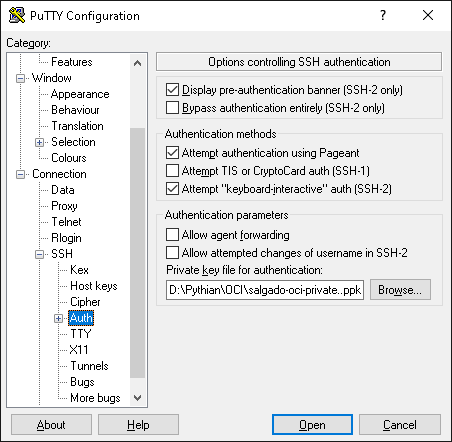
You should now be able to connect to the new instance using SSH and the key provided during its creation. If you’re using PuTTY, just put in the public IP assigned above and use your private SSH key file in the ”Private key file for authentication” filed, on the “Connection -> SSH ->Auth”:
The default username is OPC, so if everything went according to plan, when you type in the username it should log in without prompting for a password:
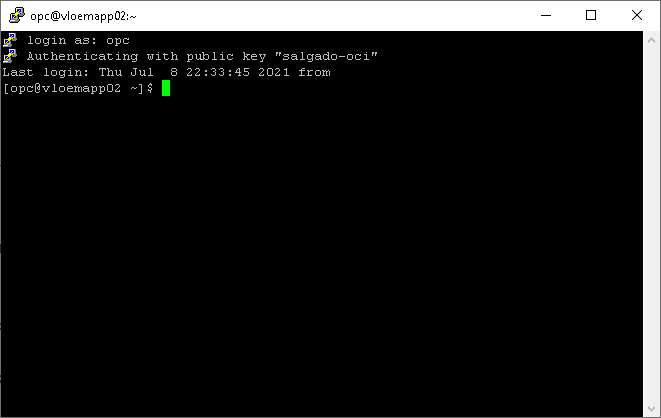
- Note: Take good care of your SSH Key files. Without them, you won’t be able to log in. It’s also recommended that you set up user equivalence to at least one other machine as a fail-safe login feature.
Now that the first application machine is up and running, it is time to set it up. First, we’ll need to create the required group and user:
- Create group and user:
[root@vloemapp01 ~]# groupadd dba -g 1001
[root@vloemapp01 ~]# useradd -d /home/oracle -g 1001 oracle
- Ensure that you set the default file mode creation mask (umask) to 022 in the shell startup file.
- Add the following in oracle’s .bash_profile:
[root@vloemapp01 ~]# echo "umask 022" >> /home/oracle/.bash_profile
- Install the packages required by OEM:
yum -y install binutils compat-libcap1 compat-libstdc++.x86_64 compat-libstdc++.i686 gcc gcc-c++ glibc.x86_64 glibc.i686 glibc-devel.x86_64 libaio.x86_64 libaio-devel.x86_64 libgcc.x86_64 libgcc.i686 libstdc++.x86_64 libstdc++.i686 libstdc++.x86_64 dejavu-serif-fonts ksh make sysstat numactl.x86_641 numactl.x86_642 motif.x86_643 motif.x86_644 redhat-lsb.x86_64 redhat-lsb-core.x86_64 openssl
- The required packages are:
binutils-2.23.52.0.1
compat-libcap1-1.10
compat-libstdc++-33-3.2.3.x86_64
compat-libstdc++-33-3.2.3.i686
gcc-4.8.2
gcc-c++-4.8.2
glibc-2.17.x86_64
glibc-2.17.i686
glibc-devel-2.17.x86_64
libaio-0.3.109.x86_64
libaio-devel-0.3.109.x86_64
libgcc-4.8.2.x86_64
libgcc-4.8.2.i686
libstdc++-4.8.2.x86_64
libstdc++-4.8.2.i686
libstdc++-devel-4.8.2.x86_64
dejavu-serif-fonts
ksh
make-3.82
sysstat-10.1.5
numactl-2.0.9 for x86_641
numactl-devel-2.0.9 for x86_642
motif-2.3.4-7 for x86_643
motif-devel-2.3.4-7 for x86_644
redhat-lsb-4.1-27.0.1.el7 for x86_64
redhat-lsb-core-4.1-27.0.1.el7 for x86_64
OpenSSL 1.0.1e
Note: Some packages require both architectures (x86_64 and i686).
Attach a block volume
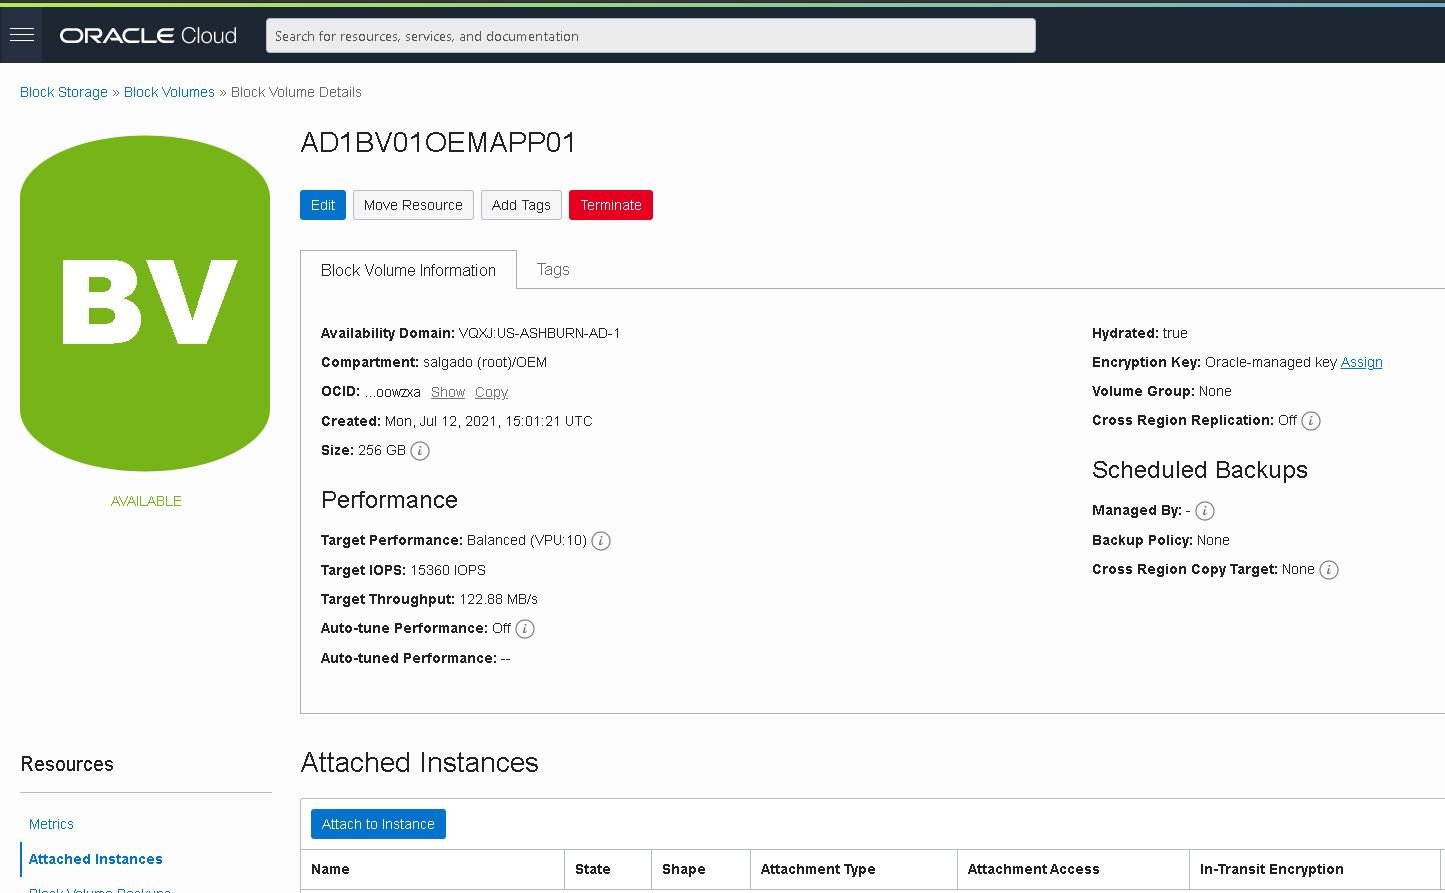
Now we’ll need to create and attach a block volume to this instance, which we’ll be used to host the OMS application. Note that block volumes should be created on the same AD as the compute instances to which they will be attached.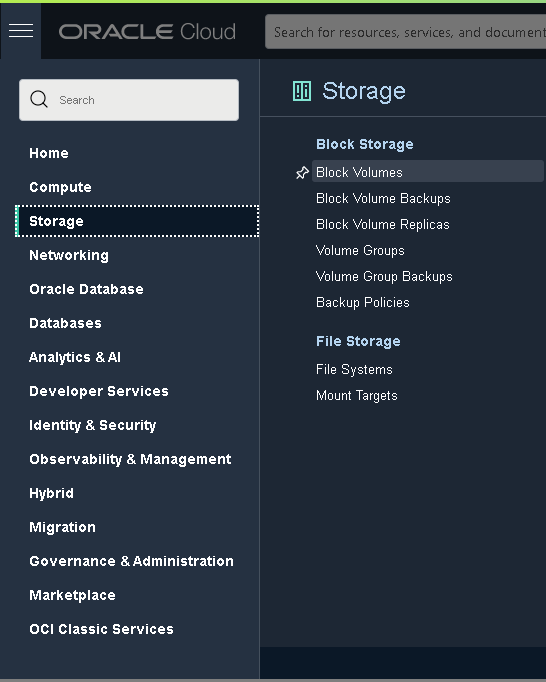
Click the “Create Block Volume” button and fill in the details as follows:

Take the opportunity to create the Block Volume that will be used in the second instance (AD2BV01OEMAPP02), as well as a third to host the shared network storage, named AD1VC01OEMSTO01, each with 256GB.
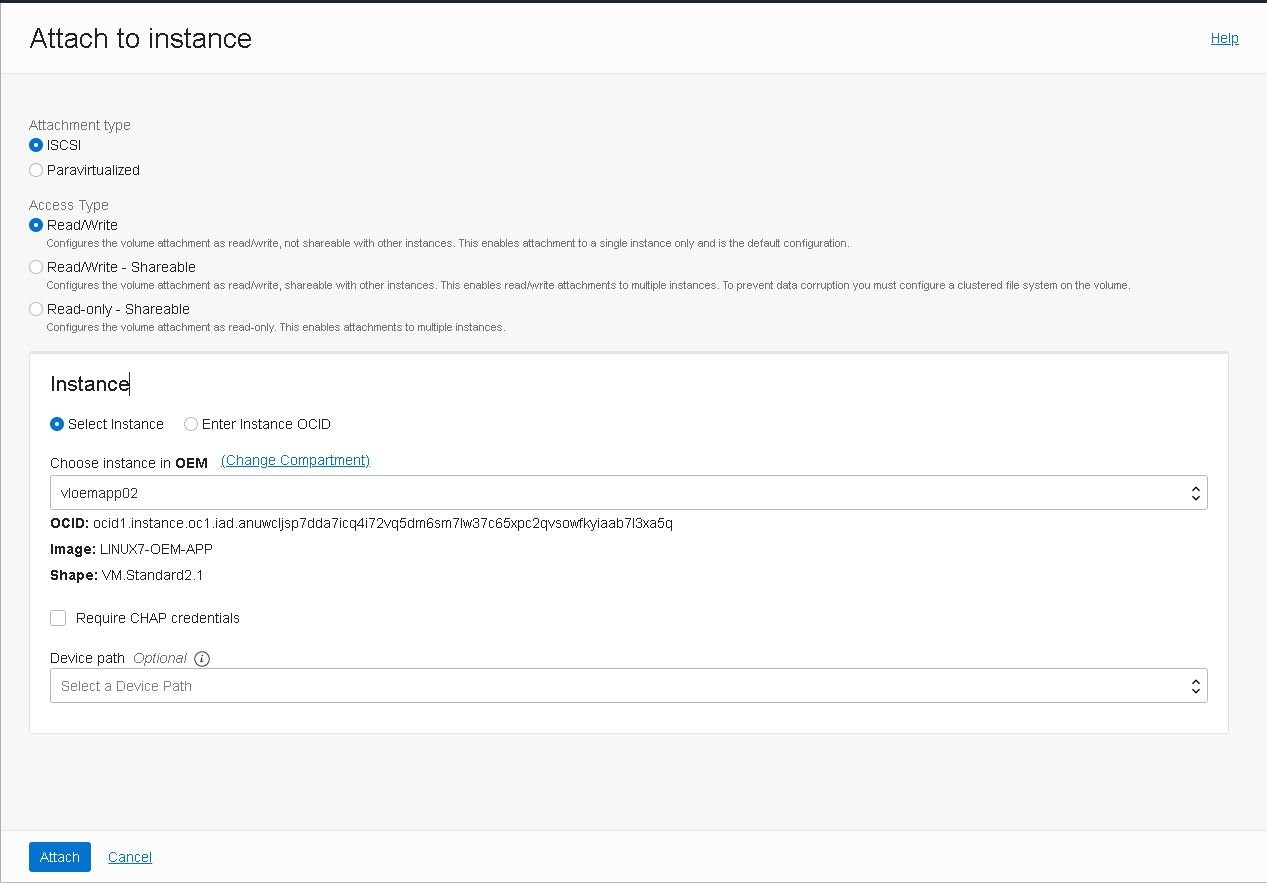
When creation is complete, attach this volume to the “vloemapp01” instance. To do so, click “Attached Instances,” then click the “Attach Instance” button:
Select the appropriate instance and click “Attach”:
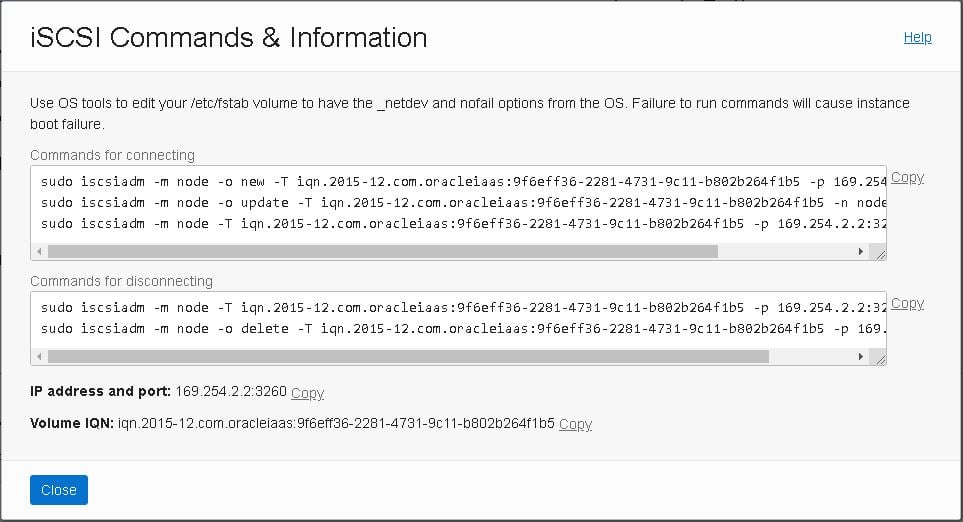
When the attachment is complete, you’ll need to run the block volume’s iSCSI commands using OS tools to login and enable the block volume. If you choose to add this volume to /etc/fstab, you must include the _netdev and nofail options. Failure to do so will cause the instance to fail to boot in the future:
- Go to the “vloemapp01” instance details page, then click on “Attached Block Volumes,” then click the Actions icon (three dots) for the newly attached volume, and finally select “iSCSI Commands and Information.”
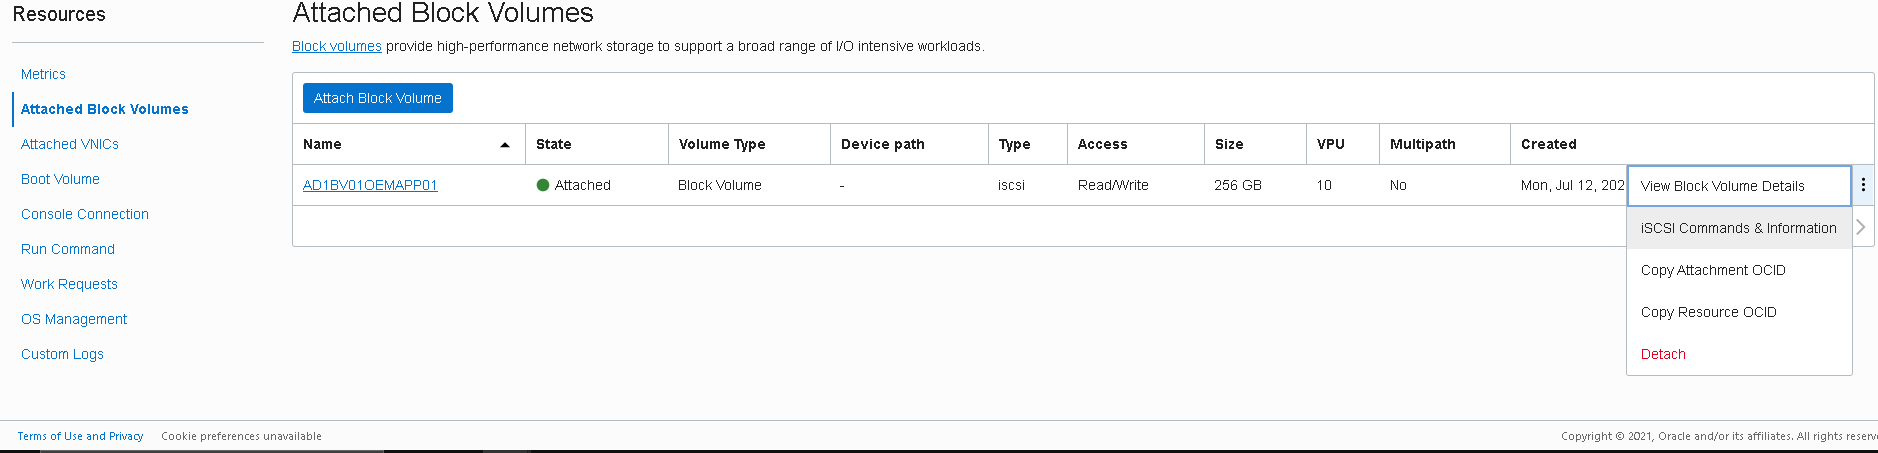
- The “iSCSI Commands and Information” dialog box displays specific identifying information about your volume and the iSCSI commands you’ll need. You can copy and paste the commands into your instance session window for each of the following steps:
Register the new block volume and create a new file system with it
- Register the volume with the iscsiadm tool:

- Configure iSCSI to automatically connect to the authenticated block storage volumes after a reboot:

- Log in to iSCSI:

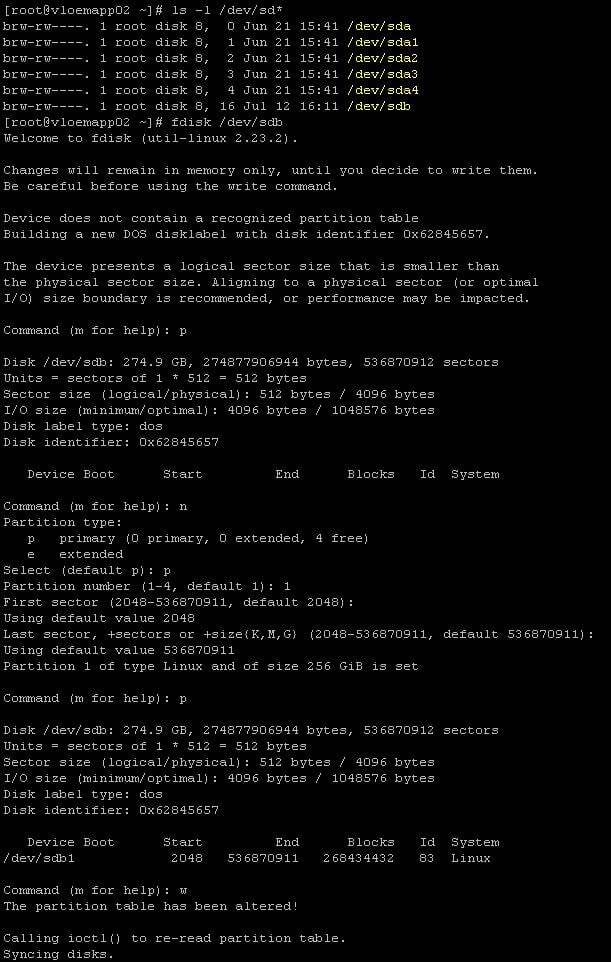
- Create a new partition using “fdisk” utility:
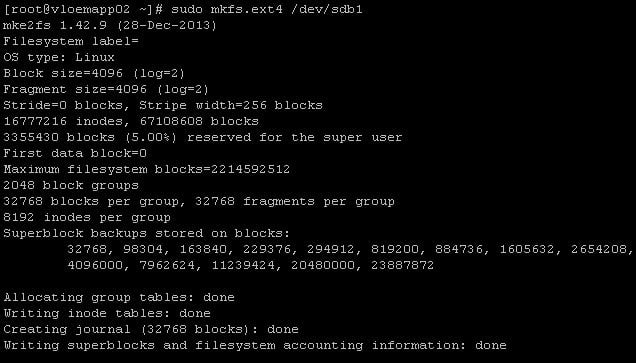
- Create and mount the new file system:
![]()
- Get the devices UUID using “blkid”:

- Add the device to /etc/fstab using the “UUID” from the “blkid” command, and the options described here.
Example:UUID=dc2a813c-bc22-4aad-8b87-ecf51f8e834e /u01 ext4 defaults,_netdev,nofail 0 2
By default, Linux processes the /etc/fstab file before the initiator starts. To configure the mount process to initiate before the volumes are mounted, specify the “_netdev” option on each line of the /etc/fstab file.
To prevent issues due to device names, specify the volume UUID in the /etc/fstab file instead of the device name. This process guarantees that the same volume is always mounted to the same mount point.
Create a 32GB swap file as required by OEM 13.5
- Create a 32GB swapfile on the new file system as OEM requires it:
[root@vloemapp01 ~]# dd if=/dev/zero of=/u01/swapfile bs=1024 count=33554432
- Set up the swap file:
[root@vloemapp01 ~]# mkswap /u01/swapfile
Setting up swapspace version 1, size = 33554428 KiB
no label, UUID=a84ed3ce-8cea-442a-b96a-f0f73c5017b
- Enable the swap file immediately but not automatically at boot time:
[root@vloemapp01 ~]# swapon /u01/swapfile
- Edit /etc/fstab to include the following entry:
UUID=310c3383-fa5b-4e0f-b1db-bea13a416db0 /u01/swapfile swap swap defaults 0 0
- Verify the swap file by viewing the output of the following commands:
[root@vloemapp01 ~]# cat /proc/swaps
or
[root@vloemapp01 ~]# free
Stay tuned for the next posts in this series, which will cover the deployment of the second compute instance, the load balancer setup, and OEM’s setup.

