"shouldn't we patch the Exadata" ?
And the answer is "yes, definitely".
Indeed, Oracle releases huges (~ 10 GB) " Quarterly Full Stack" patches (aka Bundles) every quarter (for example : Patch 24436624 - Quarterly Full Stack Download For Oracle Exadata (Oct 2016 - 12.1.0.2)); these Bundles contain all the patches for all the components that make an Exadata. You will need (almost :)) nothing else to be able to patch your whole Exadata. Even if it looks a tough operation at first sight, it is not that much. And this blog's aim is to clearly describe every step to make it easier for all of us. Let's start with a preview of this patching with the order we will be proceeding and the tools we will be using :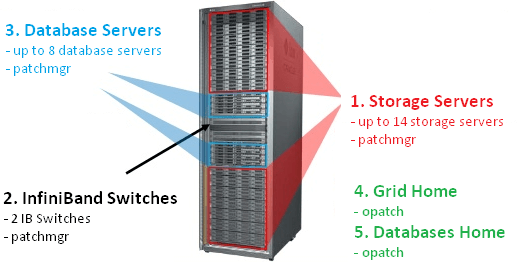
3.1/ Patching the cells (aka Storage servers) 3.2/ Patching the IB switches 3.3/ Patching the Database servers (aka Compute Nodes) 3.4/ Patching the Grid Infrastructure 3.5/ Patching the databases ORACLE_HOMEs
4/ The Rollback procedure4.1/ Cell Rollback 4.2/ DB nodes Rollback 4.3/ IB Switches Rollback
5/ Troubleshooting5.1/ Cell patching issue 5.2/ CRS does not restart issue 5.3/ A procedure to add instances to a database 5.4/ OPatch resume
6/ Timing0/ An advice
First of all, please strongly keep in mind this advice :Do NOT continue to the next step before a failed step is properly resolved.
Indeed, everything that needs to be redundant is redundant and it is supported to run different versions between servers. In the MOS note " Exadata Patching Overview and Patch Testing Guidelines (Doc ID 1262380.1)", we can read that :It is supported to run different Exadata versions between servers. For example, some storage servers may run 11.2.2.4.2 while others run 11.2.3.1.1, or all storage servers may run 11.2.3.1.1 while database servers run 11.2.2.4.2. However, it is highly recommended that this be only a temporary configuration that exists for the purpose and duration of rolling upgrade.
Then if when patching your cells one cell is not rebooting, stop here, do not continue, do not force patch the next one. Indeed, everything will still be working fine and in a supported manner with one cell down (I did it on production, no user could notice anything), it will most likely not be the case with 2 cells down. If this kind of issue happens, have a look at the troubleshooting section of this blog and open a MOS Sev 1.1/ General Information
Some information you need to know before starting to patch your Exadata :- It is better to have a basic understanding of what is an Exadata before jumping to this patch procedure
- This procedure does not apply to an ODA (Oracle Database Appliance)
- I will use the /patches/OCT2016_bundle_patch FS to save the Bundle in the examples of this blog
- I use the "DB node" term here, it means "database node", aka "Compute node"; the nodes where the Grid Infrastructure and the database are running, I will also use the db01 term for the database node number 1, usually named db01
- I use the "cell" word aka "storage servers", the servers that manage your storage. I will also use cel01 for the storage server number 1, usually named cel01
- It is good to have the screen utility installed; if not, use nohup
- Almost all the procedure will be executed as root
- I will patch the IB Switches from the DB node 1 server
- I will patch the cells from the DB node 1 server
- I will patch the DB nodes from the cel01 server
1/ Some prerequisites it is worth doing before the maintenance
1.1/ Download and unzip the Bundle
Review the Exadata general note ( Exadata Database Machine and Exadata Storage Server Supported Versions (Doc ID 888828.1)) to find the latest Bundle, download, unzip it; be sure that every directory is owned by oracle:dba to avoid any issue in the future :/patches/OCT2016_bundle_patch >
oracle@myclusterdb01) ls -ltr
total 9609228
-rw-r--r-- 1 oracle oinstall 560430690 Nov 16 18:24 p24436624_121020_Linux-x86-64_10of10.zip
-rw-r--r-- 1 oracle oinstall 1030496554 Nov 16 18:26 p24436624_121020_Linux-x86-64_1of10.zip
-rw-r--r-- 1 oracle oinstall 1032681260 Nov 16 18:27 p24436624_121020_Linux-x86-64_2of10.zip
-rw-r--r-- 1 oracle oinstall 1037111138 Nov 16 18:29 p24436624_121020_Linux-x86-64_3of10.zip
-rw-r--r-- 1 oracle oinstall 1037009057 Nov 16 18:31 p24436624_121020_Linux-x86-64_4of10.zip
-rw-r--r-- 1 oracle oinstall 1037185003 Nov 16 18:33 p24436624_121020_Linux-x86-64_5of10.zip
-rw-r--r-- 1 oracle oinstall 1026218494 Nov 16 18:35 p24436624_121020_Linux-x86-64_6of10.zip
-rw-r--r-- 1 oracle oinstall 1026514887 Nov 16 18:36 p24436624_121020_Linux-x86-64_7of10.zip
-rw-r--r-- 1 oracle oinstall 1026523343 Nov 16 18:39 p24436624_121020_Linux-x86-64_8of10.zip
-rw-r--r-- 1 oracle oinstall 1025677014 Nov 16 18:41 p24436624_121020_Linux-x86-64_9of10.zip
/patches/OCT2016_bundle_patch >
oracle@myclusterdb01) for I in `ls p24436624_121020_Linux-x86-64*f10.zip`
do
unzip $I
done
Archive: p24436624_121020_Linux-x86-64_10of10.zip
inflating: 24436624.tar.splitaj
...
Archive: p24436624_121020_Linux-x86-64_9of10.zip
inflating: 24436624.tar.splitai
/patches/OCT2016_bundle_patch >
oracle@myclusterdb01) cat *.tar.* | tar -xvf -
24436624/
24436624/automation/
24436624/automation/bp1-out-of-place-switchback.xml
24436624/automation/bp1-auto-inplace-rolling-automation.xml
...
1.2/ SSH keys
For this step, if you are not confident with the dbs_group, cell_group, etc... files, here is how to create them as I have described it in this post (look for " dbs_group" in the post).[root@myclusterdb01 ~]# ibhosts | sed s'/"//' | grep db | awk '{print $6}' | sort > /root/dbs_group
[root@myclusterdb01 ~]# ibhosts | sed s'/"//' | grep cel | awk '{print $6}' | sort > /root/cell_group
[root@myclusterdb01 ~]# cat /root/dbs_group ~/cell_group > /root/all_group
[root@myclusterdb01 ~]# ibswitches | awk '{print $10}' | sort > /root/ib_group
[root@myclusterdb01 ~]#
We would need few SSH keys deployed in order to ease the patches application :
- root ssh keys deployed from the db01 server to the IB Switches (you will have to enter the root password once for each IB Switch)
[root@myclusterdb01 ~]# cat ~/ib_group
 myclustersw-ib2
 myclustersw-ib3
 [root@myclusterdb01 ~]# dcli -g ~/ib_group -l root -k -s '-o StrictHostKeyChecking=no'
 root@myclustersw-ib3's password:
 root@myclustersw-ib2's password:
 myclustersw-ib2: ssh key added
 myclustersw-ib3: ssh key added
 [root@myclusterdb01 ~]#
- root ssh keys deployed from the cel01 server to all the database nodes (you will have to enter the root password once for each database server)
[root@myclustercel01 ~]# cat ~/dbs_group
 myclusterdb01
 myclusterdb02
 myclusterdb03
 myclusterdb04
 [root@myclustercel01 ~]# dcli -g ~/dbs_group -l root -k -s '-o StrictHostKeyChecking=no'
 root@myclusterdb01's password:
 root@myclusterdb03's password:
 root@myclusterdb04's password:
 root@myclusterdb02's password:
 myclusterdb01: ssh key added
 myclusterdb02: ssh key added
 myclusterdb03: ssh key added
 myclusterdb04: ssh key added
 [root@myclustercel01 ~]#
- root ssh keys deployed from the db01 server to all the cells (you will have to enter the root password once for each cell)
[root@myclusterdb01 ~]# dcli -g ~/cell_group -l root hostname
 myclustercel01: myclustercel01.mydomain.com
 myclustercel02: myclustercel02.mydomain.com
 myclustercel03: myclustercel03.mydomain.com
 myclustercel04: myclustercel04.mydomain.com
 [root@myclusterdb01 ~]# dcli -g ~/cell_group -l root -k -s '-o StrictHostKeyChecking=no'
 root@myclustercel04's password:
 ...
 root@myclustercel03's password:
 myclustercel01: ssh key added
 ...
 myclustercel06: ssh key added
 [root@myclusterdb01 ~]#
1.3/ Upgrade opatch
It is highly recommended to upgrade opatch before any patching activity and this Bundle is not an exception. Please find the procedure to quickly upgrade opatch with dcli in this post. Please note that upgrading opatch will also allow you to be ocm.rsp-free !1.4/ Run the prechecks
It is very important to run those prechecks and take a good care of the outputs. They have to be 100% successful to ensure a smooth application of the patches.- Cell patching prechecks (launch them from the DB Node 1 as you will patch them from here)
[root@myclusterdb01 ~]# cd /patches/OCT2016_bundle_patch/24436624/Infrastructure/12.1.2.3.3/ExadataStorageServer_InfiniBandSwitch/patch_12.1.2.3.3.161013/
 [root@myclusterdb01 ~]# ./patchmgr -cells ~/cell_group -patch_check_prereq -rolling
- DB Nodes prechecks (launch them from the cel01 server as you will patch them from here)
[root@myclusterdb01 ~]# scp /patches/OCT2016_bundle_patch/24436624/Infrastructure/SoftwareMaintenanceTools/DBServerPatch/5.161014/p21634633_121233_Linux-x86-64.zip root@myclustercel01:/tmp/. # This is patchmgr
 [root@myclusterdb01 ~]# scp /patches/OCT2016_bundle_patch/24436624/Infrastructure/12.1.2.3.3/ExadataDatabaseServer_OL6/p24669306_121233_Linux-x86-64.zip root@myclustercel01:/tmp/. # This is the ISO file, do NOT unzip it
 [root@myclusterdb01 ~]# ssh root@myclustercel01
 [root@myclustercel01 ~]# cd /tmp
 [root@myclustercel01 ~]# nohup unzip p21634633_121233_Linux-x86-64.zip &
 [root@myclustercel01 ~]# cd /tmp/dbserver_patch_5.5.161014
 [root@goblxdex02cel01 dbserver_patch_5.161014]# ./patchmgr -dbnodes ~/dbs_group -precheck -iso_repo /tmp/p24669306_121233_Linux-x86-64.zip -target_version 12.1.2.3.3.161013
 [root@goblxdex02cel01 dbserver_patch_5.161014]#
Note : if you have some
NFS mounted, you will have some error messages, you can ignore them at this stage, we will umount the
NFS before patching the DB nodes
- IB Switches prechecks (launch them from the DB Node 1 as you will patch them from here)
[root@myclusterdb01]# cd /patches/OCT2016_bundle_patch/24436624/Infrastructure/12.1.2.3.3/ExadataStorageServer_InfiniBandSwitch/patch_12.1.2.3.3.161013/
 [root@myclusterdb01]# patch_12.1.2.3.3.161013]# ./patchmgr -ibswitches ~/ib_group -upgrade -ibswitch_precheck
- Grid Infrastructure prechecks
[root@myclusterdb01]# . oraenv <<< +ASM1
 [root@myclusterdb01]# $ORACLE_HOME/OPatch/opatchauto apply /patches/OCT2016_bundle_patch/24436624/Database/12.1.0.2.0/12.1.0.2.161018DBBP/24448103 -oh /u01/app/12.1.0.2/grid -analyze
 [root@myclusterdb01]#
Notes :
- You will most likely see some warnings here, check the logfiles and they will probably be due to some patches that will be rolled back as they will not be useful any more.
[root@myclusterdb01]# $ORACLE_HOME/OPatch/opatch prereq CheckSystemSpace -phBaseFile /tmp/patch_list_gihome.txt
With the following /tmp/patch_list_gihome.txt file (check the README as the patch numbers will change with the versions)
[root@myclusterdb01]#cat /tmp/patch_list_gihome.txt
 /patches/OCT2016_bundle_patch/24436624/Database/12.1.0.2.0/12.1.0.2.161018DBBP/24448103/21436941
 /patches/OCT2016_bundle_patch/24436624/Database/12.1.0.2.0/12.1.0.2.161018DBBP/24448103/24007012
 /patches/OCT2016_bundle_patch/24436624/Database/12.1.0.2.0/12.1.0.2.161018DBBP/24448103/24846605
 /patches/OCT2016_bundle_patch/24436624/Database/12.1.0.2.0/12.1.0.2.161018DBBP/24448103/24340679
 [root@myclusterdb01]#
- Database patch prechecks
[oracle@myclusterdb01]$ . oraenv <<< A_DATABASE_WITH_THE_ORACLE_HOME_YOU_WANT_TO_PATCH
 [oracle@myclusterdb01]$ $ORACLE_HOME/OPatch/opatch prereq CheckConflictAgainstOHWithDetail -phBaseDir /patches/OCT2016_bundle_patch/24436624/Database/12.1.0.2.0/12.1.0.2.161018DBBP/24448103/24340679 $ORACLE_HOME/OPatch/opatch prereq CheckConflictAgainstOHWithDetail -phBaseDir /patches/OCT2016_bundle_patch/24436624/Database/12.1.0.2.0/12.1.0.2.161018DBBP/24448103/24846605 $ORACLE_HOME/OPatch/opatch prereq CheckSystemSpace -phBaseFile /tmp/patch_list_dbhome.txt
The file
/tmp/patch_list_dbhome.txt containing (check the README, the patch numbers will change depending on the versions) :
/patches/OCT2016_bundle_patch/24436624/Database/12.1.0.2.0/12.1.0.2.161018DBBP/24448103/24340679
 /patches/OCT2016_bundle_patch/24436624/Database/12.1.0.2.0/12.1.0.2.161018DBBP/24448103/24846605
- OJVM prechecks
[oracle@myclusterdb01]$ cd /patches/OCT2016_bundle_patch/24436624/Database/12.1.0.2.0/12.1.0.2.161018OJVMPSU/24315824
 [oracle@myclusterdb01]$ $ORACLE_HOME/OPatch/opatch prereq CheckConflictAgainstOHWithDetail -ph ./
 [oracle@myclusterdb01]$
- Do a
lsinventory -all_nodes before patching and save the output somewhere
[oracle@myclusterdb01]$ $ORACLE_HOME/OPatch/opatch lsinventory -all_nodes
- Check disk_repair_time and set it to 24h
SQL> select dg.name as diskgroup, a.name as attribute, a.value from v$asm_diskgroup dg, v$asm_attribute a where dg.group_number=a.group_number and (a.name like '%repair_time' or a.name = 'compatible.asm');

 DISKGROUP ATTRIBUTE VALUE
 -------------------- ---------------------------------------- ----------------------------------------
 DATA disk_repair_time 3.6h
 DATA compatible.asm 11.2.0.2.0
 DBFS_DG disk_repair_time 3.6h
 DBFS_DG compatible.asm 11.2.0.2.0
 RECO_ disk_repair_time 3.6h
 RECO compatible.asm 11.2.0.2.0

 6 rows selected.

 SQL> connect / as sysasm
 Connected.
 SQL> ALTER DISKGROUP DATA SET ATTRIBUTE 'disk_repair_time' = '24h' ;

 Diskgroup altered.

 SQL> ALTER DISKGROUP DBFS_DG SET ATTRIBUTE 'disk_repair_time' = '24h' ;

 Diskgroup altered.

 SQL> ALTER DISKGROUP RECO SET ATTRIBUTE 'disk_repair_time' = '24h' ;

 Diskgroup altered.

 SQL>
If one of this precheck points a problem, resolve it before heading to the next steps. Now that everything is downloaded, unzipped, updated, we can safely jump to
the patching procedure in part 2 !

