Quick links to
Part 1 /
Part 2 /
Part 3 /
Part 4 /
Part 5 /
Part 6
3: The patching procedure
3.1 Patching the Cells (aka Storage Servers)
3.1.0 - Information
- All actions must be done as root
- Patching a cell takes around one hour and thirty minutes (it may take longer in the event of heavy I/O activity, we experienced some 3 hours per cell patching sessions on an heavy I/O loaded Exadata)
- You can connect to a cell console to check what is happening during a patch application. Please find the procedure on how to connect to an ILOM console. Once connected, you will see everything that is happening on the server console like the reboot sequence, etc...:
[root@myclusterdb01 dbserver_patch_5.170131]# ssh root@myclustercel01-ilom
  Password:
  Oracle(R) Integrated Lights Out Manager
  Version 3.1.2.20.c r86871
  Copyright (c) 2014, Oracle and/or its affiliates. All rights reserved.
  > start /sp/console
  Are you sure you want to start /SP/console (y/n)? y
  Serial console started. To stop, type ESC (
3.1.1 - Check the Version of Each Cell Before Patching
All versions have to be the same on each cell at this point. If you are not confident with the
cell_group,
dbs_group,
*_group files, please
find the procedure to create them.
[root@myclusterdb01 ~]# dcli -g ~/cell_group -l root imageinfo -ver
 myclustercel01: 12.1.2.3.3.160119
 myclustercel02: 12.1.2.3.3.160119
 myclustercel03: 12.1.2.3.3.160119
 myclustercel04: 12.1.2.3.3.160119
 myclustercel05: 12.1.2.3.3.160119
 myclustercel06: 12.1.2.3.3.160119
 [root@myclusterdb01 ~]#
3.1.2 - Apply the Patch
A few notes:
- You may use screen instead of nohup if it is installed
- You can avoid the -patch_check_prereq step as it should has already been done previously, but I personally like to do it right before the patch to be absolutely sure.
- You can also use the -smtp_to and the -smtp_from options to receive email notifications: -smtp_from "dba@pythian.com" -smtp_to "myteam@pythian.com dba@myclient.com"
- Ensure you are connected on the database server node 1 (myclusterdb01)
[root@myclusterdb01 ~]# cd /patches/OCT2016_bundle_patch/24436624/Infrastructure/12.1.2.3.3/ExadataStorageServer_InfiniBandSwitch/patch_12.1.2.3.3.161013/
 [root@myclusterdb01 ~]# ./patchmgr -cells ~/cell_group -reset_force
 [root@myclusterdb01 ~]# ./patchmgr -cells ~/cell_group -cleanup
 [root@myclusterdb01 ~]# ./patchmgr -cells ~/cell_group -patch_check_prereq -rolling
 [root@myclusterdb01 ~]# nohup ./patchmgr -cells ~/cell_group -patch -rolling &
 [root@myclusterdb01 ~]# ./patchmgr -cells ~/cell_group -cleanup
You can then follow the patch in the
nohup.out file (
tail -f nohup.out). You can also check what is happening on the console or check in the
patchmgr.out file.
Non-Rolling Manner
You may also want to apply this patch in a non-rolling manner. While this will be faster, it requires a complete downtime of all the databases running on this Exadata. To do so, you will have to stop the cluster and the cells and then remove the "
-rolling" option from the previous
patchmgr command line :
[root@myclusterdb01 ~]#crsctl stop cluster -all
 [root@myclusterdb01 ~]#crsctl stop crs
 [root@myclusterdb01 ~]#crsctl check crs
 -- If the cluster is not stopped properly at this step, use the -f option : crsctl stop crs -f
You can stop the cells services on the cells to be patched using the following command on each cell:
[root@myclustercel01 ~]# cellcli -e 'alter cell shutdown services all'
Or use the
dcli command to launch it on all the cells
[root@myclusterdb01 ~]# dcli -g ~/cell_group -l root "cellcli -e alter cell shutdown services all"
[root@myclusterdb01 ~]# ./patchmgr -cells ~/cell_group -reset_force
 [root@myclusterdb01 ~]# ./patchmgr -cells ~/cell_group -cleanup
 [root@myclusterdb01 ~]# nohup ./patchmgr -cells ~/cell_group -patch &
 [root@myclusterdb01 ~]# ./patchmgr -cells ~/cell_group -cleanup
3.1.3 - Check the Version of Each Cell After the Patch
All versions have to be the same on each cell at this point.
[root@myclusterdb01 ~]# dcli -g ~/cell_group -l root imageinfo -ver
 myclustercel01: 12.1.2.3.3.161013
 myclustercel02: 12.1.2.3.3.161013
 myclustercel03: 12.1.2.3.3.161013
 myclustercel04: 12.1.2.3.3.161013
 myclustercel05: 12.1.2.3.3.161013
 myclustercel06: 12.1.2.3.3.161013
 [root@myclusterdb01 ~]#
3.2 : Patching the IB Switches
3.2.0 - Information
- Patching an IB Swicth takes around 45 minutes
- All steps have to be executed as root
- It is a 100% online operation
- I've become accustomed to using the database node 1 (myclusterdb01) to patch the IB Switches, which is why I have deployed the root SSH keys from the DB node 1 to the IB Switches in the pre-requisites section
- Nothing tricky here, we have never faced any issue.
- Please find a procedure to create the ib_group file.
3.2.1 - Check the Version of Each IB Switch Before the Patch
[root@myclusterdb01 ~]# dcli -g ~/ib_group -l root version | grep "version"
 myclustersw-ib2: SUN DCS 36p version: 2.1.3-4
 myclustersw-ib3: SUN DCS 36p version: 2.1.3-4
 [root@myclusterdb01 ~]#
3.2.2 - Apply the Patch
A few notes:
- You can use screen instead of nohup if it is installed on your system
- Be sure to be connected to the myclusterdb01 server
[root@myclusterdb01 ~]# cd /patches/OCT2016_bundle_patch/24436624/Infrastructure/12.1.2.3.3/ExadataStorageServer_InfiniBandSwitch/patch_12.1.2.3.3.161013/
 [root@myclusterdb01 ~]# nohup ./patchmgr -ibswitches ~/ib_group -upgrade &
3.2.3 - Check the Version of Each IB Switch After the Patch
[root@myclusterdb01 ~]# dcli -g ~/ib_group -l root version | grep "version"
 myclustersw-ib2: SUN DCS 36p version: 2.1.8-1
 myclustersw-ib3: SUN DCS 36p version: 2.1.8-1
 [root@myclusterdb01 ~]#
3.3 Patching the DB nodes (aka Compute Nodes)
3.3.0 - Information
-
- All actions must be done as root
- Patching a database node takes around one hour
- It is not possible to start the patch from a database node that will be patched (which makes sense). The official way to apply this patch in a rolling manner is to:
- Start the patch from the database node 1 to patch all the other nodes
- Once done, copy patchmgr and the ISO file to an already patched node and then start the patch to patch the remaining node (node 1 in my example)
Since this doesn't make sense to me (I still haven't understood why Oracle recommends to do that), I use a cell to start the patch and can then patch all the database servers in one
patchmgr session which seems more clever to me.
- I use /tmp to save patchmgr and the ISO on the cell node 1 as /tmp exists on 100% of the Unix boxes and ensure that I can write in it. An important thing to know here is that /tmp on the cells is regularly purged as described in this documentation. The dbnodeupdate.zip file could then be deleted by this purge mechanism if there is too much time between the copy of it and when you use it and then you won't be able to launch patchmgr as dbnodeupdate.zip is mandatory. There are few workarounds to that though:
- Copy patchmgr and the ISO file just before you apply the patch (this is the solution I use)
- Copy patchmgr and the ISO file outside of /tmp.
- The directories with SAVE in the name are ignored, then you could create a /tmp/SAVE directory to put patchmgr and the ISO file in
3.3.1 - Check the Image Versions Before the Patch
In this step, we should find the same version on each node.
[root@myclusterdb01 ~]# dcli -g ~/dbs_group -l root imageinfo -ver
 myclusterdb01: 12.1.2.2.1.160119
 myclusterdb02: 12.1.2.2.1.160119
 myclusterdb03: 12.1.2.2.1.160119
 myclusterdb04: 12.1.2.2.1.160119
 [root@myclusterdb01 ~]#
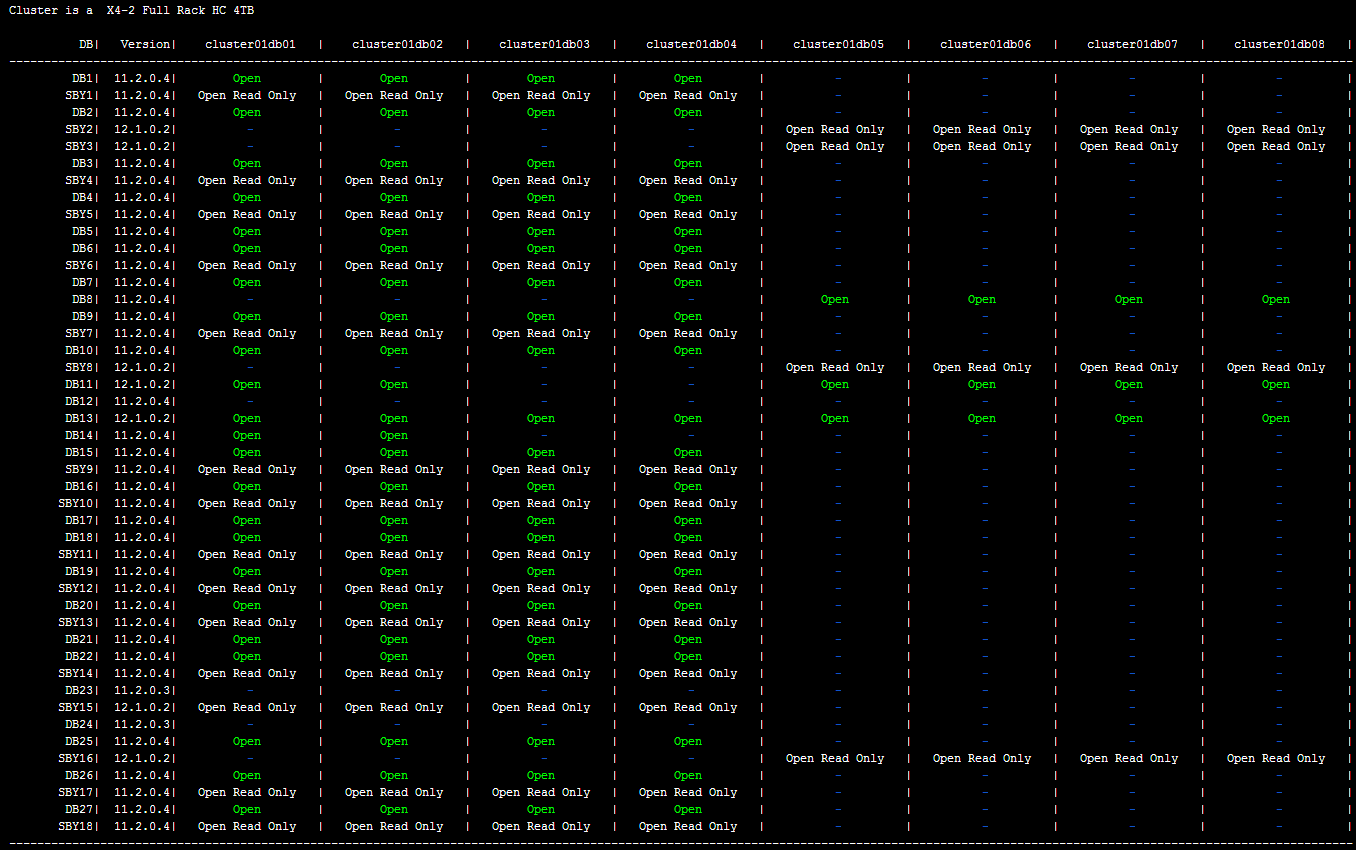
3.3.2 - Check Which Instance is Up and On Which Node
This is an important step. You have to know exactly what is running before proceeding to be sure that you will find the same status after the patch. You will then be able to follow the patching procedure with this script. You will then see all instances in a yellow "
instance shutdown" status on the server that is being patched. I use
this script to have a clear status on which instance is running on which node; it will produce this kind of output :
3.3.3 - Apply the Patch
A few notes:
- We first need to umount the NFS on each DB node, this is a pre-requisite of the patch You can generate all the umount commands with this command : "df -t nfs | awk '{if ($NF ~ /^\//){print "umount " $NF}}'"; You can also do it automatically by adding a "| bash" at the end like that "df -t nfs | awk '{if ($NF ~ /^\//){print "umount " $NF}}' | bash"
- You may use screen instead of nohup if it is installed
- You can avoid the -patch_check_prereq step as it should has already been done previously but I personnally like to do it right before the patch to be 100% sure.
- Be sure to be connected to the cell node 1 (myclustercel01)
Copy patchmgr and the ISO
Whether you choose a rolling or a non-rolling manner, you have to copy
patchmgr and the ISO file on the cell node 1 first (do not unzip the ISO file).
[root@myclusterdb01 ~]# scp /patches/OCT2016_bundle_patch/24436624/Infrastructure/SoftwareMaintenanceTools/DBServerPatch/5.161014/p21634633_121233_Linux-x86-64.zip root@myclustercel01:/tmp/. # This is patchmgr
 [root@myclusterdb01 ~]# scp /patches/OCT2016_bundle_patch/24436624/Infrastructure/12.1.2.3.3/ExadataDatabaseServer_OL6/p24669306_121233_Linux-x86-64.zip root@myclustercel01:/tmp/. # This is the ISO file, do NOT unzip it
 [root@myclusterdb01 ~]# ssh root@myclustercel01
 [root@myclustercel01 ~]# cd /tmp
 [root@myclustercel01 ~]# nohup unzip p21634633_121233_Linux-x86-64.zip &
Rolling Manner
The rolling manner will allow you to patch every node one by one. You will always have only one node unavailable, all the other nodes will remain up and running. This method of patching is almost online and could be 100% online with a good service rebalancing
[root@myclustercel01 ~]# cd /tmp/dbserver_patch_5.161014
 [root@myclustercel01 dbserver_patch_5.161110]# ./patchmgr -dbnodes ~/dbs_group -precheck -iso_repo /tmp/p24669306_121233_Linux-x86-64.zip -target_version 12.1.2.3.3.161013
 [root@myclustercel01 dbserver_patch_5.161110]# nohup ./patchmgr -dbnodes ~/dbs_group -upgrade -iso_repo /tmp/p24669306_121233_Linux-x86-64.zip -target_version 12.1.2.3.3.161013 -rolling &
Non-Rolling Manner
In a non-rolling manner,
patchmgr will patch all the nodes at the same time in parallel. It will then be quicker, but a whole downtime is required.
[root@myclustercel01 ~]# cd /tmp/dbserver_patch_5.161014
 [root@myclustercel01 dbserver_patch_5.161110]# ./patchmgr -dbnodes ~/dbs_group -precheck -iso_repo /tmp/p24669306_121233_Linux-x86-64.zip -target_version 12.1.2.3.3.161013
 [root@myclustercel01 dbserver_patch_5.161110]# nohup ./patchmgr -dbnodes ~/dbs_group -upgrade -iso_repo /tmp/p24669306_121233_Linux-x86-64.zip -target_version 12.1.2.3.3.161013 &
3.3.4 - Check the Image Version on Each Node
Be sure that everything is working well after the patch and that the expected version has been installed correctly:
[root@myclustercel01 ~]# dcli -g ~/dbs_group -l root imageinfo -ver
 myclusterdb01: 12.1.2.3.3.161013
 myclusterdb02: 12.1.2.3.3.161013
 myclusterdb03: 12.1.2.3.3.161013
 myclusterdb04: 12.1.2.3.3.161013
 [root@myclusterdb01 ~]#
3.3.5 - Check the Status of Each Instance on Each Node
Like in step 3.2.2, I use
this script to have a clear status on which instance is running on which node. We need to have the exact same status as before the application of the patch. All the infrastructure components are patched (Cells, DB Nodes and IB Switches), so we can now continue with the software components (Grid and Databases ORACLE_HOME) patching in
the Part 3 of this blog.
Quick links to
Part 1 /
Part 2 /
Part 3 /
Part 4 /
Part 5 /
Part 6

