Introduction
In this article we will explore one approach for deploying ProxySQL behind a load balancer in Google Cloud. While considering the deployment of ProxySQL, one has basically the following options:
- Install ProxySQL on existing application server(s)
- Provision dedicated ProxySQL server(s) between your application servers and the database layer.
Each approach has its pros and cons, but if there's a significant number of application servers (more than a dozen or so) having a dedicated ProxySQL "layer" can be a more attractive option, specially if there is no service discovery mechanism in place (e.g. Consul). Let's consider a simple scenario, with a master and a small number of slaves in a single geographic region. Assuming that you are following the best practice, your database servers should be split into different availability zones. So for ProxySQL, it also makes sense to have at least 3 instances (again, on different availability zones). Here's how that would look: [caption id="attachment_103672" align="alignnone" width="972"]
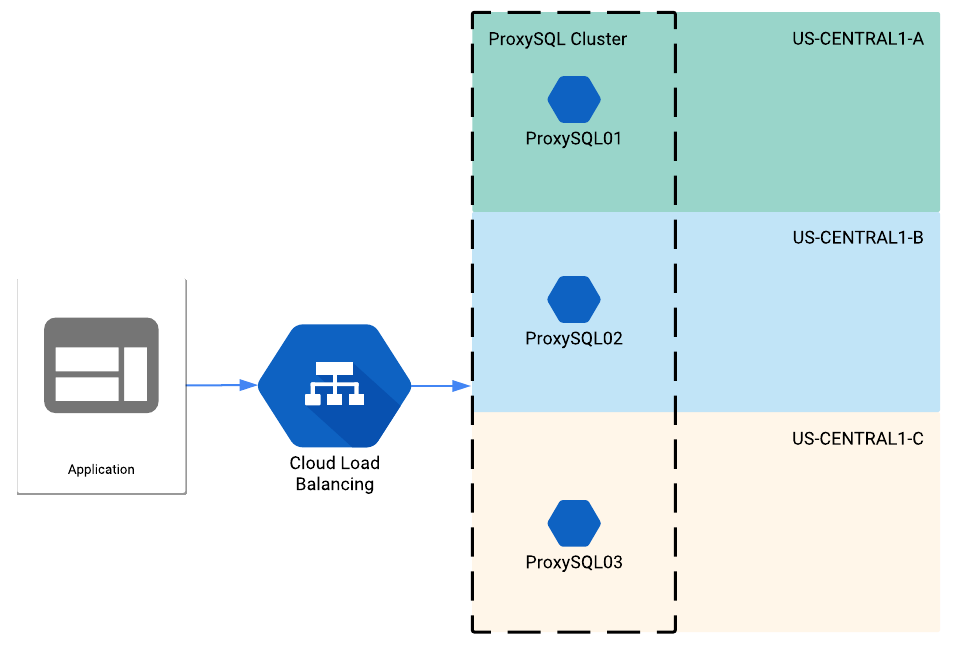 ProxySQL behind a load balancer in Google Cloud[/caption]
Getting started
Let's start by creating some basic infrastructure for our POC from Google Cloud shell.
Network infrastructure
You can skip this part if you already have a network configuration in place. 1. Create a custom VPC network
gcloud compute networks create my-custom-network --subnet-mode custom
2. Create a new subnet in your custom VPC network
gcloud compute networks subnets create my-custom-subnet \
  --network my-custom-network \
  --range 10.240.0.0/16 \
  --region us-central1
3. Configure a firewall rule to allow all traffic within the subnet
gcloud compute firewall-rules create allow-all-10-240-0-0-16 \
  --network my-custom-network \
  --allow tcp,udp,icmp \
  --source-ranges 10.240.0.0/16
4. Create a firewall rule to allow ssh, mysql, icmp traffic from anywhere to the custom network (optional)
gcloud compute firewall-rules create allow-tcp22-tcp3306-icmp \
  --network my-custom-network \
  --allow tcp:22,tcp:3306,icmp
ProxySQL instances
Now let's create some instances to install ProxySQL. I will skip the actual steps of installing and configuring ProxySQL for the sake of brevity. Check the
official doc for more on this. 1. Create 3 ProxySQL instances on different zones
gcloud compute instances create tst-proxysql01 \
  --image-family debian-9 \
  --image-project debian-cloud \
  --tags proxysql-lb \
  --zone us-central1-a \
  --subnet my-custom-subnet

 gcloud compute instances create tst-proxysql02 \
  --image-family debian-9 \
  --image-project debian-cloud \
  --tags proxysql-lb \
  --zone us-central1-b \
  --subnet my-custom-subnet

 gcloud compute instances create tst--proxysql03 \
  --image-family debian-9 \
  --image-project debian-cloud \
  --tags proxysql-lb \
  --zone us-central1-c \
  --subnet my-custom-subnet
Now we will create instance groups. One could set the group auto-scaling properties to better manage the instances but this is out of scope of this article. 2. Create 3 instance groups for ProxySQL instances on each zone
gcloud compute instance-groups unmanaged create us-proxysql-ig1 \
  --zone us-central1-a

 gcloud compute instance-groups unmanaged create us-proxysql-ig2 \
  --zone us-central1-b

 gcloud compute instance-groups unmanaged create us-proxysql-ig3 \
  --zone us-central1-c
3. Add ProxySQL instances to the appropriate instance group
gcloud compute instance-groups unmanaged add-instances us-proxysql-ig1 \
  --instances tst-proxysql01 \
  --zone us-central1-a

 gcloud compute instance-groups unmanaged add-instances us-proxysql-ig2 \
  --instances tst-proxysql02 \
  --zone us-central1-b

 gcloud compute instance-groups unmanaged add-instances us-proxysql-ig3 \
  --instances tst-proxysql03 \
  --zone us-central1-c
ProxySQL behind a load balancer
Health checks
The first thing we need to configure is the health check(s). This is what will let the load balancer know which ProxySQL instances are "healthy". We could use a simple TCP check here, so when the TCP ACK is received the member is marked healthy. The problem is there have been (rare) cases of ProxySQL being unresponsive while the TCP ACK is still being returned by the operating system. So it is a better idea to check for an actual response string from ProxySQL. I've noticed that ProxySQL returns a letter J on the first line of the response, so I've decided to use that in the response string to validate ProxySQL is alive. I've played a bit with more complex response strings but haven't been able to make them work. If you come up with a better alternative, please let me know in the comments section! I am using ProxySQL admin port for the health check, but any ProxySQL port will also work. 1. Configure the load balancer health checks for ProxySQL ports
gcloud compute health-checks create tcp my-proxysql-health-check \
  --port 6032 \
  --response="J"
Backend service
The next step is creating the backed and adding the instance groups to it. I am using a session affinity setting, so all connections from a single application server are routed to the same ProxySQL instance. Feel free to take that parameter out. 2. Create the backend service
gcloud compute backend-services create my-proxysql-lb \
  --load-balancing-scheme internal \
  --region us-central1 \
  --health-checks my-proxysql-health-check \
  --protocol tcp \
  --session-affinity="CLIENT_IP"
3. Add the instance groups to backend
gcloud compute backend-services add-backend my-proxysql-lb \
  --instance-group us-proxysql-ig1 \
  --instance-group-zone us-central1-a \
  --region us-central1

 gcloud compute backend-services add-backend my-proxysql-lb \
  --instance-group us-proxysql-ig2 \
  --instance-group-zone us-central1-b \
  --region us-central1

 gcloud compute backend-services add-backend my-proxysql-lb \
  --instance-group us-proxysql-ig3 \
  --instance-group-zone us-central1-c \
  --region us-central1
Forwarding rules
Now we need to create the forwarding rule of the load balancer. Note that if you don't specify an IP address via the --address parameter, one will be auto-generated for you. 4. Create the forwarding rule
gcloud compute forwarding-rules create my-proxysql-lb-forwarding-rule \
  --load-balancing-scheme internal \
  --ports="3306" \
  --network default \
  --region us-central1 \
  --backend-service my-proxysql-lb \
  --subnet my-custom-subnet

 Created [https://www.googleapis.com/compute/v1/projects/[PROJECT_ID]/regions/us-central1/forwardingRules/my-proxysql-lb-forwarding-rule].
 IPAddress: 10.240.0.163
 IPProtocol: TCP
Firewall rules
We need some firewall rules so application servers are allowed to reach the ProxySQL servers. Note that we don't need a specific rule for the load balancer IP address, the tag used for the backends is sufficient. We also need a rule to allow health checks to happen. This requires whitelisting some Google-owned internal IP ranges. 1. Add a firewall rule to allow traffic to the load balancer, and from the load balancer to the backends
gcloud compute firewall-rules create allow-proxysql-lb \
  --network default \
  --source-ranges 10.240.0.0/16 \
  --target-tags proxysql-lb \
  --allow tcp:3306
2. Add a firewall rule to allow the health checks to happen
gcloud compute firewall-rules create allow-proxysql-health-check \
  --network default \
  --source-ranges 130.211.0.0/22,35.191.0.0/16 \
  --target-tags proxysql-lb \
  --allow tcp:6032
Wrapping up
The next step is testing you can get to the ProxySQL instances via the load balancer. First let's check how do the backends look:
gcloud compute backend-services get-health my-proxysql-lb --region=us-central1

 ---
 backend: https://www.googleapis.com/compute/v1/projects/[PROJECT_ID]/zones/us-central1-a/instanceGroups/us-proxysql-ig1
 status:
  healthStatus:
  - healthState: HEALTHY
  instance: https://www.googleapis.com/compute/v1/projects/[PROJECT_ID]/zones/us-central1-a/instances/tst-proxysql01
  ipAddress: 10.240.0.29
  port: 80
  kind: compute#backendServiceGroupHealth
 ---
 backend: https://www.googleapis.com/compute/v1/projects/[PROJECT_ID]/zones/us-central1-b/instanceGroups/us-proxysql-ig2
 status:
  healthStatus:
  - healthState: HEALTHY
  instance: https://www.googleapis.com/compute/v1/projects/[PROJECT_ID]/zones/us-central1-b/instances/tst-proxysql02
  ipAddress: 10.240.0.30
  port: 80
  kind: compute#backendServiceGroupHealth
 ---
 backend: https://www.googleapis.com/compute/v1/projects/[PROJECT_ID]/zones/us-central1-c/instanceGroups/us-proxysql-ig3
 status:
  healthStatus:
  - healthState: HEALTHY
  instance: https://www.googleapis.com/compute/v1/projects/[PROJECT_ID]/zones/us-central1-c/instances/tst-proxysql03
  ipAddress: 10.240.0.33
  port: 80
  kind: compute#backendServiceGroupHealth
I am not sure why port 80 is reported, but other than that, all backends seem to be healthy. Now let's try connecting MySQL client through the load balancer's IP:
[root@tst-adm01 ~]# mysql -h 10.240.0.163 -uapp_rw -p
 mysql: [Warning] Using a password on the command line interface can be insecure.
 Welcome to the MySQL monitor. Commands end with ; or \g.
 Your MySQL connection id is 5461327
 Server version: 5.5.30 (ProxySQL)

 Copyright (c) 2000, 2018, Oracle and/or its affiliates. All rights reserved.

 Oracle is a registered trademark of Oracle Corporation and/or its
 affiliates. Other names may be trademarks of their respective
 owners.

 Type 'help;' or '\h' for help. Type '\c' to clear the current input statement.

 mysql> select @@hostname;
 +------------------------+
 | @@hostname |
 +------------------------+
 | tst-mysql-01 |
 +------------------------+
 1 row in set (0.05 sec)
You can see I was able to reach a MySQL server called tst-mysql-01, which I had previously configured in ProxySQL. I hope you found this article useful for configuring ProxySQL behind a load balancer. If you are interested in learning more about ProxySQL, I suggest you also check out the following articles in Pythian blog:
The State Of MySQL High Availability Going In To 2018
Using ProxySQL To Validate MySQL Updates If you have any suggestions/improvements please let me know in the comments section below. References: https://cloud.google.com/compute/docs/load-balancing/internal/

