Architecture diagram

To create a distributed availability group, you need two availability groups (AG) each with its own listener, which you then combine.In this case, one availability group is on-premises and the other needs to be created in Microsoft Azure. This example doesn’t cover all of the details like creating an extended network setup between on-premises network and Azure or joining Azure active directory domain services to and on-premises forest; instead, it highlights the key requirements for setting up the availability group in Azure and then configuring the distributed AG between the on-premises availability group (represented as AOAG-1) and the Azure availability group (represented as AOAG-2).
Prerequisites
- You must know how to create security groups in Azure.
- You know how to add windows server nodes to an active directory.
- You know how to set up a Windows cluster.
- You know how to create always-on availability groups (AOAG) and add databases to availability groups.
- You also need to be aware of SQL server licensing requirements for setting up a distributed AG.
Assumptions
- You already have an always on availability group with listener configured successfully on your primary site (on-premises).
- You already have an active Azure subscription.
- You already have a resource group created and ready to create resources.
- You already have an Azure virtual network and subnets configured where you intend to create the Azure SQL always on availability groups infrastructure.
- You already have connectivity between your on-premises and Azure virtual network.
- You already have a jump box or a bastion host configured to RDP into the Azure virtual machines that we will be creating as a part of this setup.
- You have integrated your on-premises active directory with Azure. There are multiple ways to do so, but the architecture reference must show only integration with ADDS.
- You might be asking, “Why can’t I just connect back to on-premises AD when I have connectivity between two sites?” You are right! But think about what happens when your on-premises site goes down: Your users and your nodes cannot authenticate back to the active directory.
- Since we are creating a DR site on Azure, it is also necessary that you configure an active directory in Azure and have integration with the on-premises active directory.
- The Azure region where you are deploying Azure virtual machines has availability zones.
Creating an app registration for terraform
In order to create Azure resources using terraform, you will need to create an app registration.
- Navigate to Azure Active Directory.
- Under Manage open the App registrations blade.
- Add a new registration by clicking on New registration.

- Register the application with the name terraform. Leave all options as default.
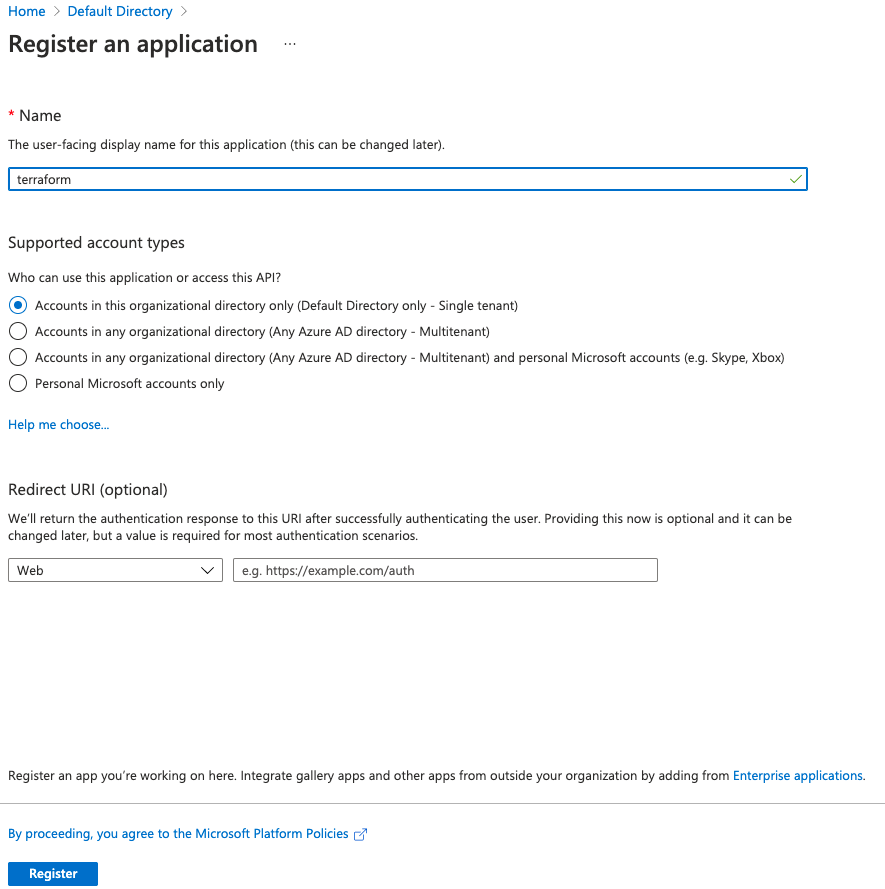
- Add a secret that will be used as a password to authenticate terraform. Provide a description and expiry period for the secret.
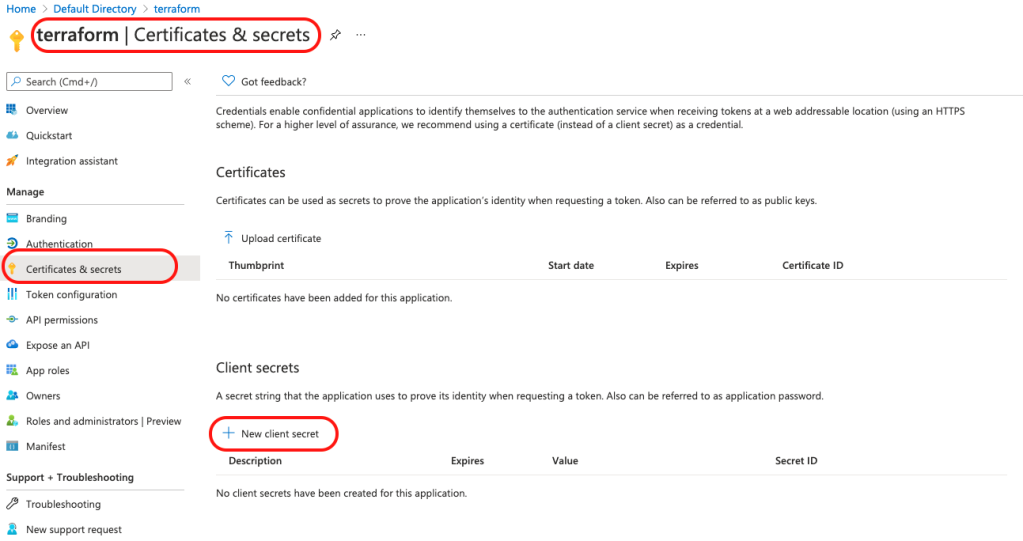
- Copy the Secret ID and value and keep it safe. We will use it later for provisioning of resources with terraform.

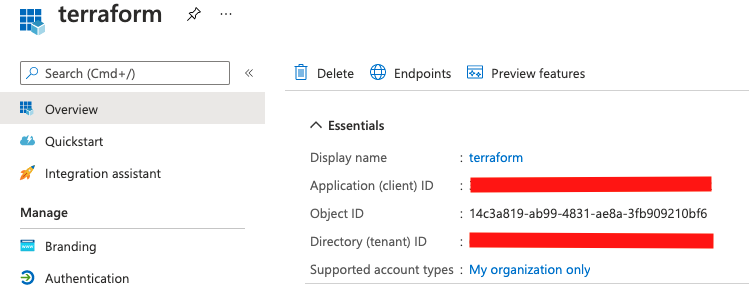
- Make a note of the client ID and tenant ID as well. You should find them under the Overview blade.
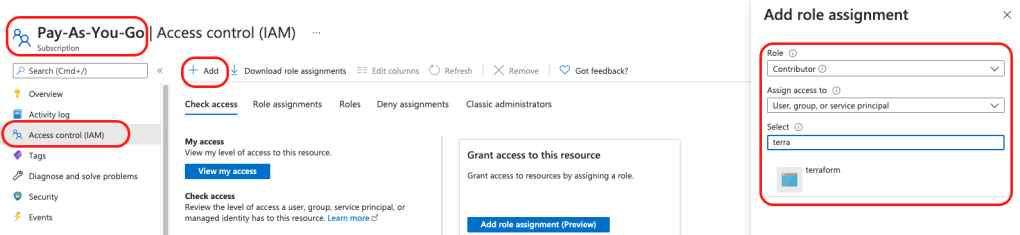
8. Now we need to grant this application access to subscription so it can create Azure resources. Navigate to your Azure subscription and then open Access control (IAM) blade. Go to + Add > Add role assignment and grant contributor access to the terraform app, then Save.
Already provisioned Azure resources
I had the resource group, network and network security group already created and provisioned in my Azure environment. If you want to replicate my setup for your test, you can run the below commands in Bash in Azure Cloud Shell:
resourceGroupName=’sqlserver-dag’
location='eastus'

# Variables for a new Virtual Network with two subnets
vnetName='network-1'
frontEnd='mgmt-subnet'
backEnd='dbsubnet'

# Create a resource group
az group create -n $resourceGroupName -l $location

# Create a virtual network with a front-end subnet
az network vnet create \
   -n $vnetName \
   -g $resourceGroupName \
   --address-prefix 10.1.0.0/24 \
   --subnet-name $frontEnd \
   --subnet-prefix 10.1.0.32/27

# Create the db subnet with service endpoints enabled for Storage
az network vnet subnet create \
   -n $backEnd \
   -g $resourceGroupName \
   --address-prefix 10.1.0.0/27 \
   --vnet-name $vnetName \
   --service-endpoints Microsoft.Storage

#Create NSG for be associated with Network interfaces of virtual machines
az network nsg create -g $resourceGroupName -n sql-ha-nsg -l $location
You need to make sure that private-endpoint-network-policies are off for the subnet where you are deploying the SQL virtual machines. Use the below code to turn it off:
az network vnet subnet update --name <<Your DB Subnet Name>> --resource-group <<Your Resource Group Name>> --vnet-name <<Your VNET Name>> --disable-private-endpoint-network-policies true
I had to run the below command for my subnet:
az network vnet subnet update --name dbsubnet --resource-group sqlserver-dag --vnet-name network-1 --disable-private-endpoint-network-policies true
Implementing SQL server HA azure infrastructure with terraform
1. Clone the git repository with terraform locally to your desktop:
git clone https://github.com/sa-proj/proj-azure.git
2. Navigate to the local repository:
cd proj-azure
3. Update the terraform.tfvars with values as per your environment. Please see the next section for more details on how to update the values in the file. The file also has comments to help you understand their purpose.
4. Initialize the Azure provider:
terraform init
5. Create and verify the execution plan:
terraform plan
6. Execute the actions proposed in the plan and create Azure resources:
terraform apply --auto-approve
If you open your resource group in Azure Portal, you will see resources being created.
7. Once you are done, you can destroy all resources as well:
terraform destroy
Bonus: Check out this great article published by one of my friends at Spacelift, in case you want to get more insights on How to Destroy Resources from Terraform.
Explanation of terraform files
This is the most important file as all values for variables are to be supplied here.
- You will need to add subscription_id, client_id, client_secret and tenant_id so terraform can authenticate to Azure and create all resources.
- The location\region specified must have availability zones; otherwise, you will need to modify the script to work with availability sets.
- Make sure to complete your capacity planning before entering the VM size. I have kept to the smallest possible size so it doesn’t cost much during the testing phase.
- The usernames and passwords for VM are lying in plain text, which is not the best practice. Ideally I should have used the key vault in data.tf and should have retrieved those values from there. However, since this is a test setup, I wanted to keep things simple.
- For disk size, again make sure you complete your capacity planning. I am using one disk for data, log and tempdb, which is not a recommended practice. You will need to modify the terraform to use separate disks for SQL data files.
- The DNS IP address is the one that gets added to the network interface on the operating system, so make sure it is reachable and all ports are open for the machine to connect to DNS and register to active directory.
- sqlInternalLB-ip will be the IP address used for the always-on listener for availability group in Azure.
terraform.tfvars
subscription_id = “xxxxxx-xxxxxx-xxxxxxx-xx” #Azure subscription id
client_id       = "xxxxxx-xxxxxx-xxxxxxx-xx" #Client id generated at time for app registration. Overview Blade.
client_secret   = "xxxxxx-xxxxxx-xxxxxxx-xx" #Secret value generated at time of secret registration for app
tenant_id       = "xxxxxx-xxxxxx-xxxxxxx-xx" #Azure tenant id
sql-1-vm-name   = "sqlserver-1" #Name of SQL-1 Host - Will be same for VM Hostname
sql-2-vm-name   = "sqlserver-2" #Name of SQL-2 Host - Will be same for VM Hostname
subnet_name     = "dbsubnet"    #Subnet Name where we want to deploy the cluster - Needs to already present.
vnet_name       = "network-1"   #VNET Name where we want to deploy the cluster - Needs to already present.
sqlserver-1-ip  = "10.1.0.10"   #IP Address from the subnet for SQL-1 Host
sqlserver-2-ip  = "10.1.0.11"   #IP Address from the subnet for SQL-1 Host
resource_group  = "sqlserver-dag" #Resource Group where the resources will be deployed - Needs to already present.
location        = "East US"       #Location where we want to deploy the cluster. The Location needs to support Availability Zones
vm_size         = "Standard_DS1_v2" #Size of the VM after checking OnPrem Sizing details
username        = "localadmin"     #Windows Machine Local User - Can't use admin or administrator
password        = "P@$$w0rd4321!"   #Windows Machine Local User password - must be strong password
sqladmin_user   = "sqladmin"        #SQL Auth User Name to be set as sysadmin - Can't use sa
sqladmin_pass   = "P@$$w0rd4321!"   #SQL Auth User Name Password
osdisksize      = 127          #Size of OS Disk after checking OnPrem Sizing details
datadisksize    = 127          #Size of Data Disk for .mdf files after checking OnPrem Sizing details
disk_type       = "Premium_LRS" #The type of storage to use for the managed disk. Premium is recommended
load-balancer-name = "sqlInternalLB" #Name of the Internal Load Balancer
sqlInternalLB-ip = "10.1.0.20"       #IP of the Load Balancer - Same as Always On Listener IP
nsg_name = "sql-ha-nsg"              #Network Security Group name for firewall that is attached to VM Nic
dns_ipaddress = "10.1.0.6"           #Primary DNS IP Address
dns_ipaddress = “10.1.0.6” #Primary DNS IP Address
This file has a virtual machine configuration (same for Node 2).
- I am using SQL 2019 Enterprise edition on Windows Server 2019. You can modify this under publisher, offer and SKU section.
- Only one disk is used here, but you can modify the template for individual disks for data, log and tempdb.
- The last section of the template downloads a PowerShell script that updates the network interface on OS and also installs a failover clustering feature on the node.
- It also disables and enables SQL services that come bundled in the image.
sqlserver-1.tf
resource "azurerm_network_interface" "sqlserver-nic-1" {
  name                = "${var.sql-1-vm-name}-nic"
  resource_group_name = var.resource_group
  location            = var.location

  ip_configuration {
    name = "${var.sql-1-vm-name}-ipc1"
    private_ip_address_allocation = "static"
    subnet_id = "${data.azurerm_subnet.dbsubnet.id}"
    private_ip_address = var.sqlserver-1-ip
  }
}
resource "azurerm_windows_virtual_machine" "sql-1-vm" {
  name                = var.sql-1-vm-name
  resource_group_name   = var.resource_group
  location            = var.location
  zone                = 1
  size                = var.vm_size
  admin_username      = var.username
  admin_password      = var.password
  network_interface_ids = [azurerm_network_interface.sqlserver-nic-1.id]
  computer_name = var.sql-1-vm-name
  os_disk {
    name                 = "${var.sql-1-vm-name}-osdisk"
    caching              = "ReadWrite"
    storage_account_type = "StandardSSD_LRS"
    disk_size_gb         = var.osdisksize
  }
  source_image_reference {
    publisher = "MicrosoftSQLServer"
    offer     = "sql2019-ws2019"
    sku       = "enterprise"
    version   = "latest"
  }
}
resource "azurerm_managed_disk" "sql-1-vm-datadisk" {
  name                 = "${var.sql-1-vm-name}-datadisk"
  location             = var.location
  zones                = [1]
  resource_group_name  = var.resource_group
  storage_account_type = var.disk_type
  create_option        = "Empty"
  disk_size_gb         = var.datadisksize
}
resource "azurerm_virtual_machine_data_disk_attachment" "sql-1-vm-datadisk" {
  managed_disk_id    = azurerm_managed_disk.sql-1-vm-datadisk.id
  virtual_machine_id = azurerm_windows_virtual_machine.sql-1-vm.id
  lun                = "10"
  caching            = "ReadWrite"
}
resource "azurerm_mssql_virtual_machine" "sqlvm-1" {
    virtual_machine_id               = azurerm_windows_virtual_machine.sql-1-vm.id
    sql_license_type                 = "PAYG"
    r_services_enabled               = false
    sql_connectivity_port            = 1433
    sql_connectivity_type            = "PRIVATE"
    sql_connectivity_update_username = var.sqladmin_user
    sql_connectivity_update_password = var.sqladmin_pass
    storage_configuration {
        disk_type               = "NEW"
        storage_workload_type   = "OLTP"
        data_settings {
            default_file_path = "X:\\DATA"
            luns = [azurerm_virtual_machine_data_disk_attachment.sql-1-vm-datadisk.lun]
        }

        log_settings {
            default_file_path = "X:\\LOG"
            luns = [azurerm_virtual_machine_data_disk_attachment.sql-1-vm-datadisk.lun]
        }

        temp_db_settings {
            default_file_path = "X:\\TEMPDB"
            luns = [azurerm_virtual_machine_data_disk_attachment.sql-1-vm-datadisk.lun]
        }

    }

}
resource "azurerm_virtual_machine_extension" "sql-1-prep" {
  depends_on=[azurerm_windows_virtual_machine.sql-1-vm]
  name = "${var.sql-1-vm-name}-vm-extension-prep"
  virtual_machine_id = azurerm_windows_virtual_machine.sql-1-vm.id
  publisher = "Microsoft.Compute"
  type = "CustomScriptExtension"
  type_handler_version = "1.9"
  protected_settings = <<PROTECTED_SETTINGS
    {
      "commandToExecute": "powershell.exe -Command \"./prepare-clusternode.ps1 -dnsIP ${var.dns_ipaddress}; exit 0;\""
    }
  PROTECTED_SETTINGS

  settings = <<SETTINGS
    {
        "fileUris": [
          "https://raw.githubusercontent.com/pythianarora/total-practice/master/sample-sql-ha/prepare-clusternode.ps1"
        ]
    }
  SETTINGS
}
The below configuration is going to create an internal load balancer.
- The load balancer is going to be used for always-on listener and I have used a standard SKU because it offers 99.99 per cent availability SLA. The basic one has no SLA.
- Another thing to mention is that load balancer waits before the virtual machines are created because the VMs will lose internet access once they are added to ILB. The VMs need to download a PowerShell, which requires internet access.
- You will see that a backend rule for port 5022 is added. This is a requirement for distributed AG listeners. While setting up a distributed AG, the LISTENER_URL specifies the listener for each availability group along with the database mirroring endpoint of the availability group that is port 5022. If you remove this block of the code, you can use the rest of the terraform template to provision infrastructure for always on in Azure.
- The health probe is what the load balancer will use to know which node is the active node.
loadbalancer.tf
#Create the SQL Load Balancer for AG
resource "azurerm_lb" "sqlinternalLB" {
  name                = var.load-balancer-name
  location            = var.location
  resource_group_name = var.resource_group
  sku                 = "Standard"
  depends_on          = [azurerm_virtual_machine_extension.sql-1-prep, azurerm_virtual_machine_extension.sql-2-prep]
  frontend_ip_configuration {
    name                          =  "${var.load-balancer-name}-fipc"
    private_ip_address_allocation = "Static"
    private_ip_address            = var.sqlInternalLB-ip
    subnet_id                     = "${data.azurerm_subnet.dbsubnet.id}"
  }
}

#Create the load balencer backend pool
resource "azurerm_lb_backend_address_pool" "sqlLBBE" {
  loadbalancer_id     = azurerm_lb.sqlinternalLB.id
  name                = "${var.load-balancer-name}-backendpool"
}

#Add the first VM to the load balencer
resource "azurerm_network_interface_backend_address_pool_association" "sqlvm1BEAssoc" {
  network_interface_id    = azurerm_network_interface.sqlserver-nic-1.id
  ip_configuration_name   = "${var.sql-1-vm-name}-ipc1"
  backend_address_pool_id = azurerm_lb_backend_address_pool.sqlLBBE.id
}

#Add the second VM to the load balencer
resource "azurerm_network_interface_backend_address_pool_association" "sqlvm2BEAssoc" {
  network_interface_id    = azurerm_network_interface.sqlserver-nic-2.id
  ip_configuration_name   = "${var.sql-2-vm-name}-ipc1"
  backend_address_pool_id = azurerm_lb_backend_address_pool.sqlLBBE.id
}

#Create the load balencer rules
#rule to connect to listener on default port
resource "azurerm_lb_rule" "sqlLBRule" {
  resource_group_name            = var.resource_group
  loadbalancer_id                = "${azurerm_lb.sqlinternalLB.id}"
  name                           = "${var.load-balancer-name}-default-port-lbr"
  protocol                       = "Tcp"
  frontend_port                  = 1433
  backend_port                   = 1433
  frontend_ip_configuration_name = "${var.load-balancer-name}-fipc"
  probe_id                       = "${azurerm_lb_probe.sqlLBProbe.id}"
  backend_address_pool_id        = azurerm_lb_backend_address_pool.sqlLBBE.id
  enable_floating_ip             = true
}
#rule to connect to listener on port 5022 required for distributed ag
#if this non distributed AG setup then you can remove this rule
resource "azurerm_lb_rule" "sqlLBHAEndpointRule" {
  resource_group_name            = var.resource_group
  loadbalancer_id                = "${azurerm_lb.sqlinternalLB.id}"
  name                           = "${var.load-balancer-name}-hadr-endpoint-lbr"
  protocol                       = "Tcp"
  frontend_port                  = 5022
  backend_port                   = 5022
  frontend_ip_configuration_name = "${var.load-balancer-name}-fipc"
  probe_id                       = "${azurerm_lb_probe.sqlLBProbe.id}"
  backend_address_pool_id        = azurerm_lb_backend_address_pool.sqlLBBE.id
  enable_floating_ip             = true
}
#Create a health probe for the load balencer
resource "azurerm_lb_probe" "sqlLBProbe" {
  resource_group_name = var.resource_group
  loadbalancer_id     = "${azurerm_lb.sqlinternalLB.id}"
  name                = "${var.load-balancer-name}-SQLAOProbe"
  port                = 59999
  protocol            = "Tcp"
  interval_in_seconds = 5
  number_of_probes    = 2
}
Creating always-on availability groups on Azure VMs
- Update\create a network security group to allow necessary permissions to RDP to VM from jump server in Management subnet.
- Update the network security group to allow necessary permissions from the on-premises subnet where SQL Server is hosted.
- Ideally these will be port 1433 (Default Port for SQL Server) and 5022 (Default HADR Endpoint).
- Log in to the virtual machines using the admin password specified in the terraform.tfvars file.
- Add the virtual machines to the active directory and restart the servers.
- Setup a Windows cluster on the new nodes provisioned in Azure.
- Add Cloud Witness as a quorum for the cluster. The terraform output will provide the storage account name; you will need an access key for the storage account to configure Cloud Witness.
- Create an always-on availability group on the new cluster on Azure.
- Make sure you add an A record for the listener in your DNS. The IP address of the listener and internal load balancer will be the same.
Identifying all resources
Before creating a distributed AG list, record the availability groups and their listeners because they are required for the next steps:
| Resource Type | On-premises | Microsoft Azure |
| Availability Group Name | aoag1 | aoag2 |
| Availability Group Listener Name | laoag1 | laoag2 |
| Domain Name | sainfra.com | sainfra.com |
Creating a distributed AG on an on-premises cluster
To create your distributed availability group using automatic seeding, use the following T-SQL
CREATE AVAILABILITY GROUP [dag]
   WITH (DISTRIBUTED)
   AVAILABILITY GROUP ON
      'aoag1' WITH
      (
         LISTENER_URL = 'tcp://laoag1.sainfra.com:5022',
         AVAILABILITY_MODE = ASYNCHRONOUS_COMMIT,
         FAILOVER_MODE = MANUAL,
         SEEDING_MODE = AUTOMATIC
      ),
      'aoag2' WITH
      (
         LISTENER_URL = 'tcp://laoag2.sainfra.com:5022',
         AVAILABILITY_MODE = ASYNCHRONOUS_COMMIT,
         FAILOVER_MODE = MANUAL,
         SEEDING_MODE = AUTOMATIC
      );
GO
It is important that you have your firewall rules configured properly and your load balancer to have the port 5022 enabled in the backend rules. See Microsoft’s documentation for more details.
Join the distributed AG to the cluster in Azure
To join your distributed availability group using automatic seeding, use the following T-SQL:
ALTER AVAILABILITY GROUP [dag]
   JOIN
   AVAILABILITY GROUP ON
      'aoag1' WITH
      (
         LISTENER_URL = 'tcp://laoag1.sainfra.com:5022',
         AVAILABILITY_MODE = ASYNCHRONOUS_COMMIT,
         FAILOVER_MODE = MANUAL,
         SEEDING_MODE = AUTOMATIC
      ),
      'aoag2' WITH
      (
         LISTENER_URL = 'tcp://laoag2.sainfra.com:5022',
         AVAILABILITY_MODE = ASYNCHRONOUS_COMMIT,
         FAILOVER_MODE = MANUAL,
         SEEDING_MODE = AUTOMATIC
      );
GO
Congratulations! You have successfully provisioned distributed availability groups with your forwarder in Microsoft Azure.